A robust solution for agile project management, Jira proves its worth when it comes to scheduling, monitoring, and assigning tasks, as well as reporting across multiple initiatives. Due to its versatile features, the Atlassian-sourced software comes in handy from the earliest stages of a project manager’s planning work, helping them outline a project’s strategy and prioritize essential activities.
However, while project planning and tracking are ongoing, the effective communication of what is going on remains pivotal for the project’s success. Bridging teams and decision-makers is essential, and PMs know that clearly visualizing what needs to be done in a project surpasses other responsibilities in terms of efforts and skills.
Creating a roadmap in Jira is a great way to visually represent your project’s timeline, objectives, and milestones so that you can better understand where your project stands and ensure you are meeting your goals. Helping you stay organized and on track, a Jira roadmap can also be used to communicate progress to stakeholders.
Given the importance of roadmapping for successful project delivery, we’ve put together the present tutorial to help you learn how to efficiently present Jira roadmaps to teams, executives, and other stakeholders. Throughout this guide, we’ll be looking at two ways in which Jira can be leveraged to map out a project’s strategic direction:
- Using Jira’s native Timeline feature (formerly called Basic Roadmaps).
- Importing Jira data into an automated roadmap maker like Office Timeline and turning it into a presentation-ready PowerPoint slide.
Now let’s see how each of these two options works and which is easier to use in terms of collaboration and communication.
Which tutorial would you like to see?
How to use Jira Roadmaps for presentations
A great task tracker and tool to get project-related things done, Jira is also a powerful resource that can help you plan and map project work at a macro level through features such as Basic Roadmaps and Advanced Roadmaps.
The former, launched in 2018 and recently renamed as Timeline, is available with all Jira plans and allows you to visually lay out an agile team’s work over a specified period, helping you display how a product will develop over time, for instance. The latter, limited only to Jira Premium and Enterprise, offers similar functionalities but extends its capabilities to viewing tasks from multiple teams and projects, as well as adding hierarchy levels above epics.
In short, while Timeline can be used to map dependencies within a single project, Advanced Roadmaps allows you to review team capacity on a sprint-to-sprint basis across several projects and create multiple versions/views of your Jira roadmap. Providing teams with a bigger picture for their work and how they are contributing to larger business goals, roadmaps in Jira serve as a crucial guide for defining priorities and keeping teams aligned. Below, we will demonstrate how you can create a roadmap in Jira using the Timeline feature.
1. Create a Jira project.
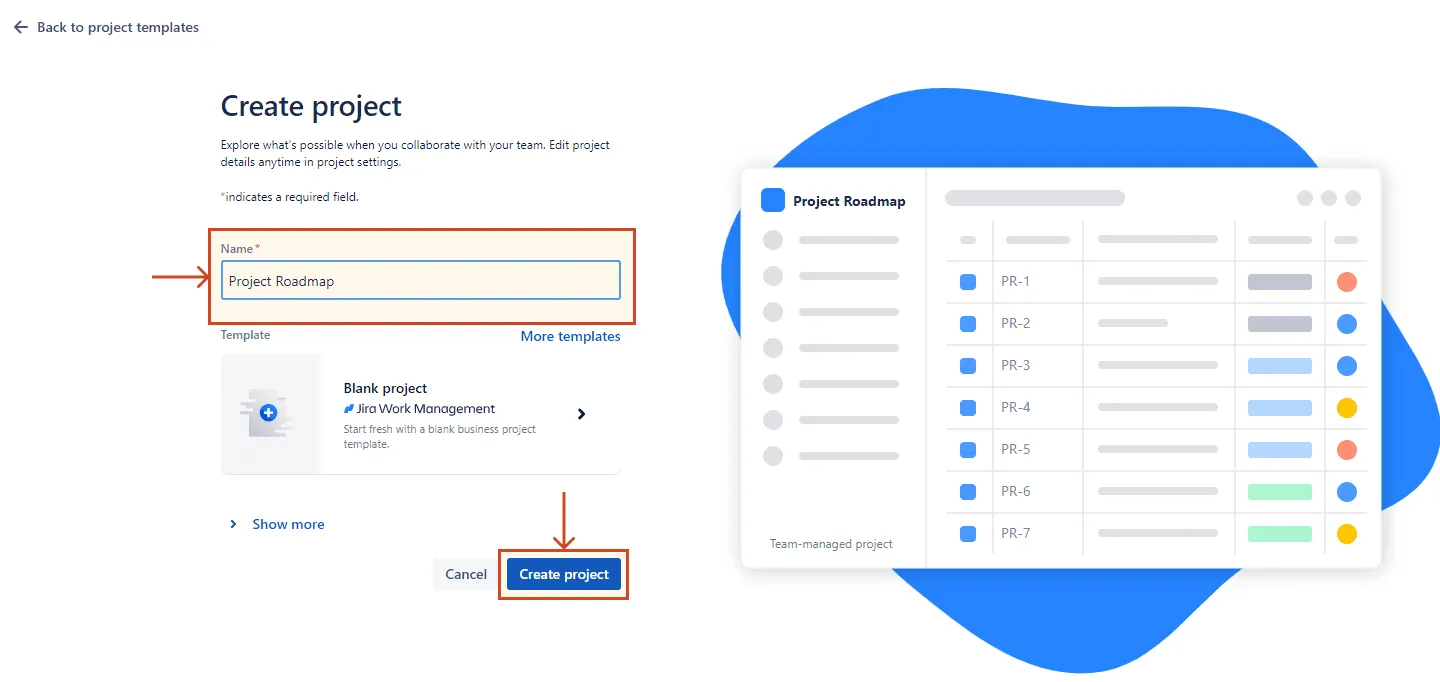
a) Log into your Jira account.
b) Click the Create project button in the top-right corner of the Jira dashboard or double-click on any of the options recommended in the template gallery below.
In our case, we decided to start from the Blank project template. If you go with the first action, you will also need to choose a template to be able to proceed.

c) On the subsequent screen, type the name of your project in the corresponding input field and click Create project.
2. Define the issue types for your Jira project.
Once your new project is created, you will be taken to a separate screen where you can start adding the associated tasks and milestones. Given that any new Jira project is set by default to include only tasks and sub-tasks as issue types, we wanted to add two more options to correspond to task categories and milestones, that is epics and milestones, respectively.
Here is how you can do the same:
a) Click Project settings from the horizontal navbar underneath your project title.
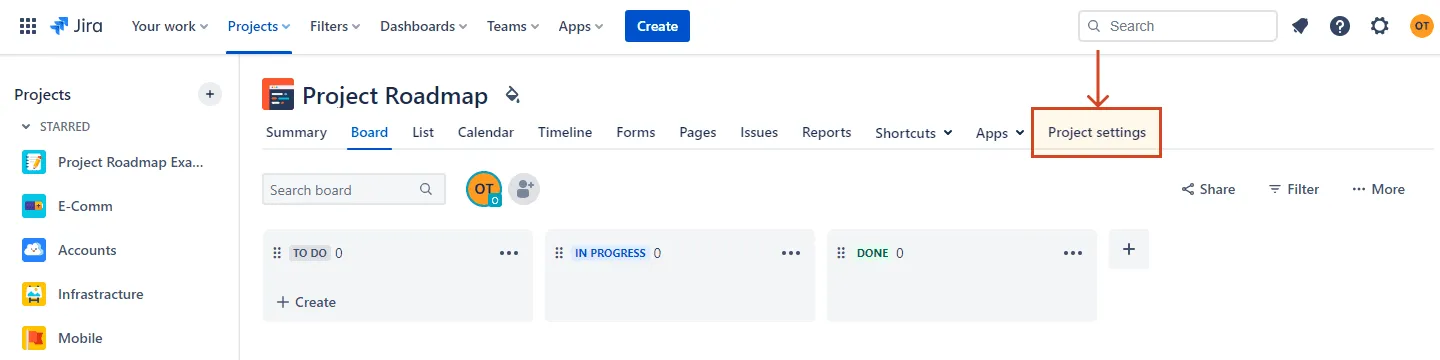
b) Click on Issue types from the Project settings left-side navbar and then select the Add issue type button.

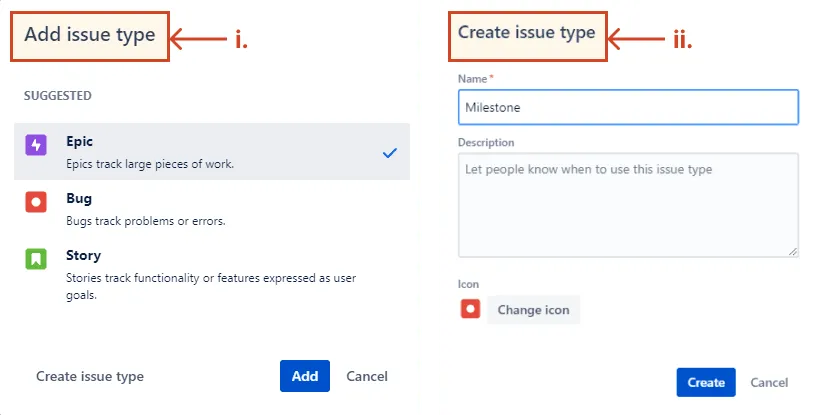
Clicking the Add issue type button will open a new window where you can:
i. Select a type of issue to use from a list of predefined options by clicking on the preferred item and then clicking on Add. We chose to add Epic as an extra issue type to use for our task categories.
ii. Create a completely new type of issue by clicking Create issue type and entering a name. You can add a brief description underneath, and you can also set a custom associated icon from the menu that appears when clicking Change icon. Once ready, click Create.
For our example, we’ve set up Milestone as a new type of issue to define the critical points throughout the project life cycle.
3. Add your project data in Jira.
Now that you have defined the main issue types for your project, you can proceed to listing the events and activities you want to map out on your Jira roadmap. Here is what you need to do:
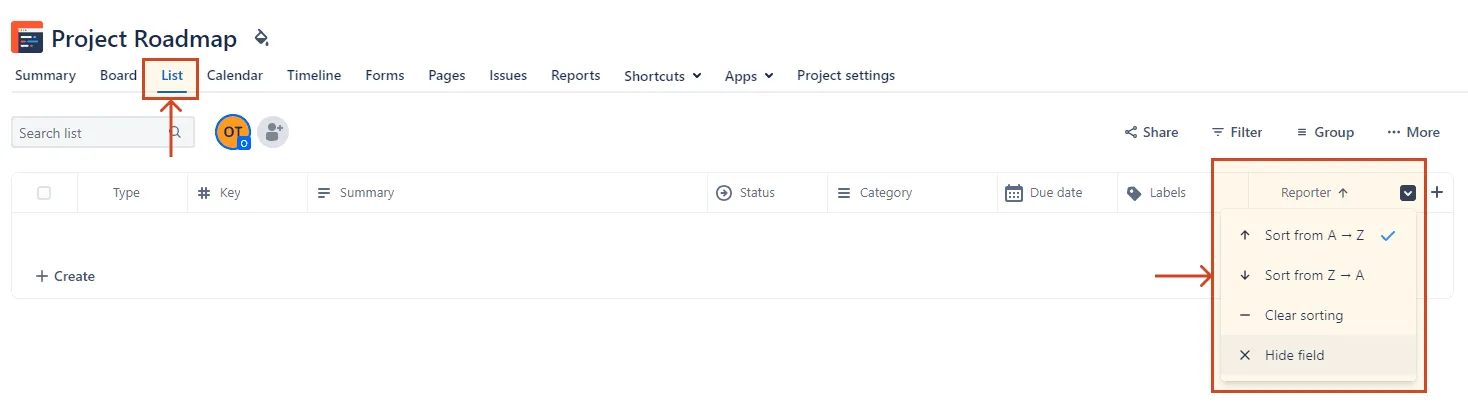
a) Go to the List view of your project. This will allow you to organize your project items in a clear table-like format.
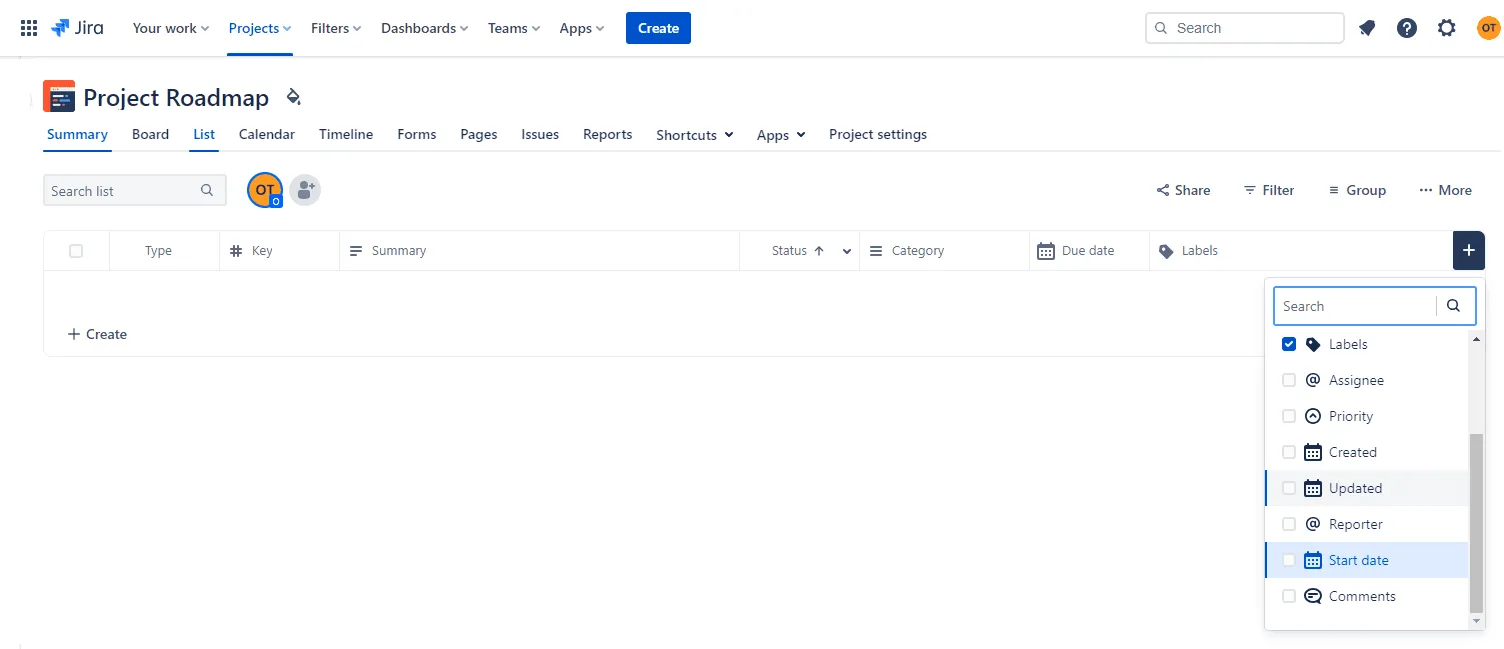
i. If you want to reduce clutter on your Jira project’s List view, you can choose to hide certain fields. To do this, hover your cursor over the field name you intend to remove until a downward arrow icon becomes visible, click on it, and then select Hide field from the dropdown menu.
Repeat the action as many times as necessary until you have hidden all irrelevant fields.
ii. To include other fields to your project’s List view, click the + button visible on the far-right side of the field title bar and select the items you want to add from the dropdown menu. In our case, we chose to have the Start date field displayed in our Jira project list view.
b) To start adding your project items, click Create at the top-right side of your Jira dashboard.

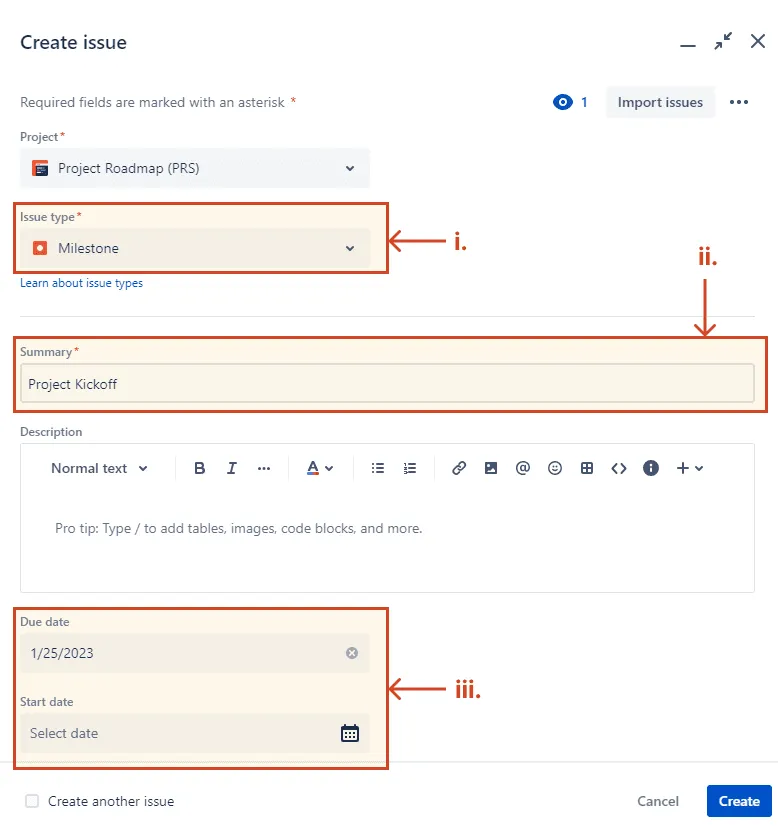
This will open a separate window where you need to:
i. Select the type of issue you want to add to your project’s List view by using the associated dropdown arrow.
ii. Enter a short description for the item you want to add. Depending on the issue type, these short descriptions will serve as titles for your tasks or milestones.
iii. Set a Start and/or Due date for your project issues using the corresponding Select date fields. Clicking the calendar icon will open a calendar within which you can choose the relevant time references.
For milestones, you will need to set only a Due date, whereas tasks will require both a Start and Due date.
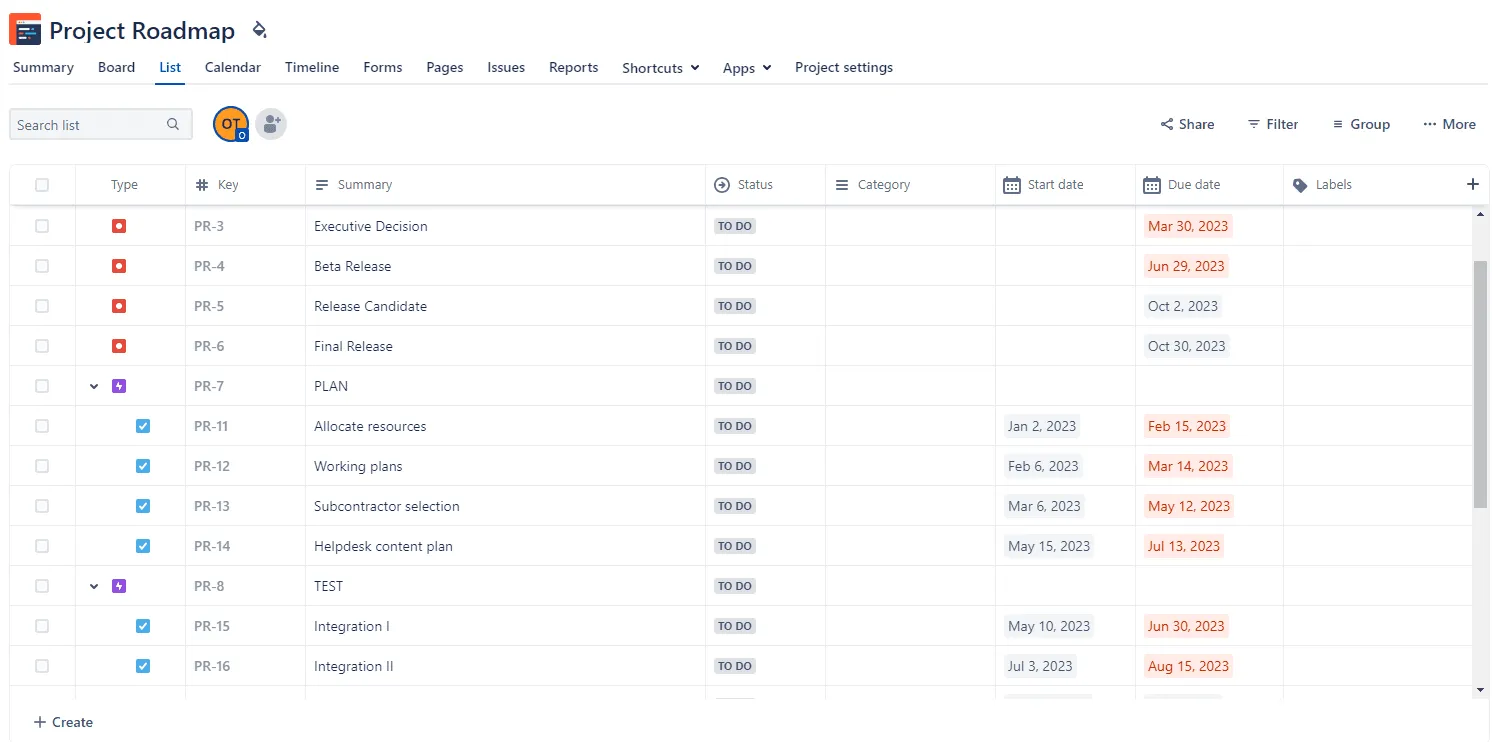
In our case, we first added our project’s major milestones, then four epics, namely PLAN, TEST, DEVELOP, and LAUNCH. For the latter issue type, we haven’t set any start or due date, as they will serve as general categories for our tasks. We will use these to group our project’s more specific activities so we can better structure the final roadmap.
Here is how our project’s list view looks so far:

c) To add tasks within an existing epic, hover the cursor towards the right side of the epic-associated icon until a + button becomes visible, click on it, and then type the task title in the input field that shows up next. Once ready, press Enter.
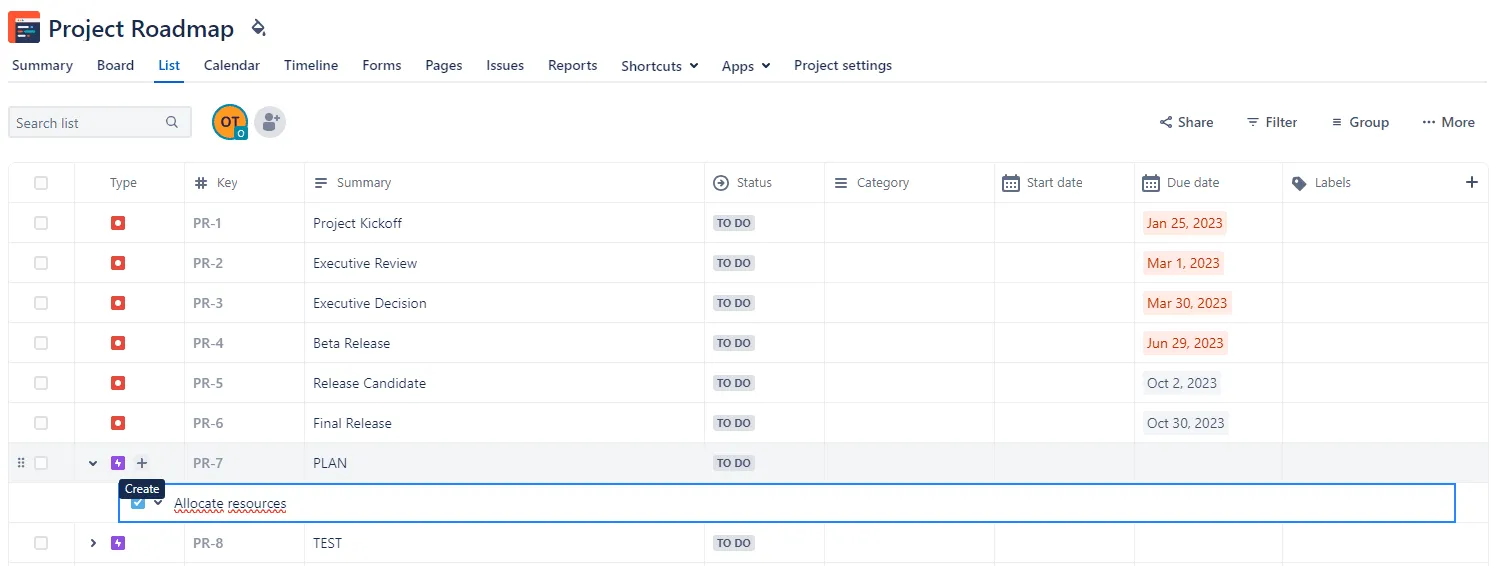
Pressing Enter will create the entry for your task, and also add a new input field below, where you can continue to add another task. Repeat the action as many times as necessary.
You will notice that each task entry lacks Start and Due dates, but you can add those later using the corresponding columns from the List view. Simply click on the corresponding Start/Due date cell and select the time reference from the calendar that appears.
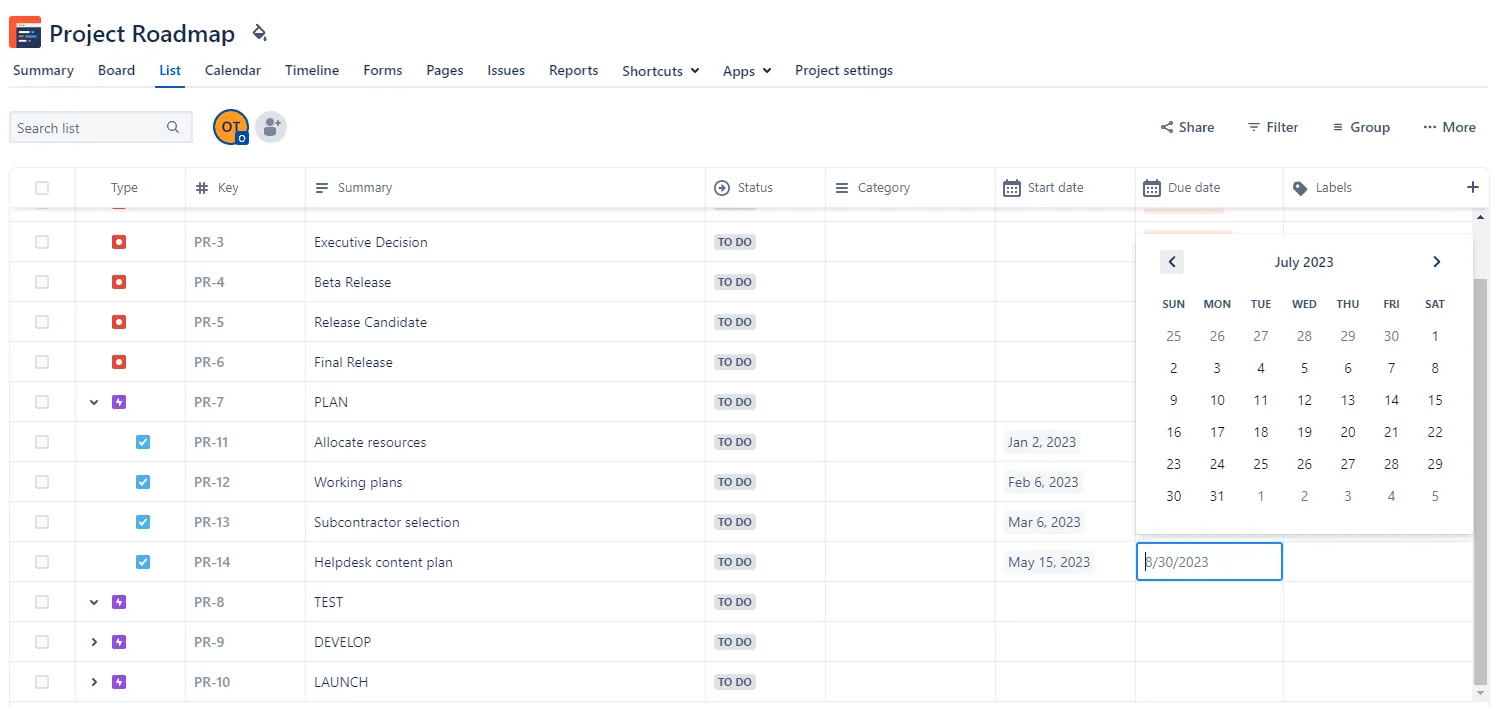
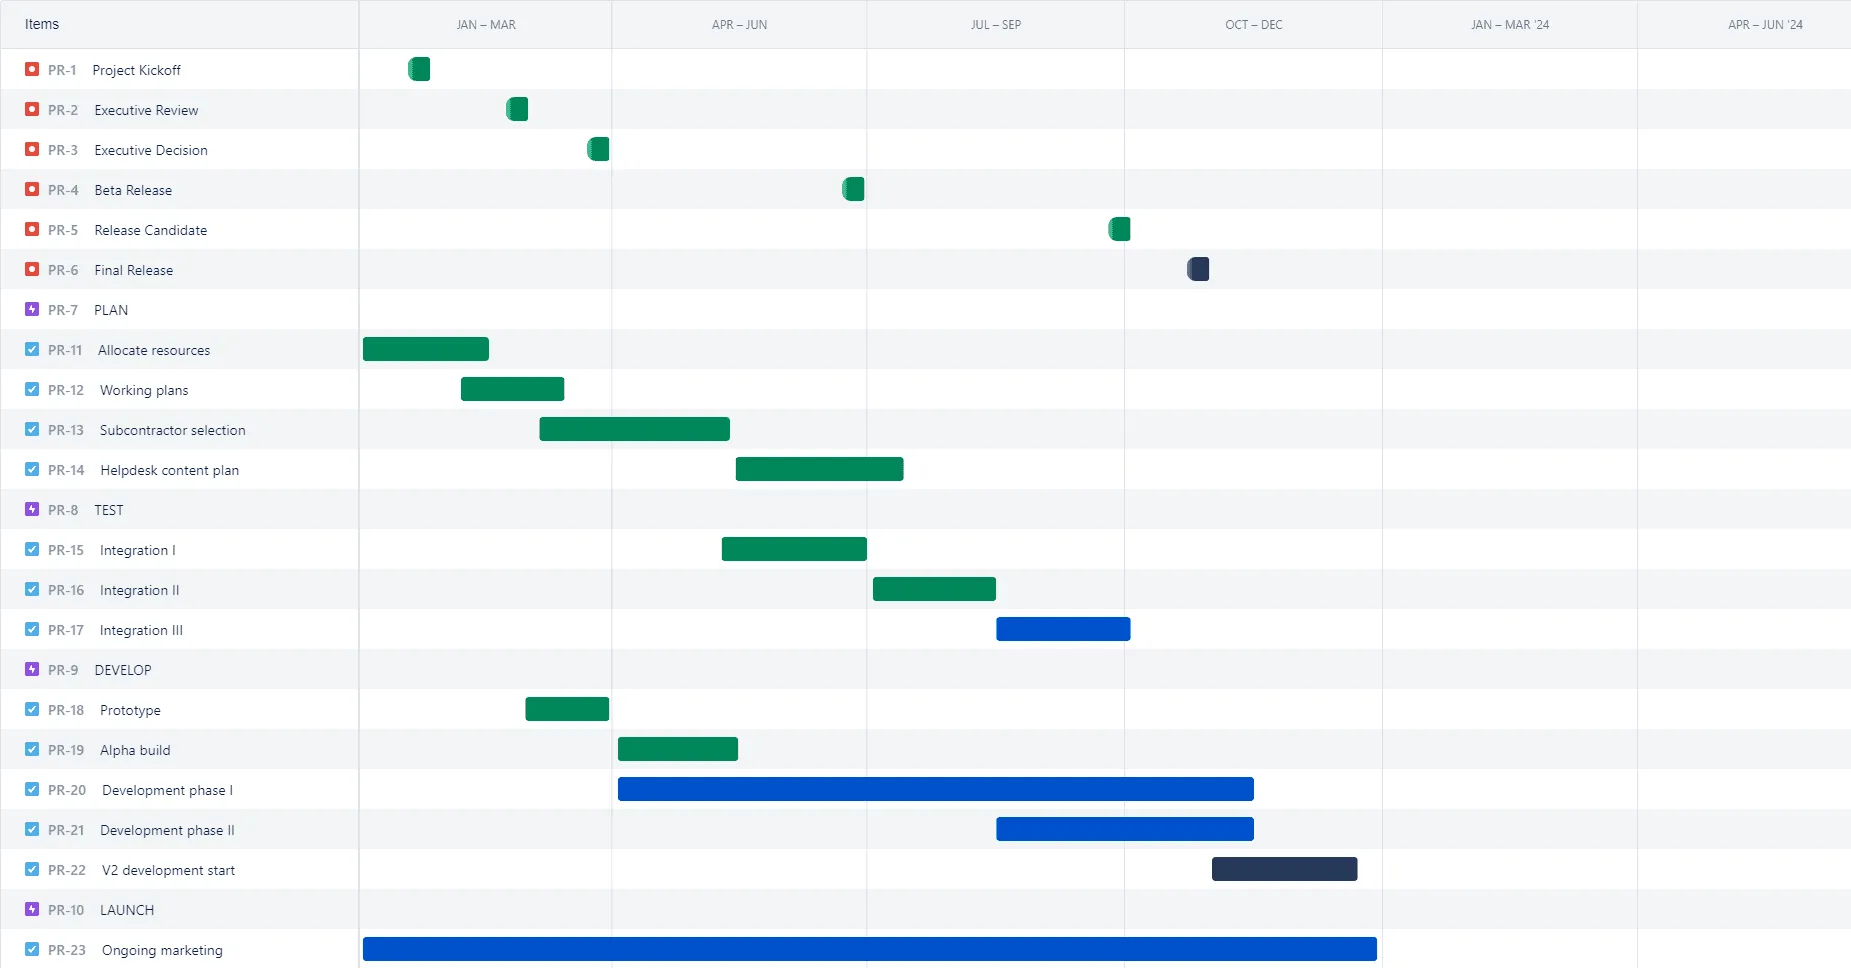
Here is how our project’s List view looks like after we finished entering all our issues:
4. Organize project data for a clearer roadmap view.
Now that your tasks and milestones are listed on your project board, you may want to further organize data for an optimal display on your Jira roadmap. Here are a few suggestions in this respect:
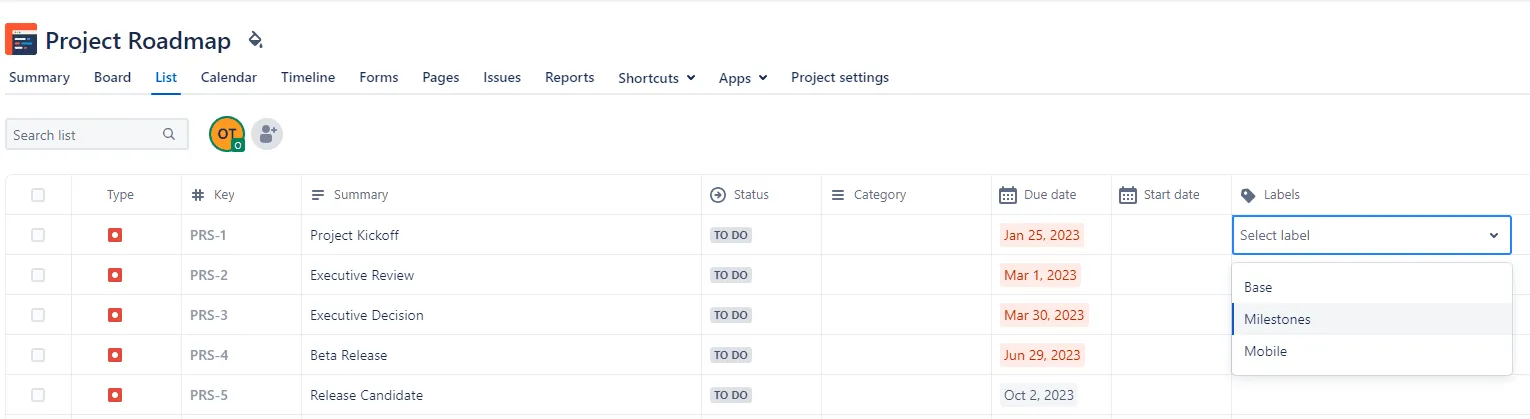
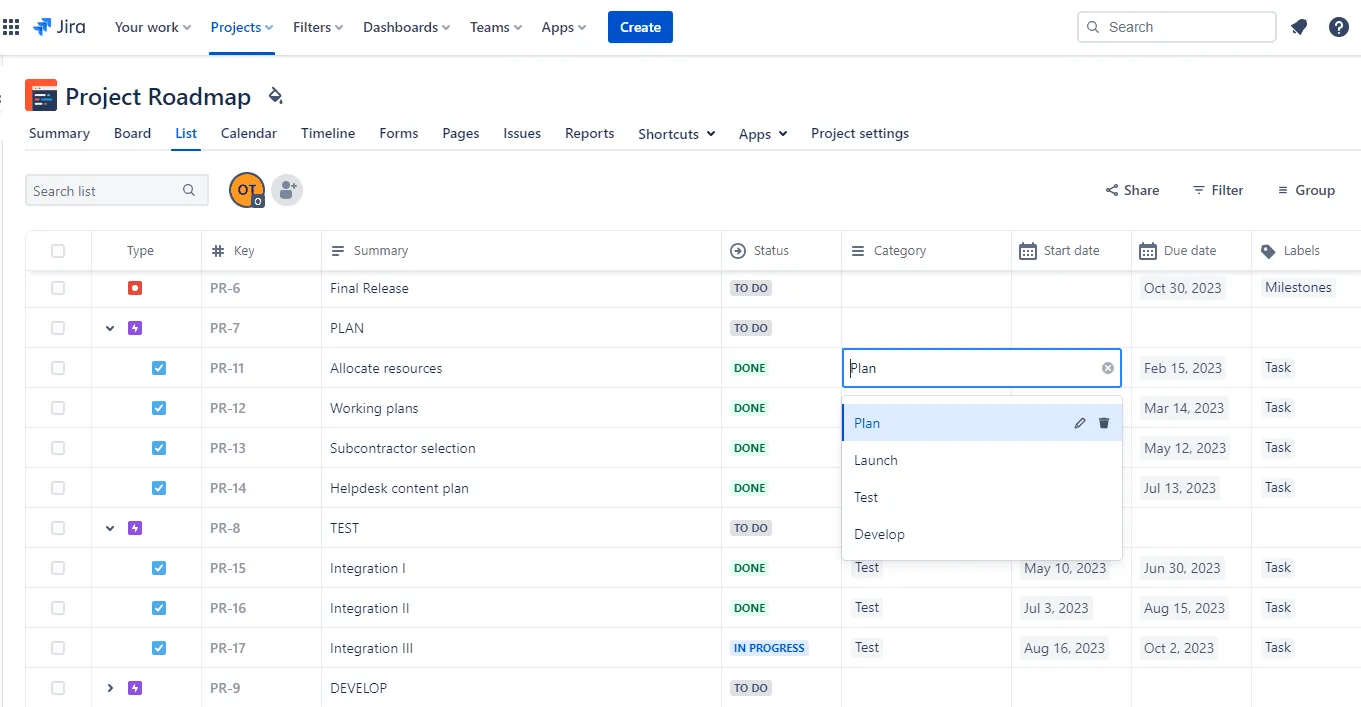
a) Add labels to your listed project issues using the Labels column. This will help you filter what data you want to display on your roadmap.
To add a label to your Jira issues, simply click on the Labels cell associated with the item in question and select an option from the dropdown menu that shows up next. You can also create a new label by typing its name into the cell and then hitting Enter.
b) Set a status indicator to your specific project issues using the Status column. Simply click on the Status cell corresponding to the item in question and select one of the three available options, i.e. TO DO, IN PROGRESS, or DONE.
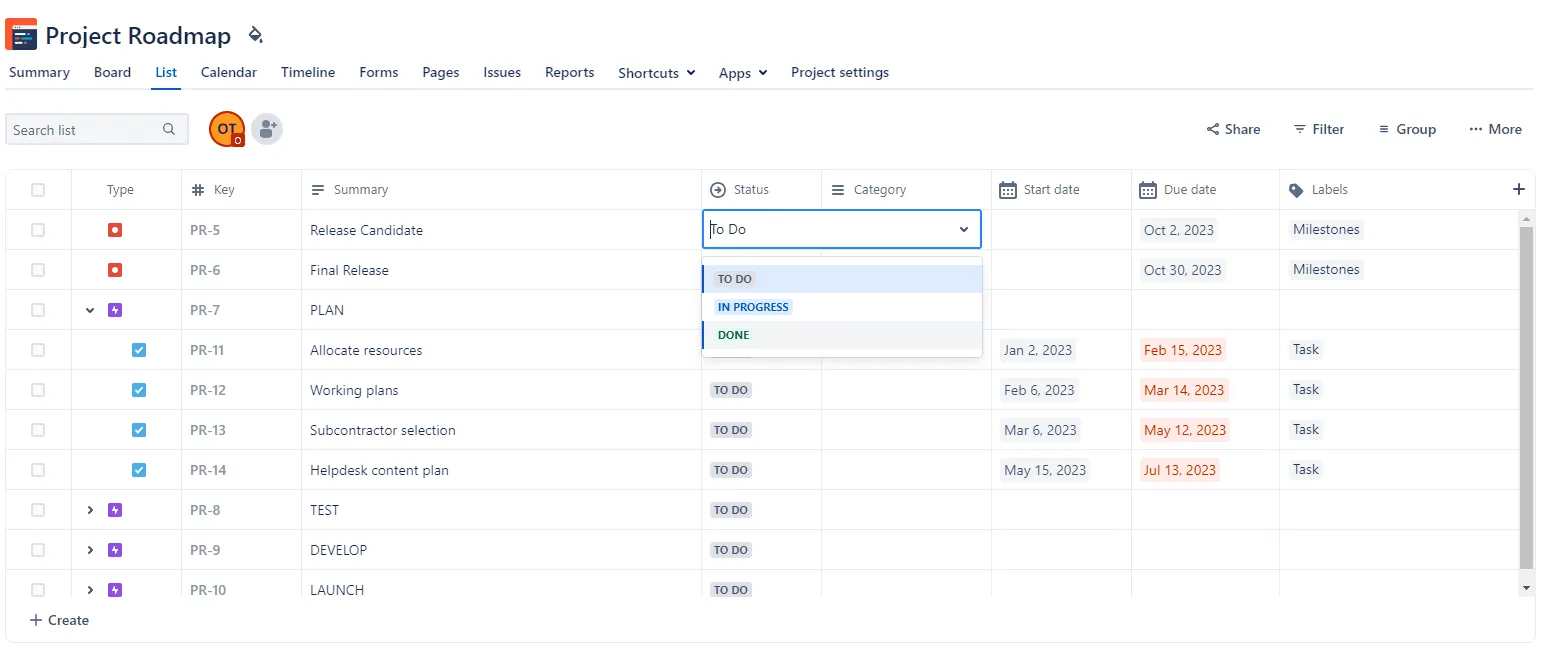
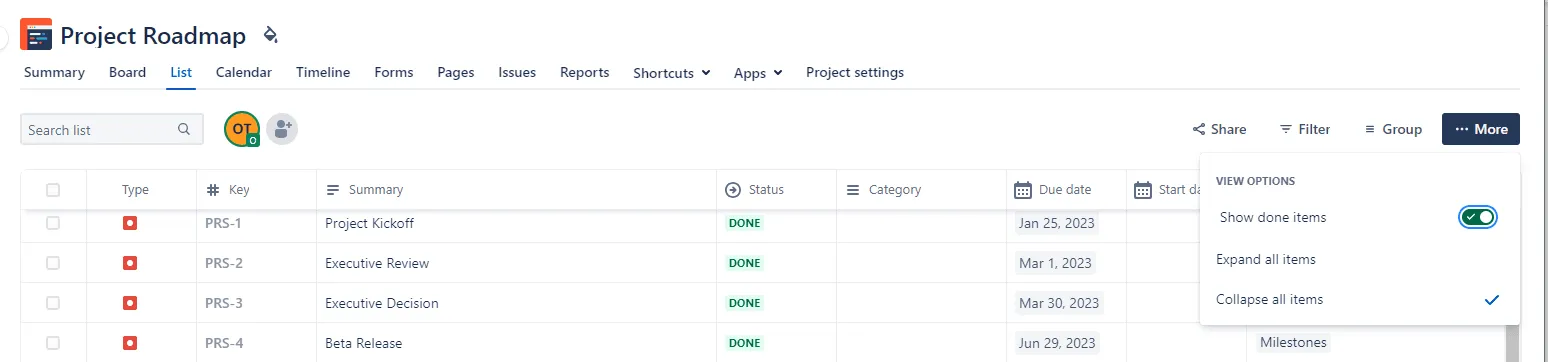
NOTE: The items that you mark as DONE will disappear from the List view. To have them displayed again, simply click on More and then turn on the Show done items toggle switch.
5. View, update, and share your Jira project roadmap.
a) To view your Jira project roadmap, click on Timeline from the horizontal tab bar beneath your project title. To edit or filter the details that you want displayed on your roadmap, you can choose to:
- Apply specific filters from the menu that appears once you click on Filter. In our case we chose to have all three status category items (DONE, IN PROGRESS, TO DO) and all issue types included (Epics, Tasks, and Milestones).
- Zoom in and out on the roadmap by adjusting the timeline using Weeks, Months, or Quarters as units. For our project, we used Quarters for the roadmap’s timeframe.
- View date ranges and edit them just by extending the issue-associated bar.

b) To share your roadmap as an image, click on Export.
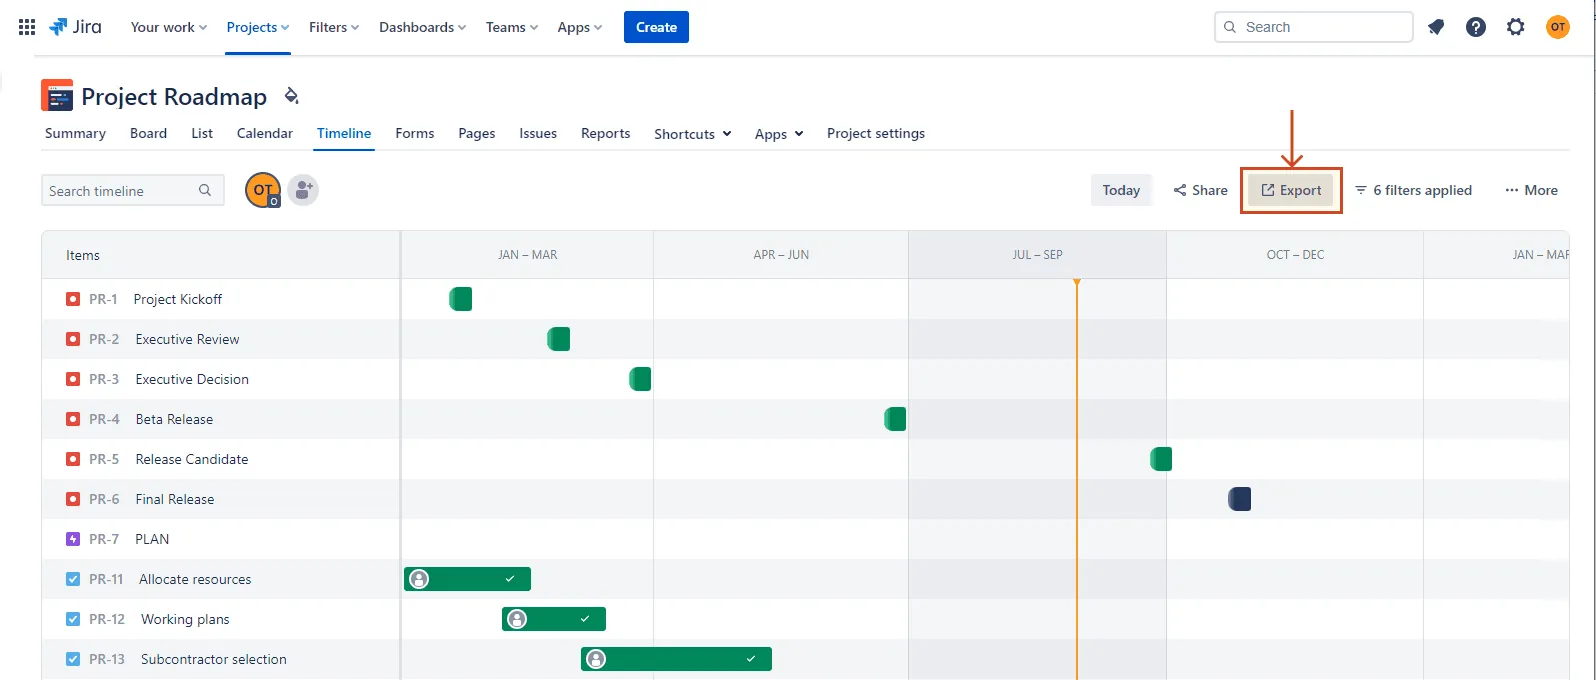
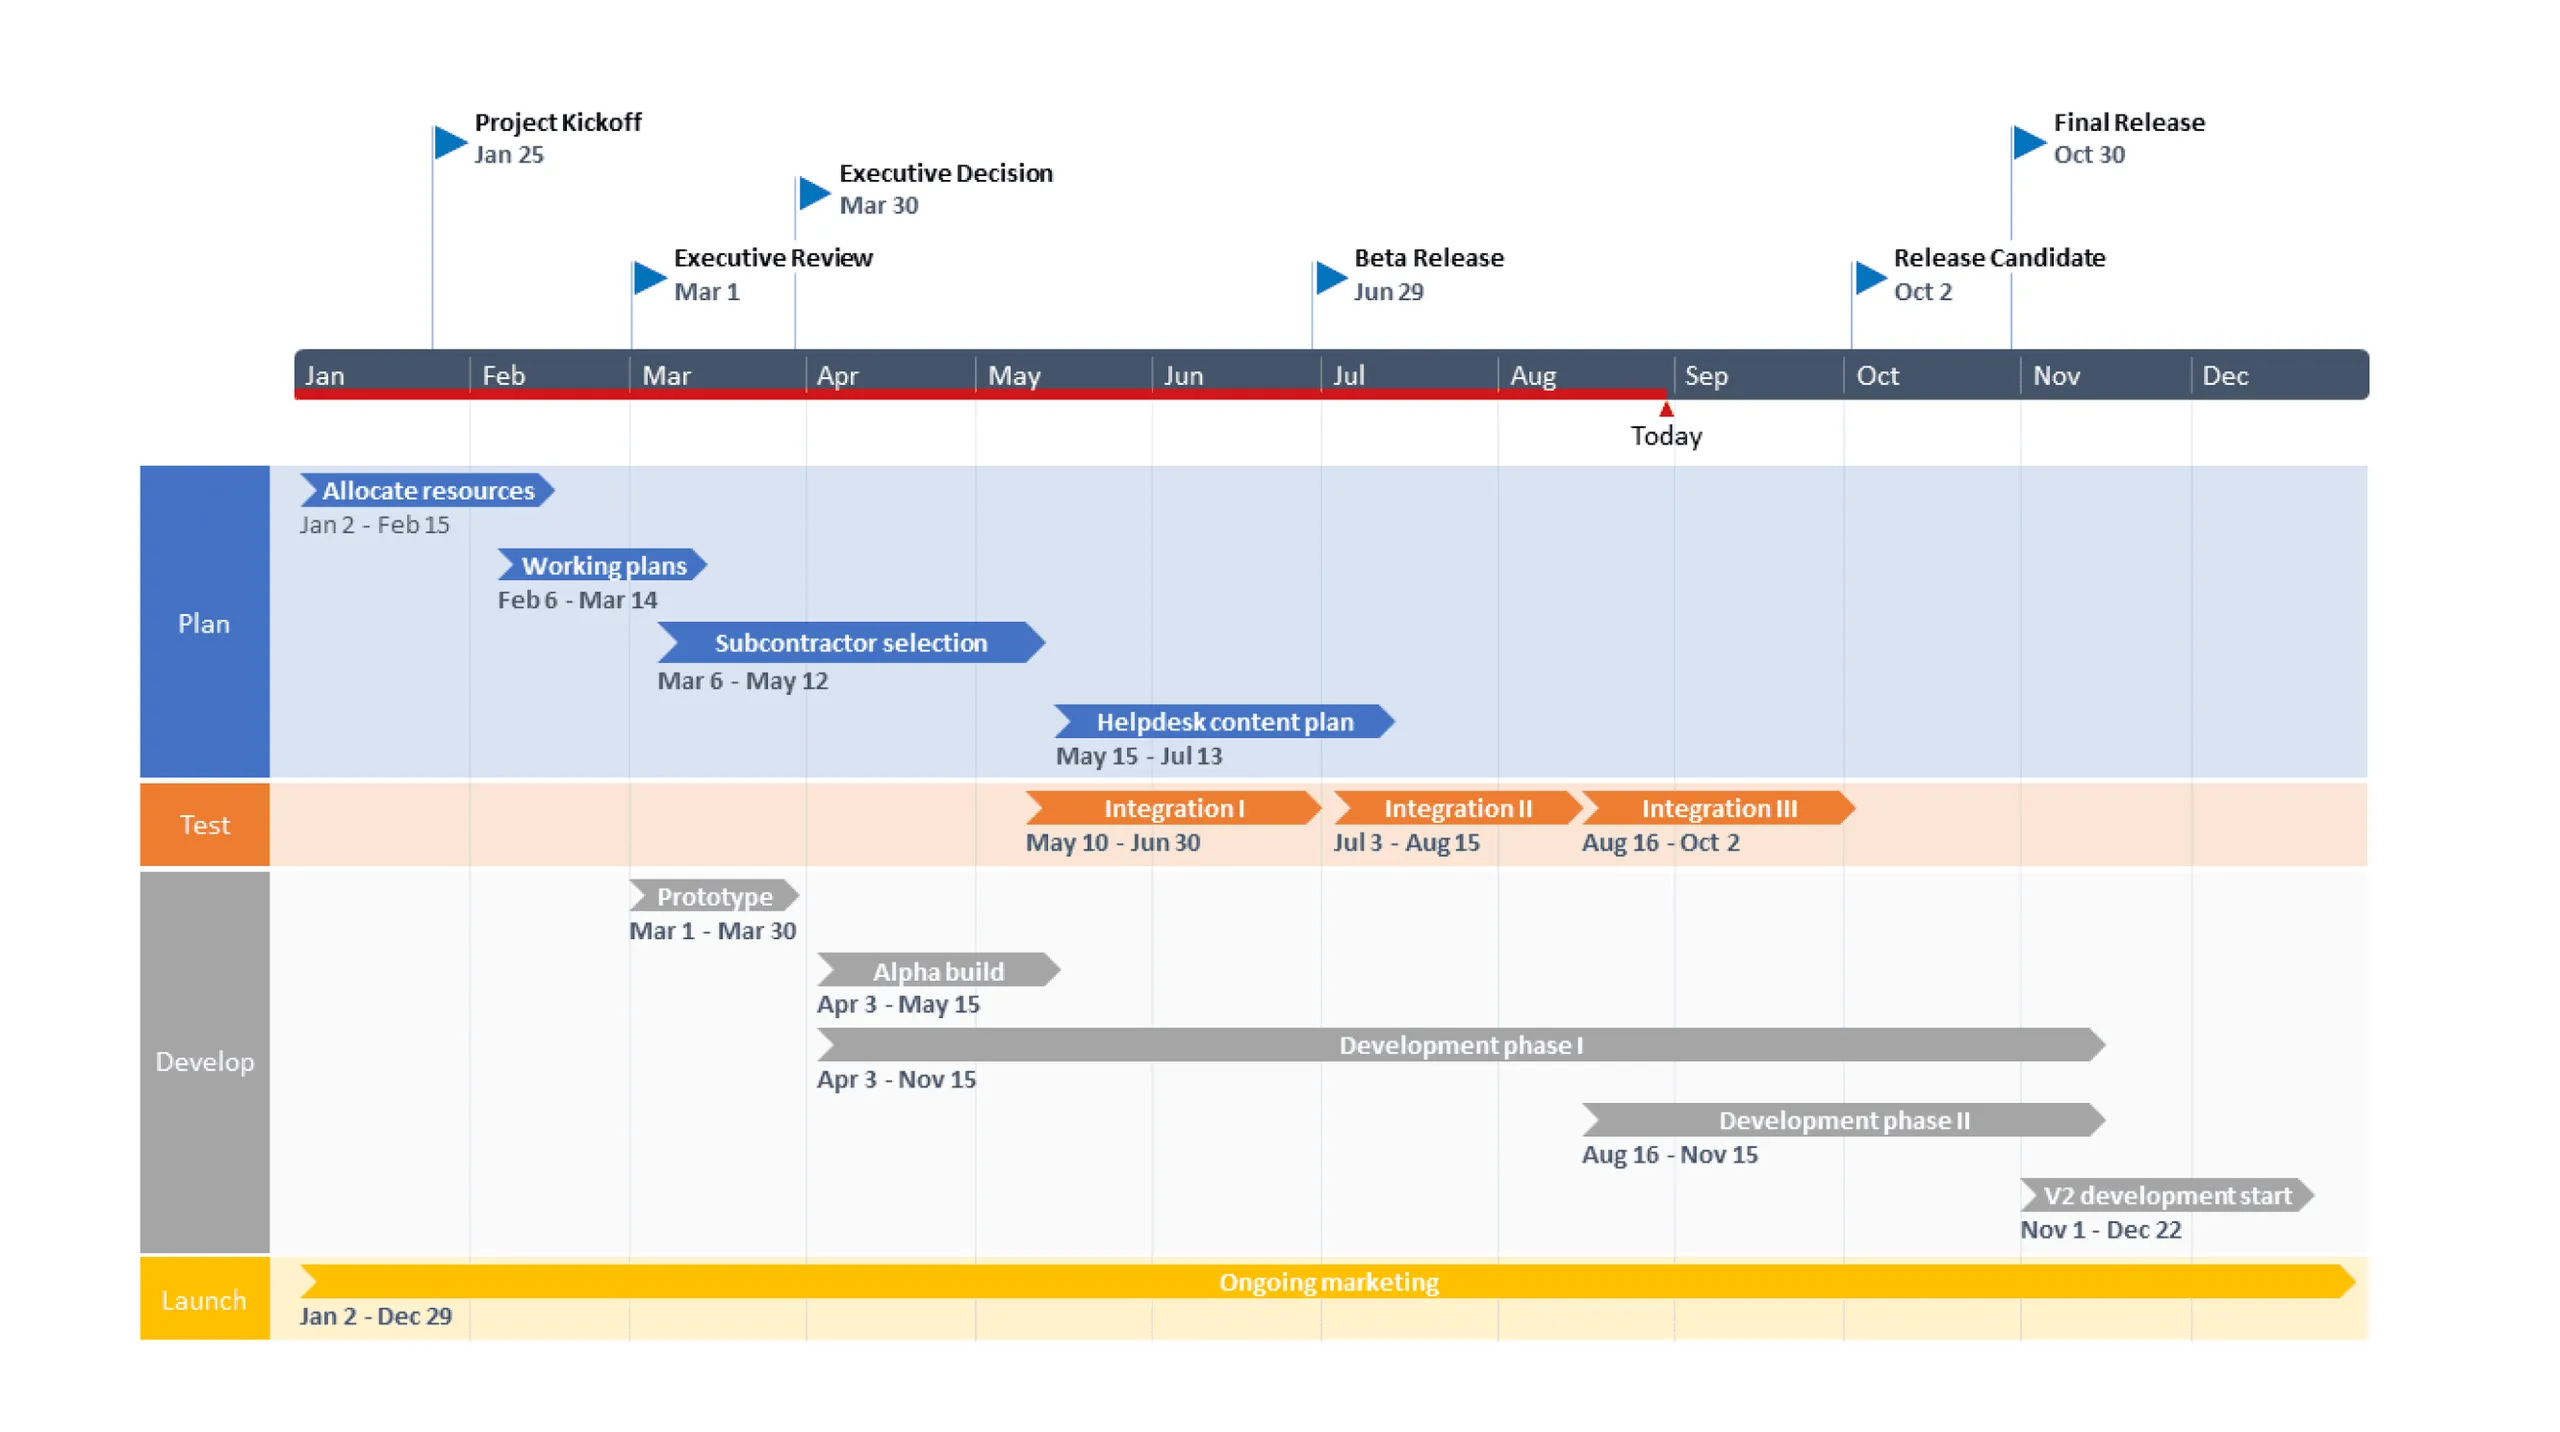
Once exported, here is how the final roadmap of our Jira project plan looks like:

Alternative to creating and presenting roadmaps in Jira
Once you export your Jira project roadmap as an image, its constituent elements become static and can no longer be edited. Whenever you want to update the visual, you will have to log into Jira, make the necessary adjustments, and then export it again.
Furthermore, presenting your project roadmap to stakeholders, executives, and team members from Jira itself can be problematic. Having to navigate through numerous menus to add new items and use top-bottom or left-right sliders to display the full view of your strategic plan is not very appealing during important presentations.
Fortunately, you can easily include your Jira project data into a professional client presentation or a high-level executive summary roadmap by using Office Timeline’s PowerPoint add-in. In stark contrast to the complicated process shown so far, the professional timeline maker from Office Timeline features a streamlined import from Jira that helps you create a concise, comprehensive display of your Jira project data.
How to make a roadmap in PowerPoint using Jira data
Below, we will demonstrate how simple and swift it is to turn Jira project data into a stylish, presentation-ready roadmap slide with the help of the Office Timeline add-in. To get started, you will need to install the free trial of the Office Timeline add-in, which will add a new tab to the PowerPoint ribbon.
1. Set up your Jira data for importing.
Before importing from Jira into Office Timeline, you may need to set up your issues in Jira to ensure a successful mapping.
In our case, we populated the Category cells corresponding to every task with the name of their associated epic to use as Swimlanes. This will allow us to identify task categories more easily and group activities accordingly when importing into Office Timeline.
2. Import data from Jira software into PowerPoint.
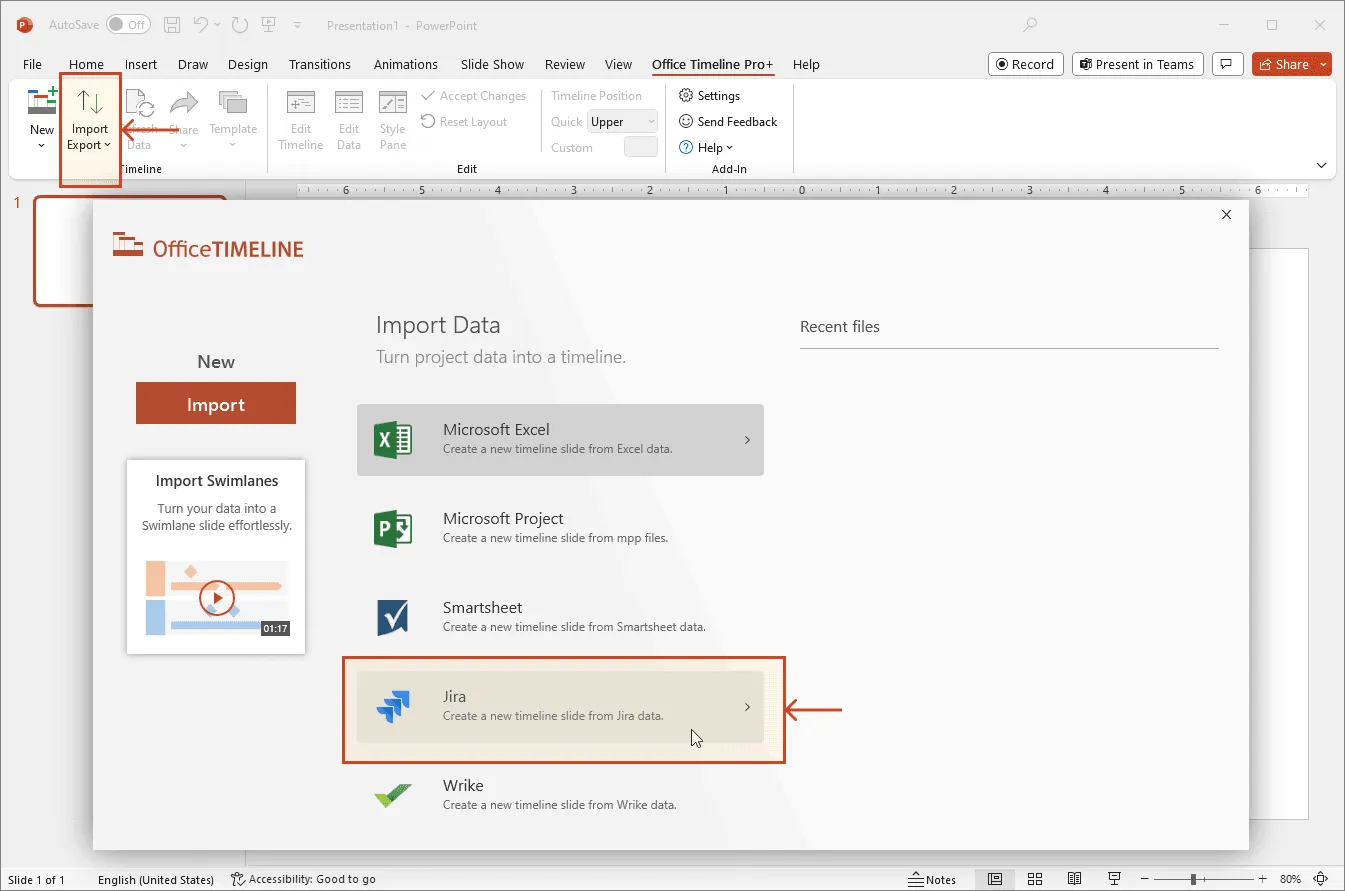
a) Open PowerPoint.
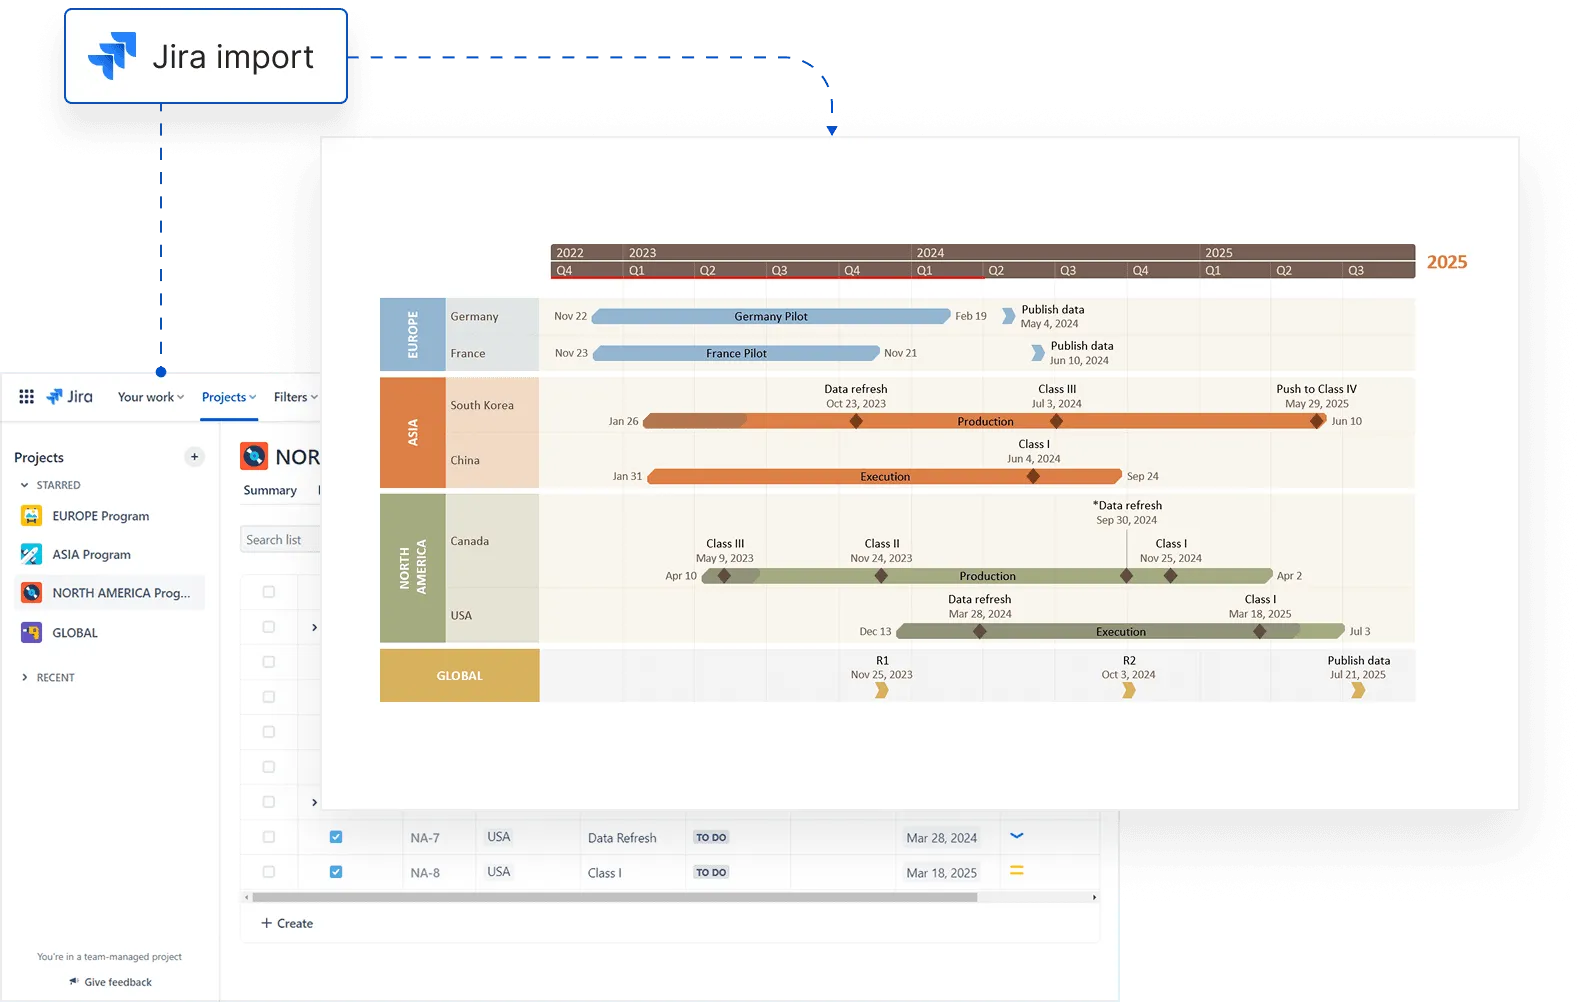
b) Click Import on the Office Timeline ribbon in PowerPoint, then select Import and choose Jira from the window that pops up.
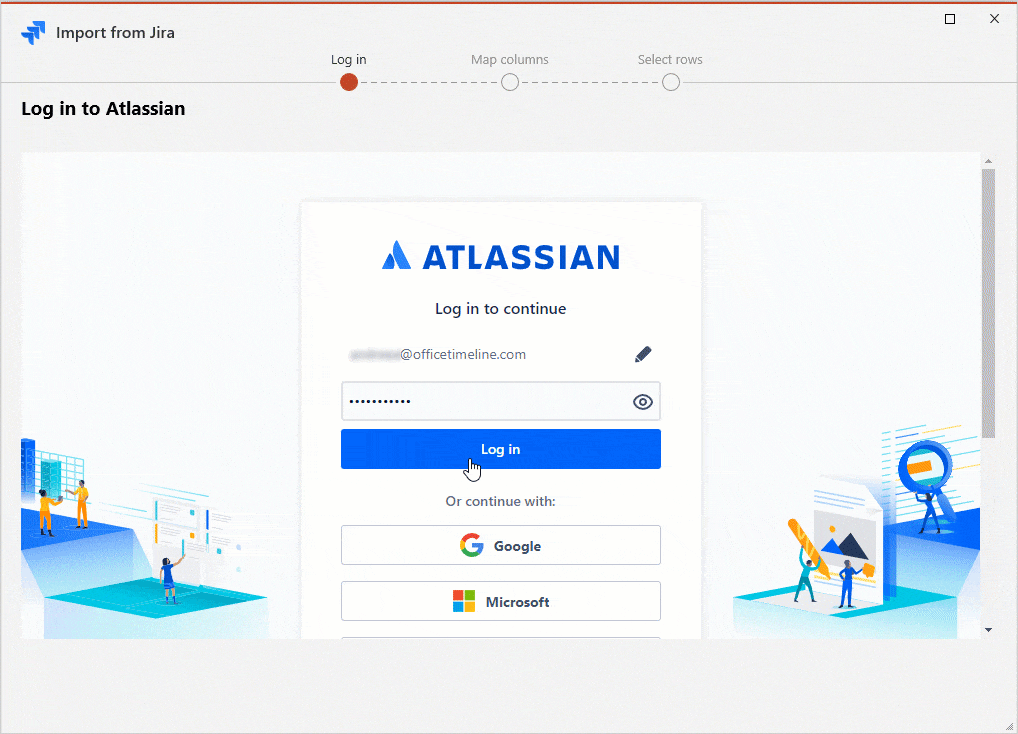
c) From the Jira import wizard, log in to your Atlassian account and grant us access to your Jira site.
Once you agree to give Office Timeline access to your Jira files, you will then need to select your data source. At this point, you can also choose to apply a few filters so you can quickly get the exact data set you need from your selected project. Learn more about these actions with our support article on how to select your data source and filter your data.
d) After loading your data source, the add-in should automatically map the mandatory columns needed to generate your timeline: Title, Start Date, and End Date. Additionally, it may also map the Swimlane and Sub-Swimlane columns or Notes if it detects relevant fields in your Jira source.
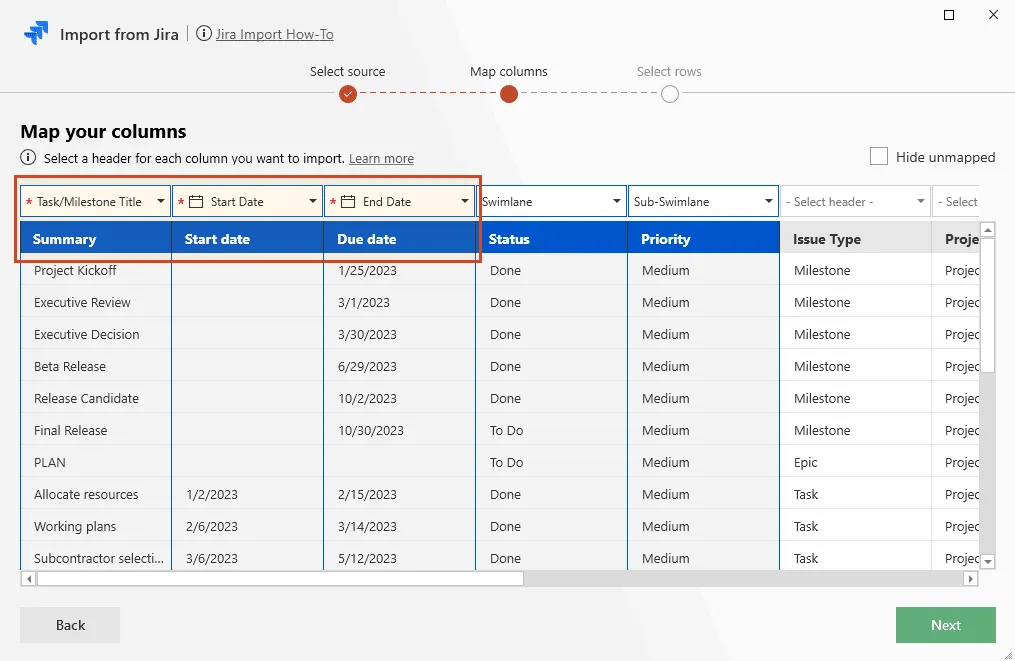
Note: In the example above, the headers in the first row are Office Timeline headers, while the second row shows the corresponding Jira issue fields.
If you need fields from Jira other than the default mappings, you can easily remap them. Simply click the dropdown arrow above the column you want to adjust and select the corresponding Office Timeline header, as shown below:
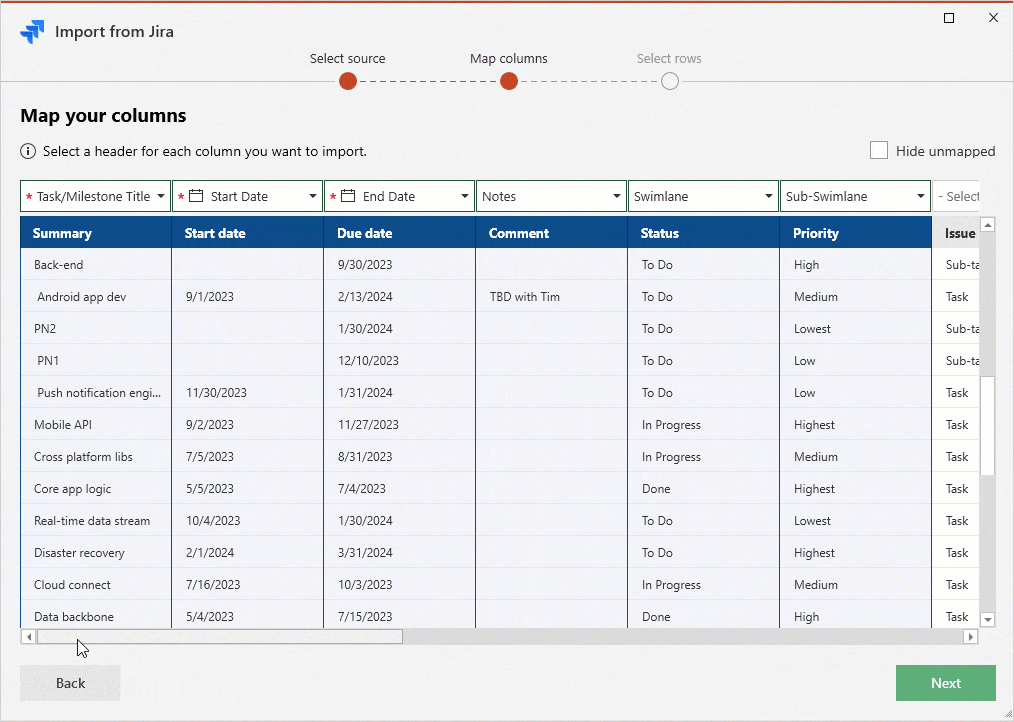
In our case, we remapped the Jira imported column called Category under the Swimlane header and unmapped the Sub-swimlane column. Once you finish mapping your Jira imported columns, click Next.
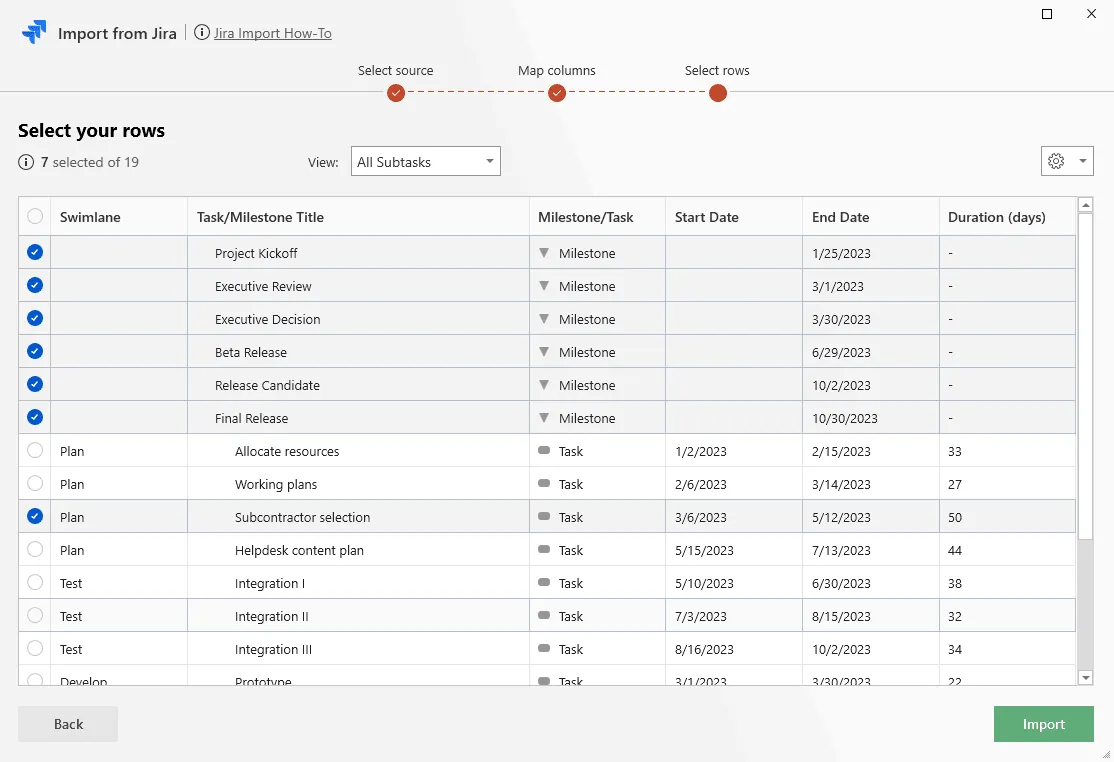
e) In the import screen you see next, you can select the Jira items that you want to import. Check or uncheck the data as needed. When ready, click on Import.
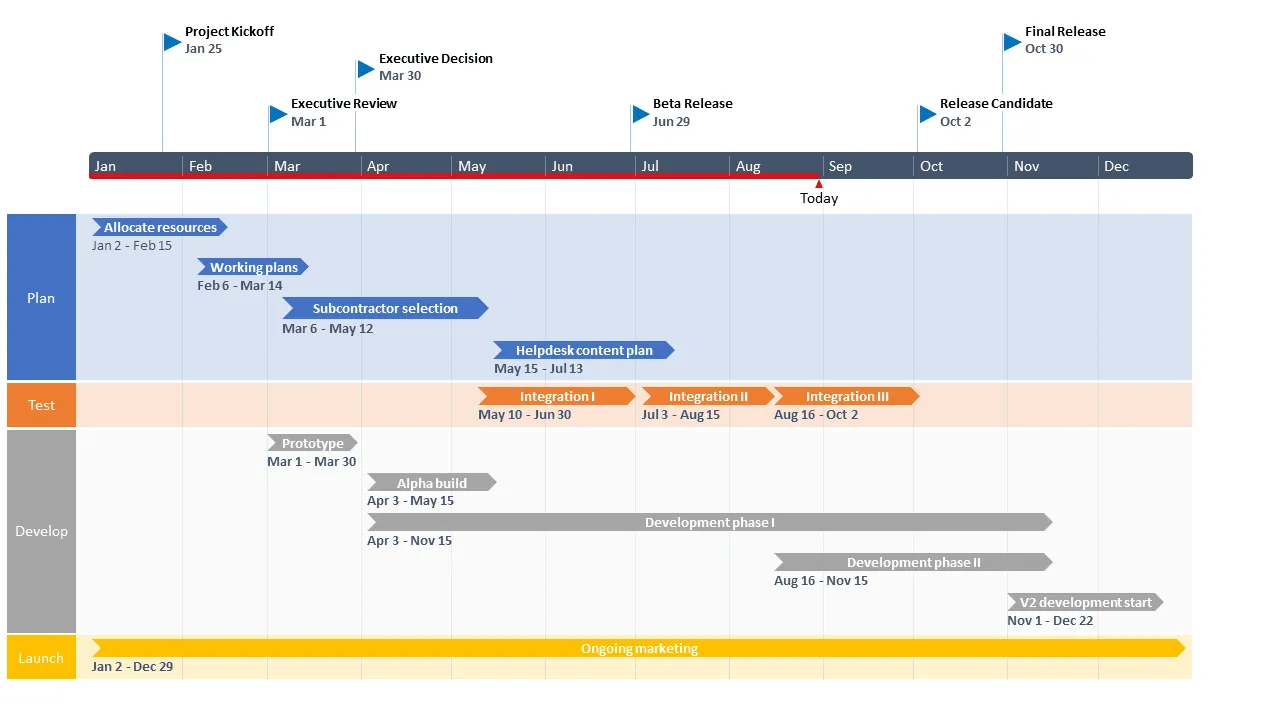
After applying some quick styling touches to change task-associated shapes and adjust their spacing, reposition task titles and dates, as well as group a few tasks on a single row, our roadmap looks this:

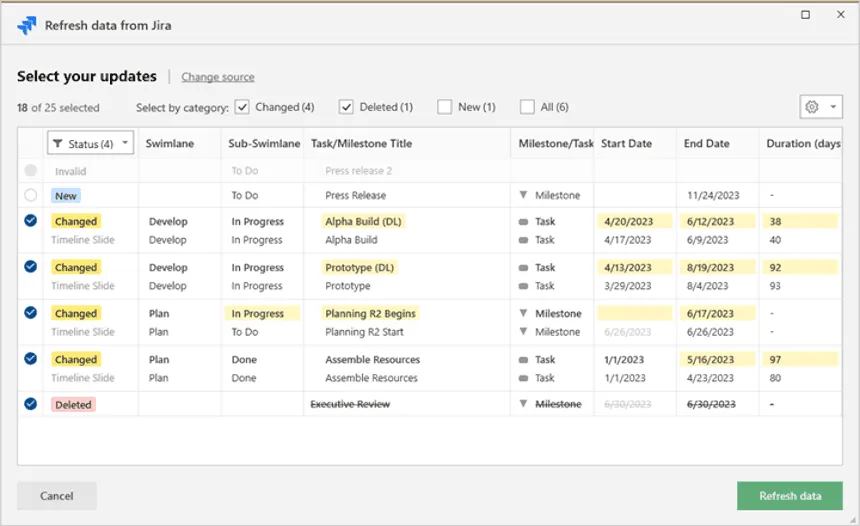
3. Refresh your roadmap data.
Once created, the roadmap can be easily customized and updated when your Jira project data changes. Just click Refresh Data on the Office Timeline ribbon in PowerPoint. The add-in will automatically identify the changes in Jira and give you the option to select the changes you want to keep. Click Finish to complete the update of your Jira data roadmap. For more details, check out our support article on how to refresh Jira data imports.
Get this free roadmap template
FAQs about making roadmaps in Jira
Read here the short answers to the most commonly asked questions about how to make a roadmap in Jira.
Yes, Jira does allow the creation of roadmaps. Depending on whether you want to map out the strategic direction for a single project or multiple ones, you can make a roadmap in Jira using either the Basic Roadmaps (now called Timeline) or the Advanced Roadmaps feature. The difference between the two is that the former allows the creation of strategic plans based on Jira issues assigned to a single, specific team, whereas the latter extends its roadmapping capabilities to span across multiple teams and projects.
In terms of accessibility, the Timeline feature is available with all Jira plans, while Advanced Roadmaps is accessible only to users with Jira Software Premium and Enterprise.
To explore more options in terms of Jira roadmapping, check out our review of the 5 best tools and plugins for presenting Jira roadmaps.
Yes, you can create multiple roadmaps in Jira, but you will need a Premium or Enterprise subscription so you can get access to the Advanced Roadmaps feature, which will allow you to visualize a strategic plan across multiple projects.
To find out how you can map out the strategic direction for multiple Jira projects for free, see our tutorial on how to make a roadmap in PowerPoint using Jira data.