Interactive timelines transform chronological information from static displays into dynamic, explorable experiences. By allowing users to click, scroll, and engage with historical events or project milestones, these digital tools create more meaningful connections with content.
Using an online timeline maker, you can easily create customizable and visually engaging timelines that illustrate events, processes, and routines over specific time periods. There are many types of timelines to choose from, depending on your goals, from simple linear charts to complex, data-driven interactive versions.
This article explores what makes timelines interactive, how to build them effectively, and which tools can help you create your own.
Timelines and interactive timelines
To understand what makes interactive timelines so powerful, it helps to start with the foundation: the traditional timeline. Let’s look at what it is and how it’s used.
What is a timeline?
A timeline is a linear representation of important events that occurred over a specific period. It graphically represents events arranged in chronological order. It serves as a visual tool to map out key events and project timelines. Its linear format allows viewers to easily follow the progression of events over time.
Timelines can be applied in various contexts, including education, business, and personal projects, to display historical events, milestones, or processes.
What is an interactive timeline?
An interactive timeline differs from traditional static timelines by responding to user actions. Rather than simply presenting information in a fixed format, interactive timelines invite exploration and engagement.
The defining features of interactive timelines include:
- Clickable elements: Users can select specific events, dates, or periods to reveal additional information, such as detailed descriptions, supporting documents, or contextual explanations.
- Zoom and scroll functionality: Users can adjust their view to focus on specific time periods or zoom out for a broader perspective. This allows for both detailed examination and big-picture understanding.
- Multimedia integration: Interactive timelines incorporate images, videos, audio clips, and other media that bring events to life in ways text alone cannot achieve.
- Data visualization components: Charts, graphs, and other visual elements can be integrated to represent quantitative information related to timeline events.
- Filtering options: Users can sort or filter timeline content based on categories, themes, or other criteria, allowing for customized viewing experiences.
- Animated graphics: Incorporating animated graphics can enhance visual design and engagement, making the timeline more appealing and interactive.
For example, a museum might create an interactive timeline of ancient civilizations where visitors can click on the Egyptian period to view artifacts, watch videos of archaeological sites, and listen to expert commentary, all while maintaining the chronological context.
Why create an interactive timeline
Once you understand what makes a timeline interactive, it’s easy to see why these tools have become so popular. They turn static information into an experience, one that captures attention and helps people make sense of complex stories or data.
Engages users and deepens understanding
Interactive timelines encourage active exploration. Users can click, hover, or scroll to reveal details, making the experience more hands-on and memorable. This engagement improves comprehension, since users control how they move through the information and can focus on what interests them most.
Adds clarity and context
By combining text, visuals, and multimedia, interactive timelines make it easier to grasp connections between events. They turn dense information into a structured, visual narrative, ideal for classrooms, business reports, or storytelling projects.
Creates lasting impact
Because users interact directly with the content, they remember it longer. The combination of visuals, animation, and motion transforms simple data into an experience that’s both educational and enjoyable.
How to create an interactive timeline
Creating timelines can be a straightforward process with the right tools and approach. Creating an interactive timeline doesn’t require advanced technical skills. With the right tools and approach, you can build engaging chronological experiences relatively quickly.
Step 1: Gather and organize your data
Before selecting a tool, collect all the information you want to include:
- list events with accurate dates or time periods;
- write concise descriptions for each event;
- compile relevant media (images, videos, audio);
- identify connections between events.
- determine categories or themes for potential filtering;
For optimal organization, consider creating a Google spreadsheet with columns for dates, titles, descriptions, media links, and categories.
Step 2: Choose a suitable builder
Several timeline builders are available, ranging from simple drag-and-drop interfaces to more sophisticated programming options:
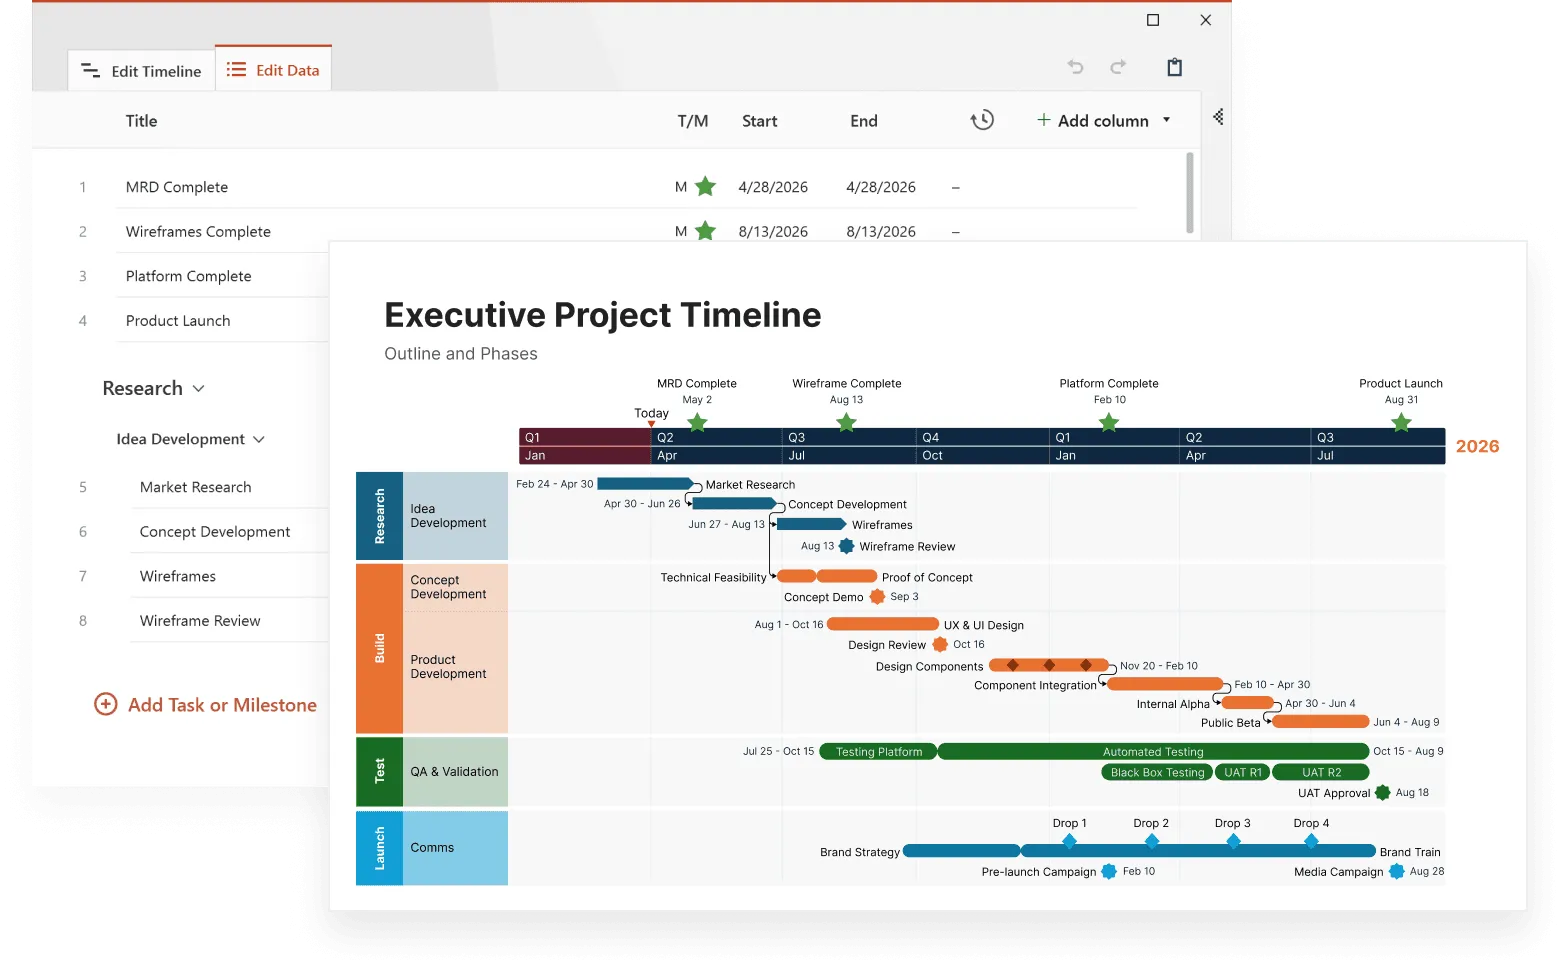
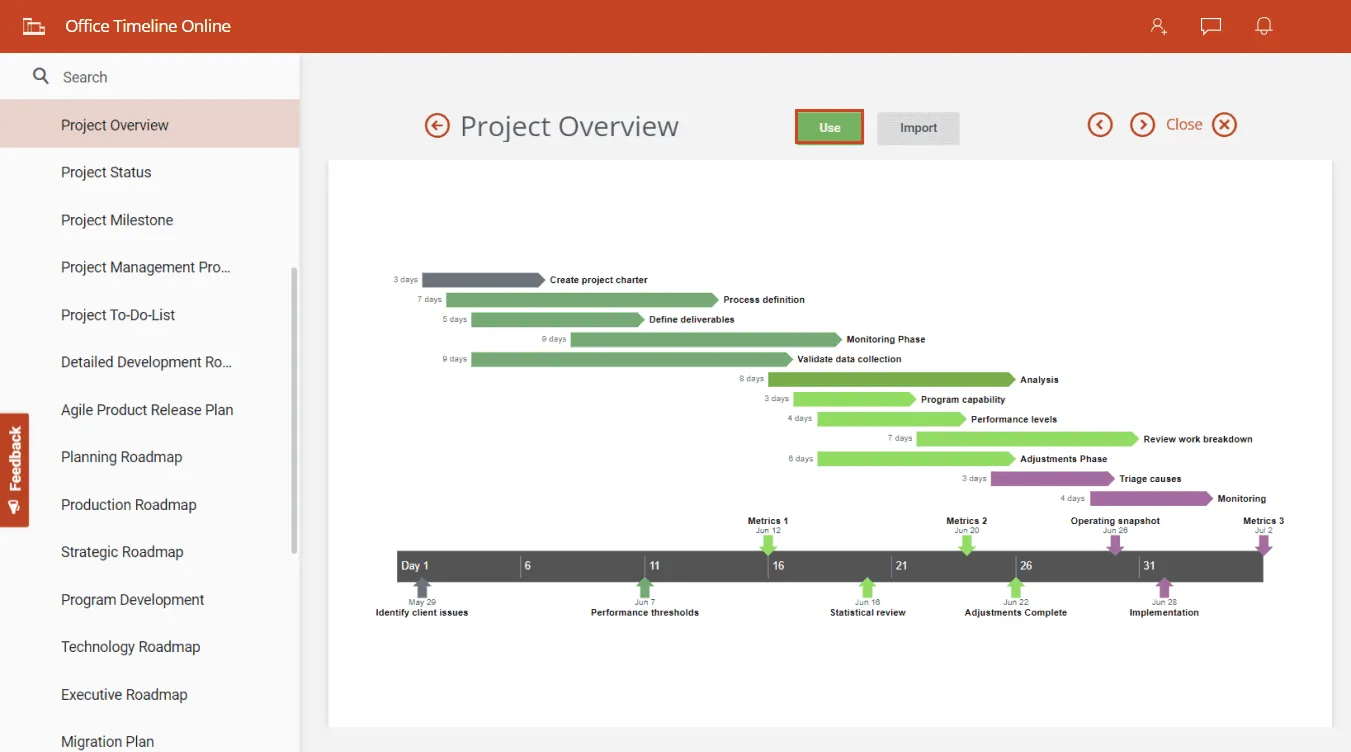
- Office Timeline Online: a browser-based tool that makes it easy to create, update, and share interactive project timelines with drag-and-drop editing, real-time collaboration, and PowerPoint integration
- Timeline JS: a free, open-source tool for creating visually rich, interactive timelines;
- Tiki-Toki: offers 3D timeline visualization and multimedia integration;
- Preceden: provides clean, professional timeline layouts with filtering capabilities;
- custom web development: For more specialized needs, JavaScript libraries like vis.js or TimelineJS can be implemented by developers.
The best choice depends on your technical comfort level, budget, and specific requirements.
Step 3: Input your data
Most interactive timeline creators follow a similar process:
- create a new project in your chosen platform;
- import or manually enter your event data;
- upload or link to your media files;
- arrange events chronologically (typically handled automatically by the software);
- organize events into categories if applicable.
Step 4: Add interactive elements
Using timeline templates can help you add interactive elements more efficiently. With your basic timeline structure in place, enhance it with interactive features:
- configure clickable events that reveal detailed information;
- add navigation controls for scrolling and zooming;
- incorporate media viewers for images and videos;
- set up filtering options based on your categories.
Step 5: Customize the design
Make your timeline visually appealing and aligned with your branding or subject matter. Selecting a suitable timeline template can make the design process easier and ensure visual consistency.
Here are some tips:
- select appropriate color schemes;
- choose fonts that balance readability and style;
- adjust spacing and layout for clarity;
- create custom icons or markers for different types of events;
- ensure visual hierarchy guides users to important information.
Step 6: Test and refine
Before publishing, make sure you test on different devices and screen sizes and check that all interactive elements function correctly. Also, check load times for media elements. Be ready to get feedback from potential users and to make adjustments based on testing results.
Step 7: Publish and share
Once you're happy with your timeline, generate the final version and embed it on your website or platform. Share the link with your target audience, and if possible, check the analytics to see how people are interacting with it. This helps you understand what content they find most interesting and how you might improve future timelines.
Choosing the right interactive timeline builder
There are factors that can make or break both your timeline-building experience and your audience's engagement with the final product. When selecting an online timeline creation tool, pay attention to these aspects:
- Ease of use: How intuitive is the interface? Can you create a timeline without extensive training or technical knowledge?
- Customization options: Can you adjust the visual design to match your needs? Are there templates available as starting points?
- Multimedia support: What types of media files can be incorporated? Are there limitations on file sizes or formats?
- Integration capabilities: Can the timeline be easily embedded in your website or learning management system? Does it work well with your existing tools?
- Data input methods: Can you import data from spreadsheets or databases, or must everything be entered manually?
- Collaboration features: Can multiple team members work on the timeline simultaneously? How are changes tracked?
- Cost structure: Is the tool free, subscription-based, or a one-time purchase? Are there limitations on free versions?
- Support and documentation: Is help available when you encounter problems? Are there tutorials and resources for learning advanced features?
Here’s a brief comparison of popular options:
- Office Timeline Online: Paid with free option, highly intuitive and browser-based, ideal for professionals who need polished, presentation-ready timelines, with real-time collaboration and seamless PowerPoint integration
- Timeline JS: Free, excellent for journalists and educators, integrates with Google Sheets, limited design customization.
- Tiki-Toki: Paid with free option, standout 3D view, good multimedia support, intuitive interface.
- Preceden: Paid with trial option, exceptionally clean interface, strong for project planning, excellent layer system for organizing complex timelines.
The right timeline tool can transform your project from a static presentation into an engaging, interactive experience. Take time to evaluate these factors based on your specific needs and audience. While feature-rich platforms might seem appealing, sometimes the simplest option that meets your core requirements will lead to the best results. Remember that the goal is both to create a beautiful timeline, and to communicate your story in an interesting way.
Collaborate on timelines instantly
Try Office Timeline Online for free. Work with your team in real time and create timelines that look great in presentations and online.
Best practices for interactive timeline design
We've all seen boring timelines that make us want to click away. Let’s see how you can avoid that. When designing your interactive timeline, think about these practical tips that can make a big difference:
- Keep it clean and clear: Don't cram too many events or details into your timeline. It's better to highlight the most important events and let users click for more info. Nobody wants to feel overwhelmed at first glance.
- Be brief with your text: Write short, catchy headlines for each event. Save the longer explanations for when someone clicks on an event - that way they choose what to dive deeper into.
- Mix media thoughtfully: Add photos, videos, or audio that actually help tell the story - not just to make it look pretty. Each picture should add something to what you're explaining.
- Make sure it works everywhere: Your timeline should look good on phones, tablets, and computers. Remember that people might be using their fingers to navigate on smaller screens, so make those buttons easy to tap.
- Give a quick intro: Help first-time visitors understand what your timeline is about and how to use it. A simple "Click on events to learn more" can go a long way.
- Stay consistent: If you use blue text for dates in one place, use it everywhere. This helps people understand what they're looking at without having to figure it out each time.
- Make clicks worthwhile: Every button, slider, or clickable element should show users something interesting or useful - not just fancy effects that don't add value.
- Think about everyone: Make sure people with disabilities can use your timeline too. Add descriptions for images and check that your color choices work for colorblind users.
- Start simple: Show just enough information at first, then let people expand sections they're interested in. This approach is like a good conversation - starting with the basics before going deeper.
Remember, the best timelines tell stories that draw people in and keep them exploring. By following these tips, you'll create an informative experience that is enjoyable to use.
Best use cases for interactive timelines
We all learn better when we can see how things connect over time. Let's look at some creative ways people have used interactive timelines to tell compelling stories about history, business growth, art, and current events.
Educational: timeline about the evolution of computing
Imagine scrolling through computing history from the abacus to today's AI systems. With this type of timeline, students could filter to focus just on hardware, software, or networking breakthroughs. They might click on the first microprocessor to learn how it sparked a revolution in personal computing. The best part? Seeing how each invention built on earlier ones, helping students connect the dots between historical innovations and the devices they use every day.
Corporate: company growth visualization
Picture a startup showing its journey from a garage operation to market leader. Viewers could click on key moments like the first funding round or product launch to reveal the numbers behind the story. This approach helps teams understand company milestones while giving context to current projects. Team members might discover that today's challenges mirror those faced during an earlier expansion phase.
Museum: art movements through centuries
Think about walking through art history chronologically, from Renaissance masters to modern expressions. Visitors could tap on different periods to see what made each unique and how they influenced each other. With audio commentary available for highlighted works, it would feel like having a personal museum guide explaining the cultural significance of what you're seeing.
Journalism: ongoing news story development
When covering complex stories that unfold over months, news sites can create timelines that get updated as new developments occur. Readers could filter events by key players or locations, helping them make sense of complicated situations. They might click on a diplomatic meeting to see the original documents or statements that resulted, adding depth beyond typical reporting.
The beauty of these examples is how they can transform overwhelming information into engaging stories you can explore at your own pace. For teachers helping students understand history, storytellers bringing narratives to life, or planners visualizing projects, a thoughtfully designed timeline can help people understand better what happened, why it matters, and how events connect to each other.
Conclusion
Interactive timelines bring dry facts to life, turning a simple list of dates into something people are actually excited to explore. There's a huge difference between reading about history and actively discovering it at your own pace - clicking through events, zooming into details that catch your eye, and seeing how everything connects.
These tools work for all kinds of people - visual learners can see relationships between events, readers can dive into detailed descriptions, and everyone benefits from being in control of what they learn and when. Whether you're a teacher trying to make the Civil War more interesting, a team leader showing project progress, or someone telling your family history, interactive timelines help your audience connect with the story you're sharing.
The best part? You don't need to be a tech wizard to create one. With today's user-friendly tools, anyone can build an impressive interactive timeline. By focusing on clear design, thoughtful organization, and meaningful interactivity, you'll create something that doesn't just inform your audience – it draws them in and keeps them engaged from beginning to end.
Frequently asked questions
Still have questions about creating interactive timelines? Here are answers to some common questions we hear:
The time needed really depends on your project's size and complexity. A simple timeline with 10-15 events might take just an hour or two once you've gathered your information. More complex projects with lots of media and custom design elements could take several days. The good news is you can start simple and add more details over time – many timeline tools let you save and come back to your work.
Not at all! While some advanced customization might require basic HTML knowledge, most timeline tools are designed for people with zero coding experience. They use simple drag-and-drop interfaces and visual editors. If you can create a PowerPoint presentation or write an email, you already have all the skills you need to get started.
Most timeline tools let you export static versions as PDFs or image files that can be printed. While you'll lose the interactive elements, the core information remains intact. Some platforms also offer ways to download an offline version that maintains some interactivity when viewed on a computer without internet access. If offline sharing is important for your project, check whether your chosen tool supports this feature before you start building.