
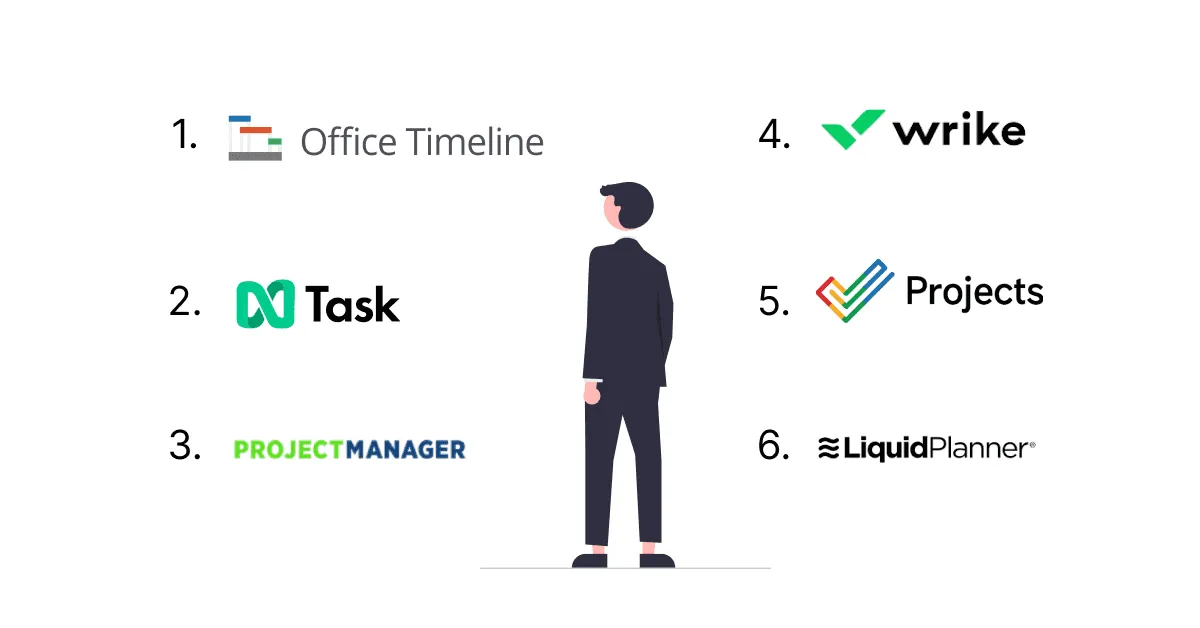
Top 6 critical path analysis software
Read our review of the 6 best critical path analysis tools to effectively plan, schedule, and track your project’s critical path activities.
Efficiently identify the critical path of your project with our simple 6-step guide.
Having a clear understanding of your project’s critical path is essential for ensuring successful project completion. In project management, this identification process is called the critical path method (CPM). By mapping out the crucial tasks required to achieve the desired deliverables, CPM greatly helps project managers complete their initiatives.
But how exactly do you find the critical path of a project? It is this question that we want to answer in this blog post, with step-by-step instructions and illustrative examples. But first, let’s cover some basic aspects of the critical path method.
The critical path method (CPM) or critical path analysis is a management technique for planning project processes. It involves outlining the string of tasks and dependencies that take the longest time to complete in a project. This group of essential to-do activities is called the critical path.
The overall duration of the critical path represents the minimum amount of time you will need to carry out a whole project. Any delay in completing a crucial task will result in extending the total project duration. By knowing what a project’s critical and noncritical tasks are, project managers can prevent timeframe problems more easily.
With every project relying on a plan that forecasts and sets a deadline for completion, CPM allows managers to be more accurate by determining which tasks cannot be delayed.
CPM was developed at the American company DuPont in 1957 by mathematicians James E. Kelley and Morgan R. Walker. They were looking for a way to reduce costs associated with agricultural and construction work caused by inefficient scheduling.
With its usage becoming more widespread due to the PC revolution, CPM has extended to other various fields, including software development.
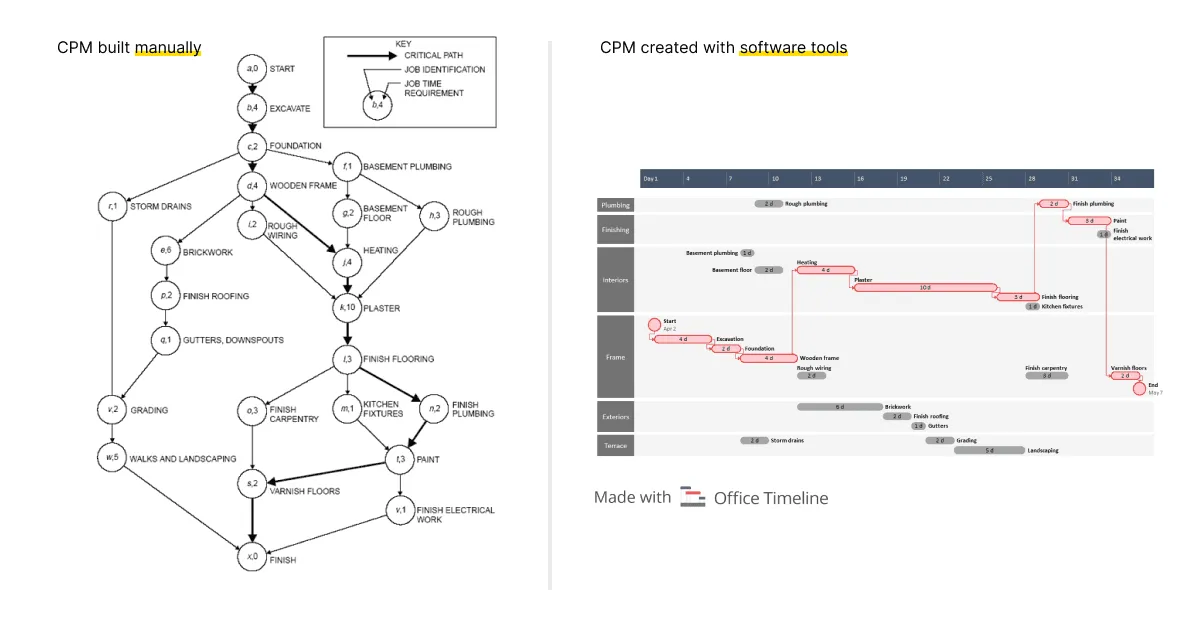
Originally drawn by hand, the critical path can now be effectively highlighted with the help of critical path software programs.
Project managers often find value in using the critical path method because:
As it is the case with most of the popular approaches used in project management, there are both advantages and disadvantages associated with the critical path method. Let’s review the most important ones:
Now that we have clarified these elementary characteristics of the critical path method, let’s see the steps that lie at the basis of this project management technique.
Here are the main 6 steps included in the critical path analysis process:
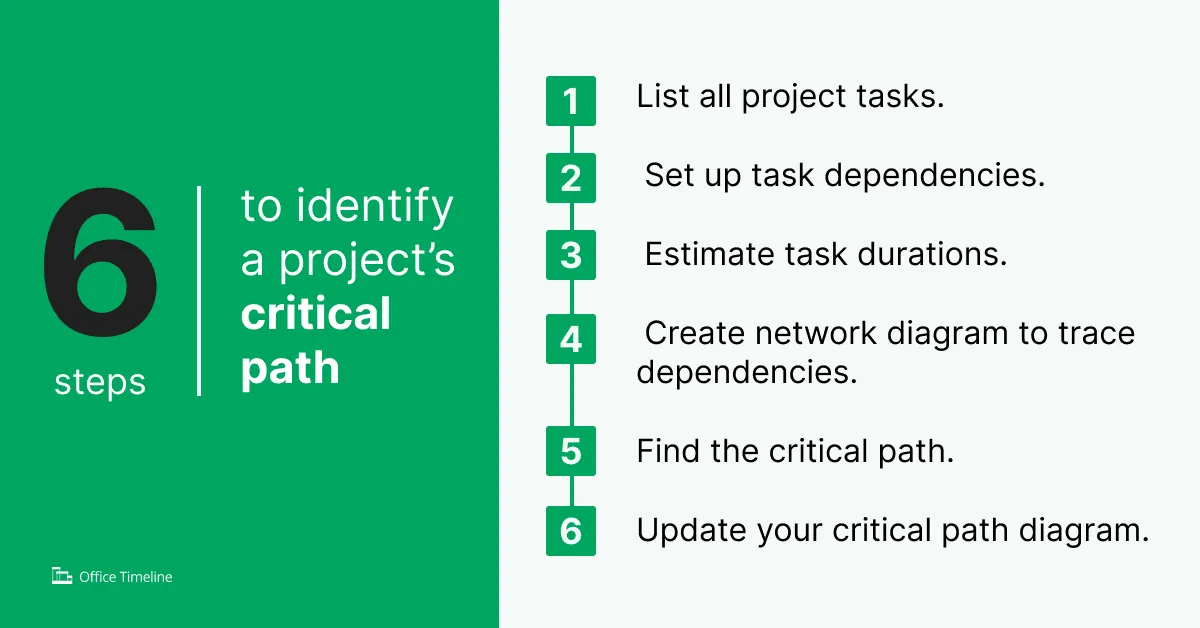
Break down your project into milestones and actionable tasks required to produce your deliverables. This high-level structure may look like lists, tables, or tree structures, and will serve as the foundation for the rest of the following CPM steps.
For illustrative purposes, we have organized below all the tasks associated with planning an online press conference:
| Guests | Program | Logistics | Online Press Kit |
|---|---|---|---|
| Collect contacts for publications | Confirm speakers and panelists | Pre-production meeting | Outline press release |
| Create invite | Check speakers' slides | Collect assets | |
| Send out invites | Draft press release | ||
| Send out reminders | Finalize press release | ||
| Send out press kit |
Listing project tasks for critical path identification
Once you have your project tasks laid out, identify any dependencies between them. By outlining the activities that can’t proceed without another’s output, you will establish their correct order more easily.
Here is how we have defined the dependencies for our example above:
| Taks ID | Task | Dependency |
| 1 | Collect contacts for publications | - |
| 2 | Create invite | - |
| 3 | Send out invites | Tasks 1, 2 |
| 4 | Confirm speakers and panelists | - |
| 5 | Check speakers' slides | Task 4 |
| 6 | Outline press release | - |
| 7 | Collect assets | - |
| 8 | Draft press release | Task 6 |
| 9 | Finalize press release | Task 8 |
| 10 | Send out press kit | Tasks 1, 7, 9 |
| 11 | Implement press conference | Tasks 3, 5, 10 |
Defining task dependencies for critical path identification
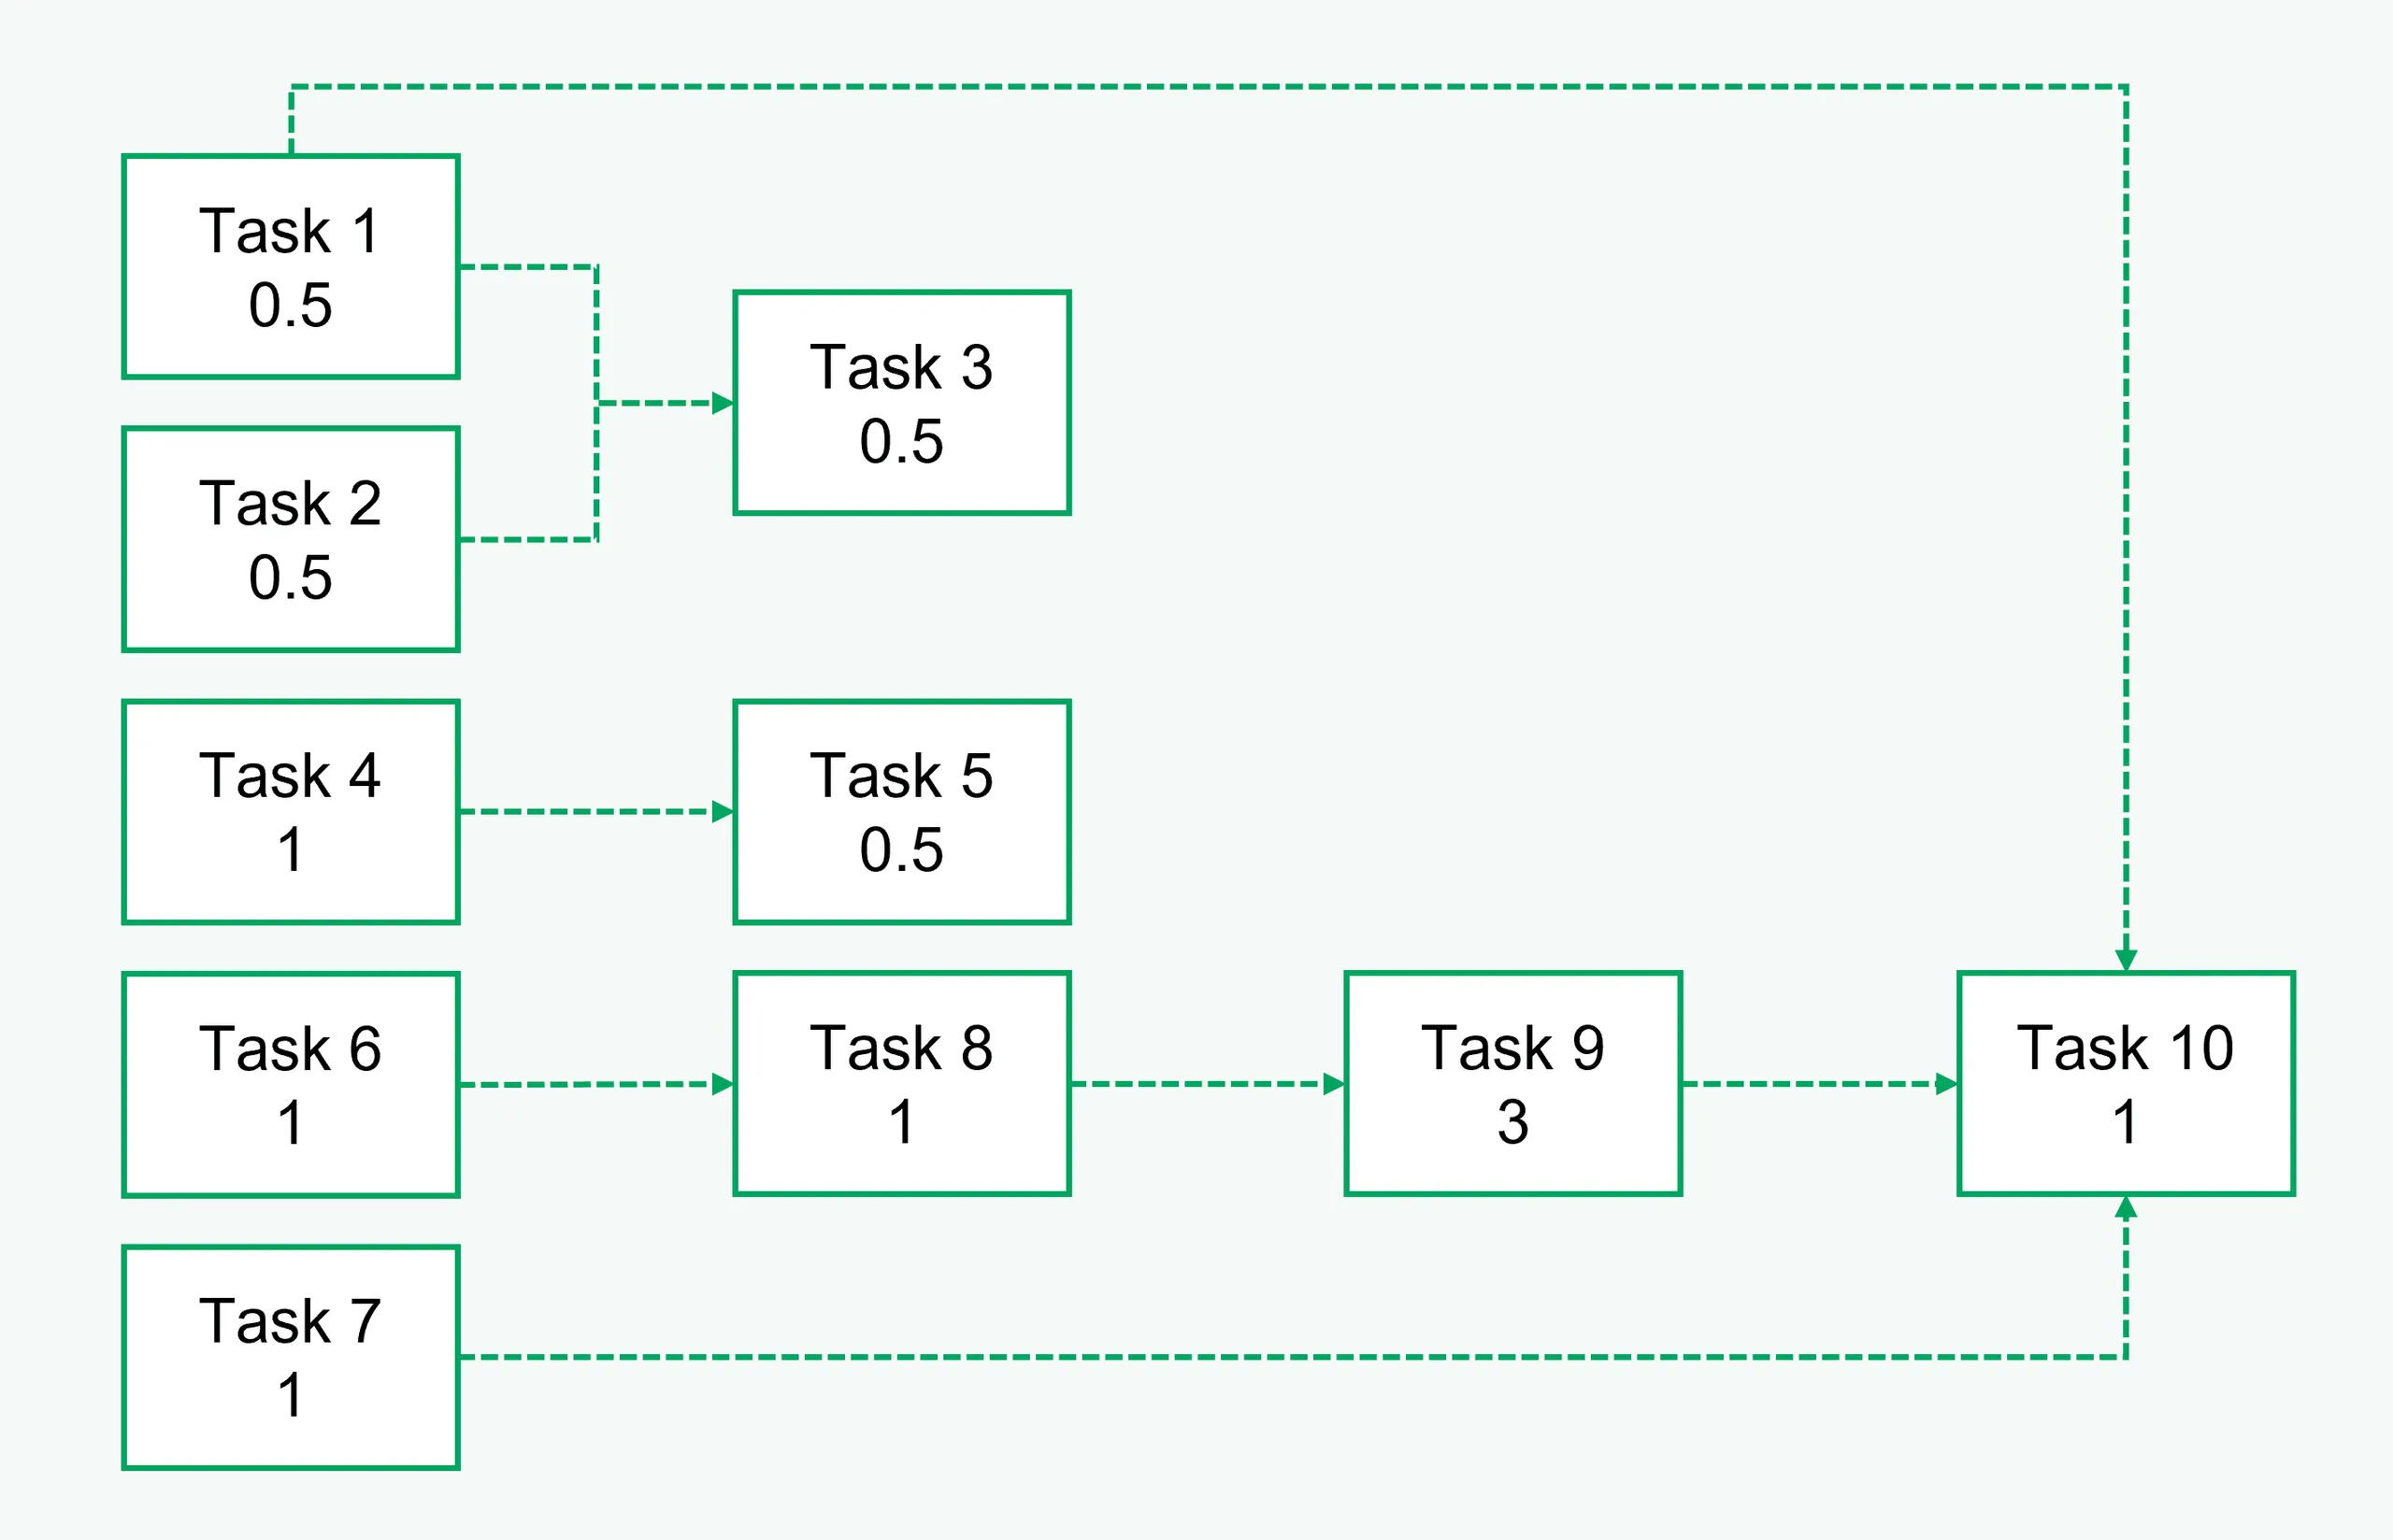
The list of dependent tasks is known as an activity sequence, which will be used to outline the critical path. Based on this, you can also recognize any work that can be done in parallel. For instance, in our case, Task 2, Task 4, Task 6, and Task 7 can run at the same time with Task 1, as they don’t rely on any previous activities.
After ordering your tasks in a clear sequence that takes into account their interdependencies, it’s time to establish an estimate of how long each would take. The measure you use for your tasks’ durations can be days, weeks, or months, depending on how small or complex your project is. For our demonstration, we used days as time units.
| Task ID | Task | Dependency | Duration (days) |
| 1 (Start) | Collect contacts for attendees | - | 0.5 |
| 2 | Create invite | - | 0.5 |
| 3 | Send out invites | Tasks 1, 2 | 0.5 |
| 4 | Confirm speakers & panelists | - | 1 |
| 5 | Check speakers' slides | Task 4 | 0.5 |
| 6 | Outline press release | - | 1 |
| 7 | Collect assets | - | 1 |
| 8 | Draft press release | Task 6 | 1 |
| 9 | Finalize press release | Task 8 | 3 |
| 10 | Send out press kit | Tasks 1, 7, 9 | 1 |
| 11 (Finish) | Implement press conference | Tasks 3, 5, 10 | 0.5 |
Estimating task duration for critical path identification
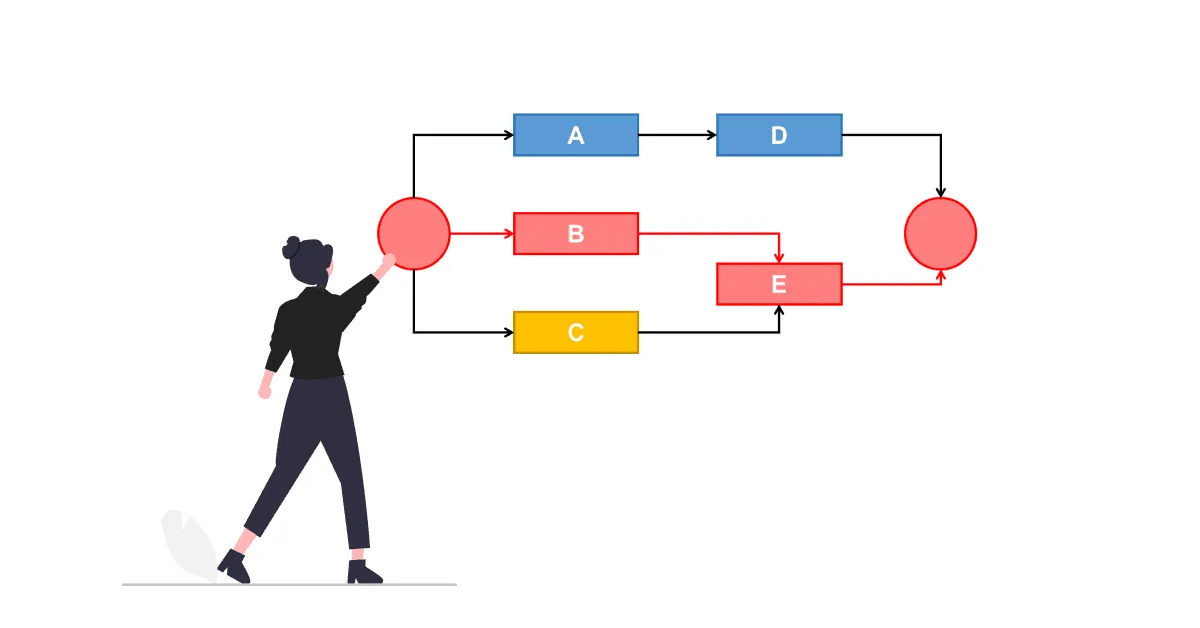
You are now ready to draw the critical path network diagram for your project, which is a flowchart that displays the chronology of your activities. Use boxes and arrows to visually represent your tasks and their dependency relationships, respectively.
Our network diagram looks like this:
As you can see from the image above, Task 1 points to Task 3, for instance, because the latter can only proceed when the former is finished.
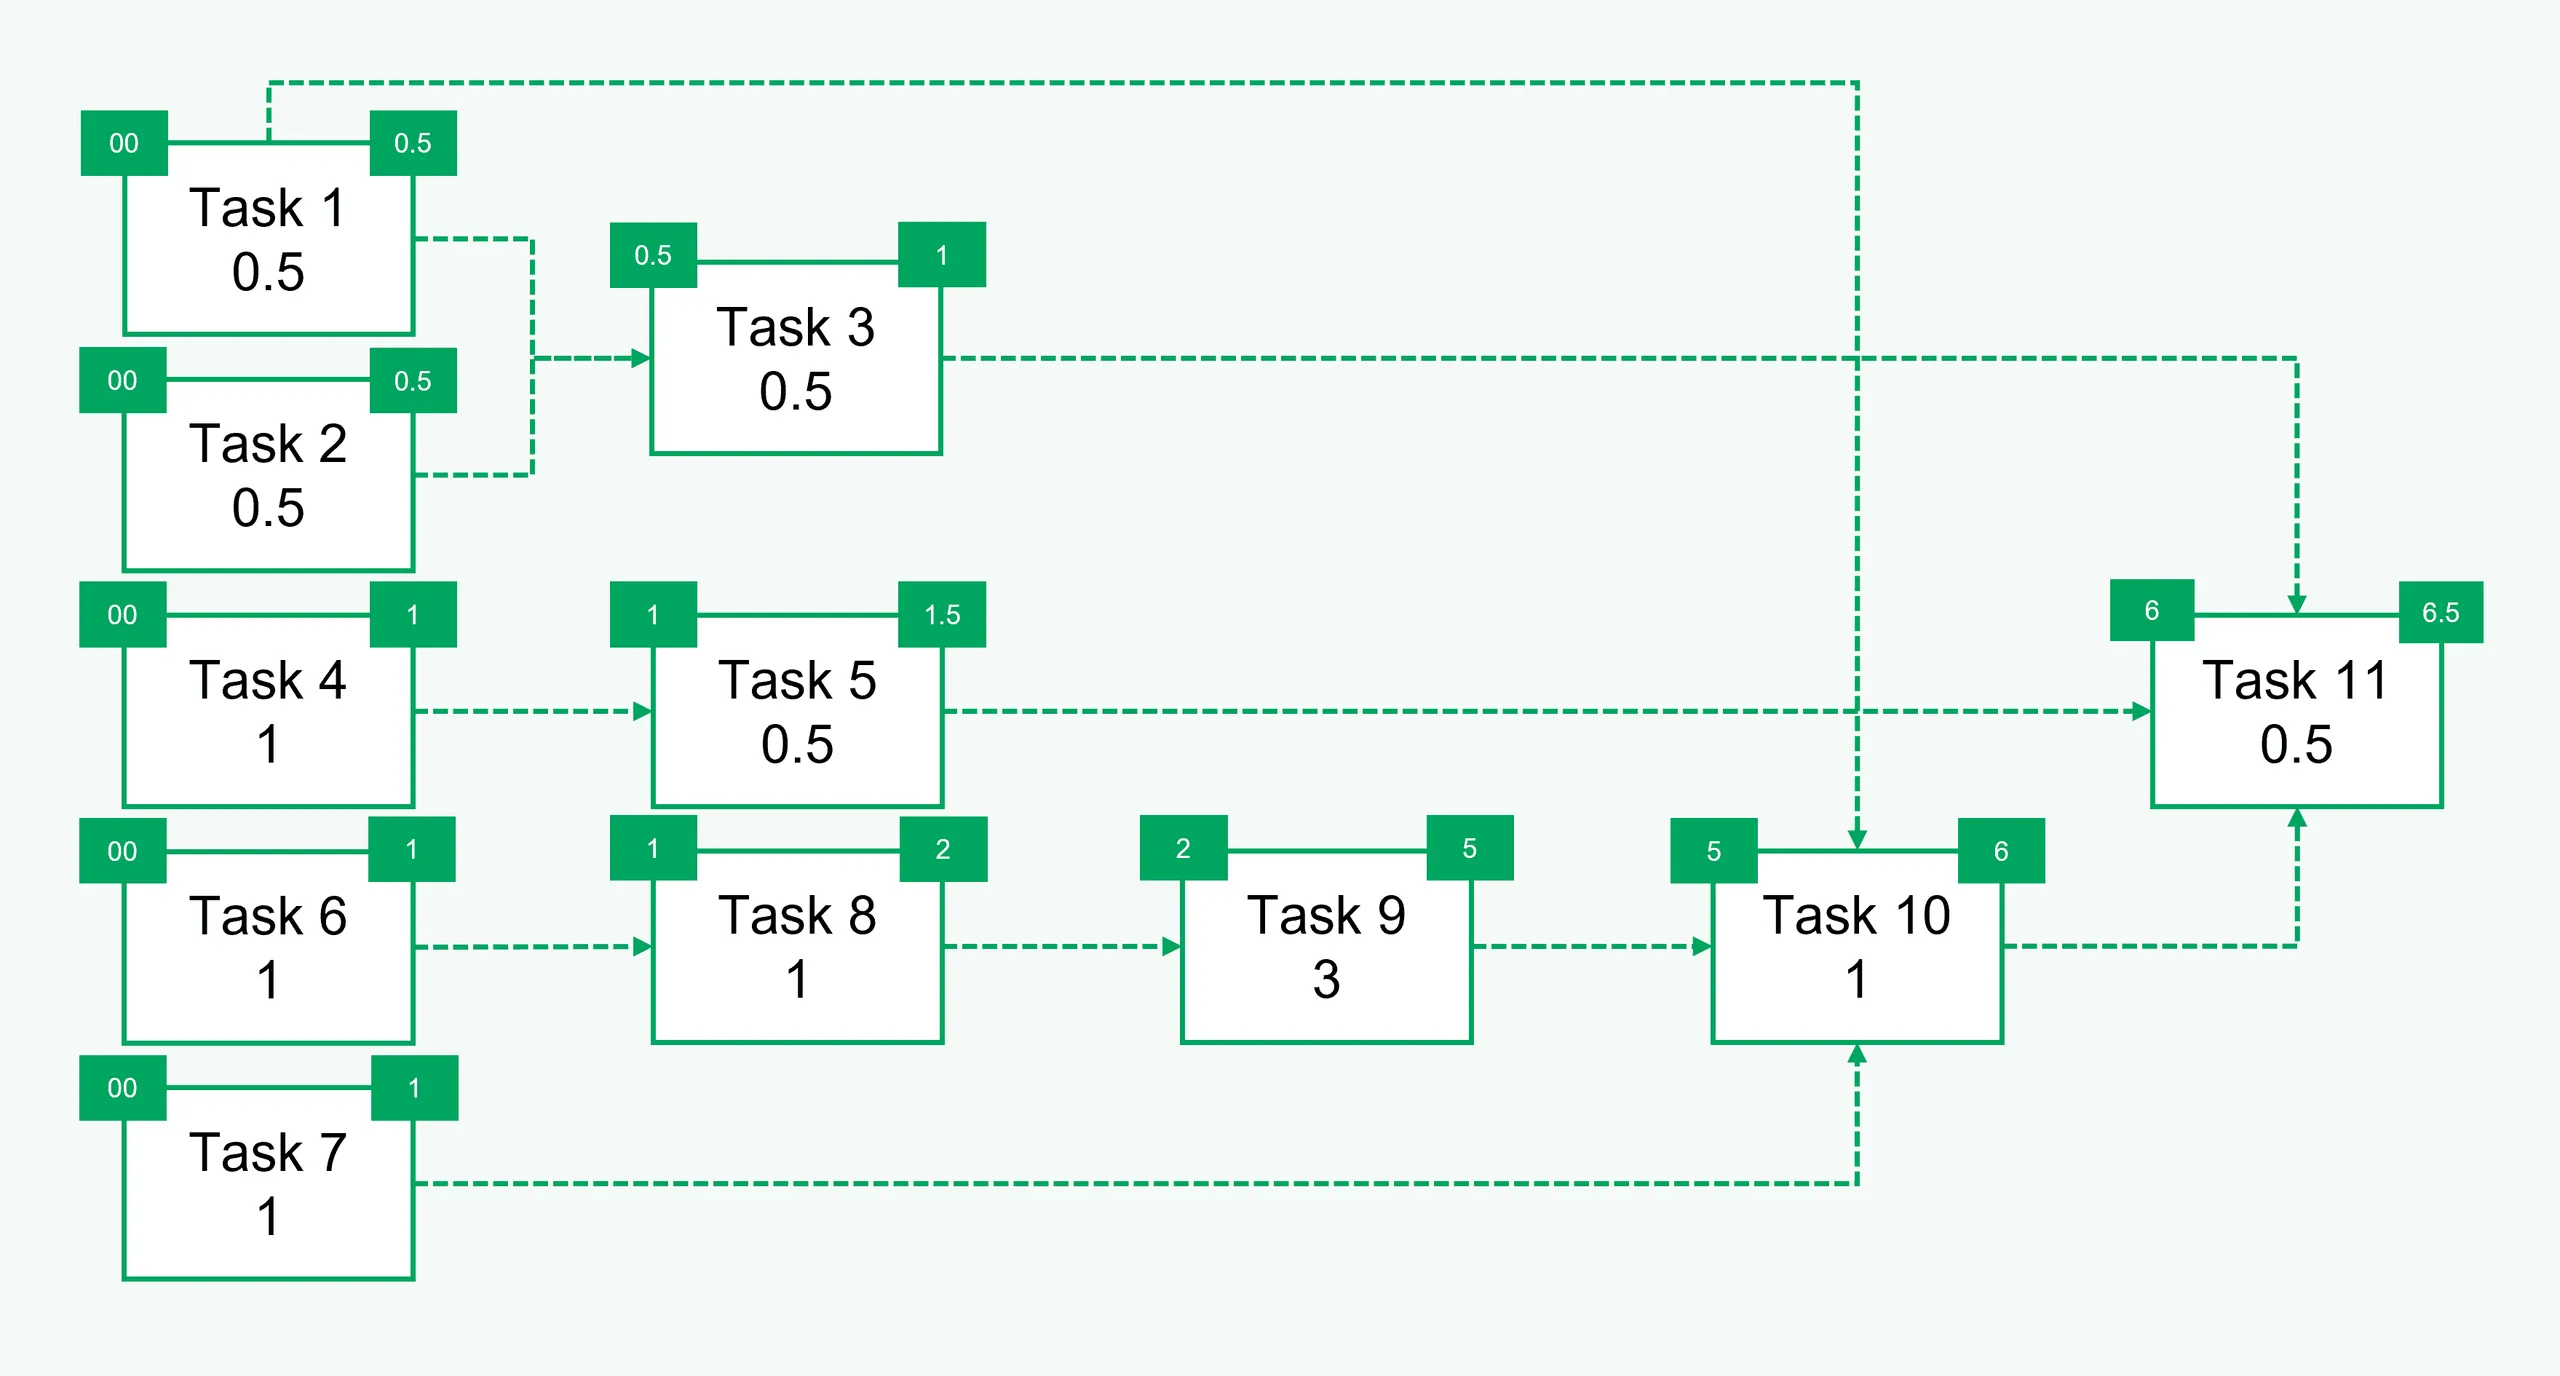
To know your critical path, you will need to look for the longest series of critical activities. To start calculating this, do the following:
Upon applying these to our initiative, it turns out that the critical path consists of the following task series:
Press release outline (Task 6) -> Draft press release (Task 8) -> Finalize press release (Task 9) -> Send out press kit (Task 10) -> Implement press conference (Task 11)
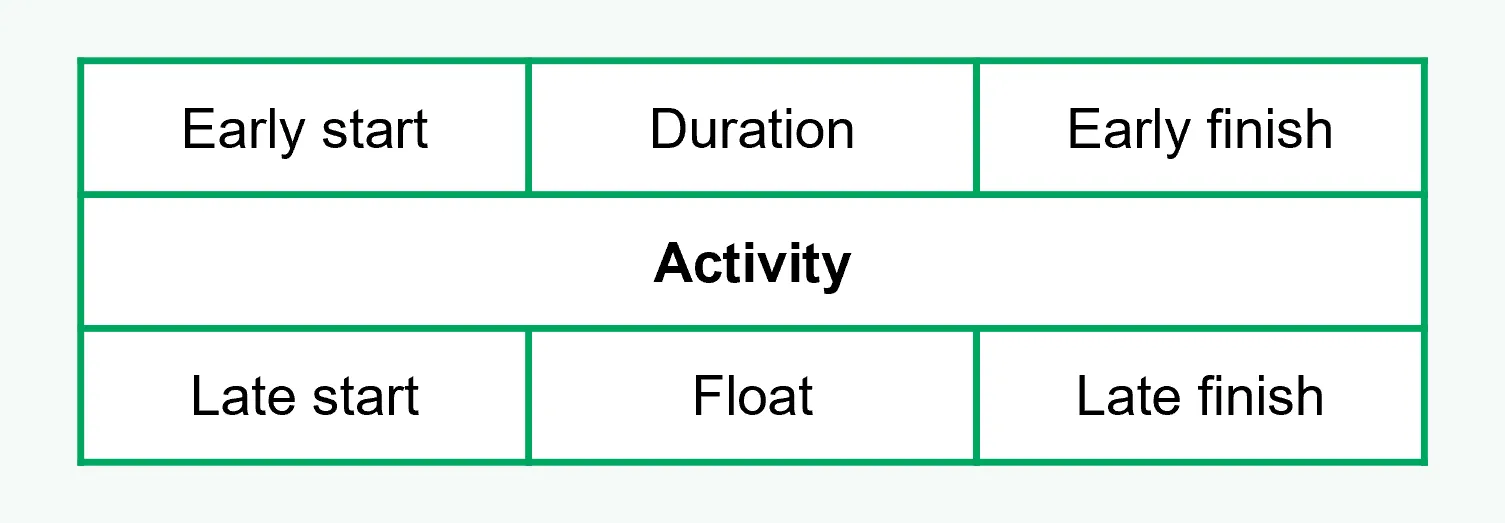
Here are some extra related parameters that can help you refine your critical path analysis process:
To include the values of these parameters in your critical path chart, use the following layout for clarity:
Once you have figured out the critical path, you can start building the actual project schedule around it. As the project progresses, you can monitor the actual completion times for your activities and update the network diagram to include this new information.
This will allow you to have a more accurate, realistic view of the project’s due date, better assess whether you are on track or falling behind, and even to find a different critical path.
To conclude, the ultimate purpose of finding a project’s critical path is so that you can undertake your initiative efficiently and meet your milestones without delays. It will give a powerful way of assessing:
Let’s answer some of the most frequently asked questions on critical paths.
The critical path of a project represents the longest sequence of key tasks required to complete a project. It indicates the minimum time necessary to achieve your final deliverables. In essence, the critical path of a project is a bottleneck route.
Highlighting the series of tasks that are crucial to the project’s successful outcome, it shows project managers where to focus their attention and resources to prevent timeframe problems.

To find the critical path on a network diagram, you first need to make sure the critical path chart you are working on clearly shows:
– All the tasks that make up a project’s work breakdown structure, listed in chronological order.
– All the dependencies that exist between the tasks. Represented by arrows, dependencies will point out the activity sequences that need to happen so that the project could move forward.
– The durations for each of the project activities.
Considering that these preliminary elements are displayed on your diagram, you will find the critical path by looking at the activity sequence with the longest duration.
Finding the critical path is important in project management because it allows project managers to:
– Accurately estimate the total duration of their initiative.
– Understand what tasks are essential and non-essential to the successful delivery of the project.
– Identify task dependencies, resource constraints, and project risks.
– Prioritize tasks and develop realistic project schedules.
– Focus efforts on professional work optimization.
Depending on the nature and complexity of your project, you could resort to various software options to calculate the critical path. However, to choose the best tool that you can use for your specific case, look for a program that allows you to process the following elements:
– Task dependencies (successors and predecessors).
– Durations.
– Start time and end time.
– Slack time.
To discover practical examples of such tools, check out our overview of top 6 critical path analysis software. For more resources on the critical path method in general, please refer to our dedicated website section on the critical path.
Project management tips and tricks
Tagged With:
Critical pathGet the advanced features of Office Timeline free for 14 days.
Read our review of the 6 best critical path analysis tools to effectively plan, schedule, and track your project’s critical path activities.