How do you visually represent progress over extended periods? Vertical timelines arrange data points chronologically along a vertical axis, offering a clear, structured way to show progression over time.
This layout provides a different perspective from traditional horizontal formats, making it easy to follow the sequence of events in project management, historical records, and personal development tracking.
In this article, we’ll explore how vertical timelines work, their practical applications, and offer guidance on designing effective ones. Learn more about timelines and explore our full collection of timeline types to discover different ways to visualize information and communicate progress clearly.
What is a vertical timeline?
A vertical timeline displays a sequence of events from bottom to top (or sometimes top to bottom) along the y-axis of a page or screen. Instead of spreading horizontally from left to right as in traditional timelines, events are stacked vertically with a chronological progression.
This vertical orientation mimics natural growth patterns – plants grow upward, buildings are constructed from the ground up. This visual metaphor makes time line vertical formats particularly effective for showing development and advancement.

Vertical timelines organize information such as:
- historical events in chronological order,
- project milestones from inception to completion,
- personal growth from beginning stages to mastery,
- important upcoming dates and events,
- funding progress tracking.
Unlike horizontal timelines that may be limited by page width, vertical timelines can accommodate longer time periods by simply extending further down (or up) on a page or screen. This makes them well-suited for comprehensive histories or detailed project plans.
Why choose a vertical timeline?
Vertical timelines shine in several situations where horizontal ones fall short:
- They feel right at home on phones and tablets. Think about how you use your phone - you scroll up and down, not sideways. When someone views your vertical timeline on mobile, they can simply flick their thumb to see the whole story unfold. No awkward side-scrolling or pinching required.
- They give breathing room for your descriptions. With a vertical layout, each event gets its own horizontal space. You can include a paragraph about an important milestone without worrying about crowding the next event. We've found this especially valuable when creating timelines for complex projects where context matters.
- They fit where horizontal timelines can't. Those narrow spaces in your documents and websites? Perfect for vertical timelines. The sidebar of your annual report, the margin of your case study, or that empty space on the right side of your presentation slide – all these spaces are tall but not wide.
- They visually reinforce growth and progress. We naturally associate upward movement with improvement. When you're showing how something developed or improved over time, the upward flow of a vertical timeline subtly reinforces this message. This psychological alignment makes vertical timelines particularly effective for showing advancement.
- They handle time clusters gracefully. Real-world timelines rarely have events spaced at perfect intervals. Maybe nothing happened for three years, and then five major developments occurred in six months. Vertical layouts adapt to these uneven distributions more naturally, expanding where needed without looking unbalanced.
- They make room for parallel tracks and branches. Need to show two related streams of events happening simultaneously? Vertical timelines can branch out horizontally while maintaining their overall flow. This works better visually than trying to add vertical branches to a horizontal timeline.
- They stand out from the crowd. Most people default to horizontal timelines. When you use a vertical format thoughtfully, your presentation becomes more memorable simply by being different in a purposeful way.
How to design an effective vertical timeline
Creating an impactful vertical timeline involves several specific design decisions:
- Choose your direction
Decide whether your timeline will flow from bottom to top (showing growth) or top to bottom (showing progression through steps). - Start with the oldest date
Begin with the earliest event at the chosen end and work chronologically. - Plan event and line placement
Space events carefully, using graphics to balance the design and create visual interest. - Make dates prominent
Ensure dates stand out by making them bold, larger, or a contrasting color from other text. - Consider proportional spacing
Use equal spacing for equal time periods where possible to create an accurate visual representation. - Implement purposeful color
Use a color scheme that either categorizes different types of events or creates a cohesive visual flow. - Write concise descriptions
Keep event descriptions brief but informative, focusing on key information. - Add visual elements
Include relevant icons, images, or illustrations to improve understanding and engagement.
Practical methods to create a vertical timeline
So you've decided a vertical timeline is the right choice for your project. Great! Now comes the fun part – actually building it. You have several good options depending on what software you're comfortable with and how much customization you need. Let's walk through the most practical methods, starting with tools many of us already have on our computers.
Using spreadsheet software
Excel and Google Sheets might not seem like obvious choices for timeline creation, but they're surprisingly powerful for this task. We've created dozens of professional timelines using just spreadsheets.
Here's how to turn your data into a vertical timeline:
- Start with a simple table of your events and dates
- Create an X-Y Scatter Plot (this gives you precise control over positioning)
- Add data labels to show what each point on your timeline represents
- Use error bars to create the actual vertical line connecting your events
- Format your markers and labels to look less like a chart and more like a timeline
- For historical timelines, customize your number formats to handle dates like "15,000 BC"
Here's a sample of how to organize your data:
| Date | Event | Description |
| 2026-01-15 | Project kickoff | Initial team meeting and scope definition |
| 2026-03-22 | First prototype | Completion of minimal viable product |
| 2026-06-10 | Beta testing | Release to limited test audience |
| 2026-09-05 | Official launch | Public release of product |
This might look like a boring table now, but once you transform it into a chart and apply some formatting, you'll be surprised at how professional it can look. The biggest advantage of the spreadsheet approach is that when your dates change (and they always do), updating your timeline is as simple as changing a cell value.
Using presentation software
PowerPoint and Google Slides offer a more visual, drag-and-drop approach to timeline creation. Most people find this method more intuitive than working with spreadsheet charts.
When you create vertical timelines in presentation software, you get:
- designs that match your existing presentation style,
- easy editing that doesn't require formula knowledge,
- simple export to other formats like PDF or images,
- the ability to animate events for revealing information gradually.
Creating a basic vertical timeline in PowerPoint is straightforward:
- Draw a vertical line using the Shapes tool.
- Add circles or other markers at each event point.
- Type your event descriptions in text boxes next to each marker.
- Group related elements together so they move as one unit.
- Apply colors and styles that match your brand or presentation.
The main downside? When dates change, you'll need to manually reposition everything. That's fine for stable timelines but can get tedious for project plans that change frequently.
Using dedicated vertical timeline maker tools
If you create timelines regularly, specialized tools can save you tons of time. These timeline makers are designed specifically for creating professional-looking timelines with minimal effort.
The process typically goes like this:
- Pick a vertical template that matches your style.
- Click to add events (usually with a + button).
- Enter your dates and descriptions.
- Customize colors, fonts, and spacing.
- Export or share your finished timeline.
Some popular options worth considering:
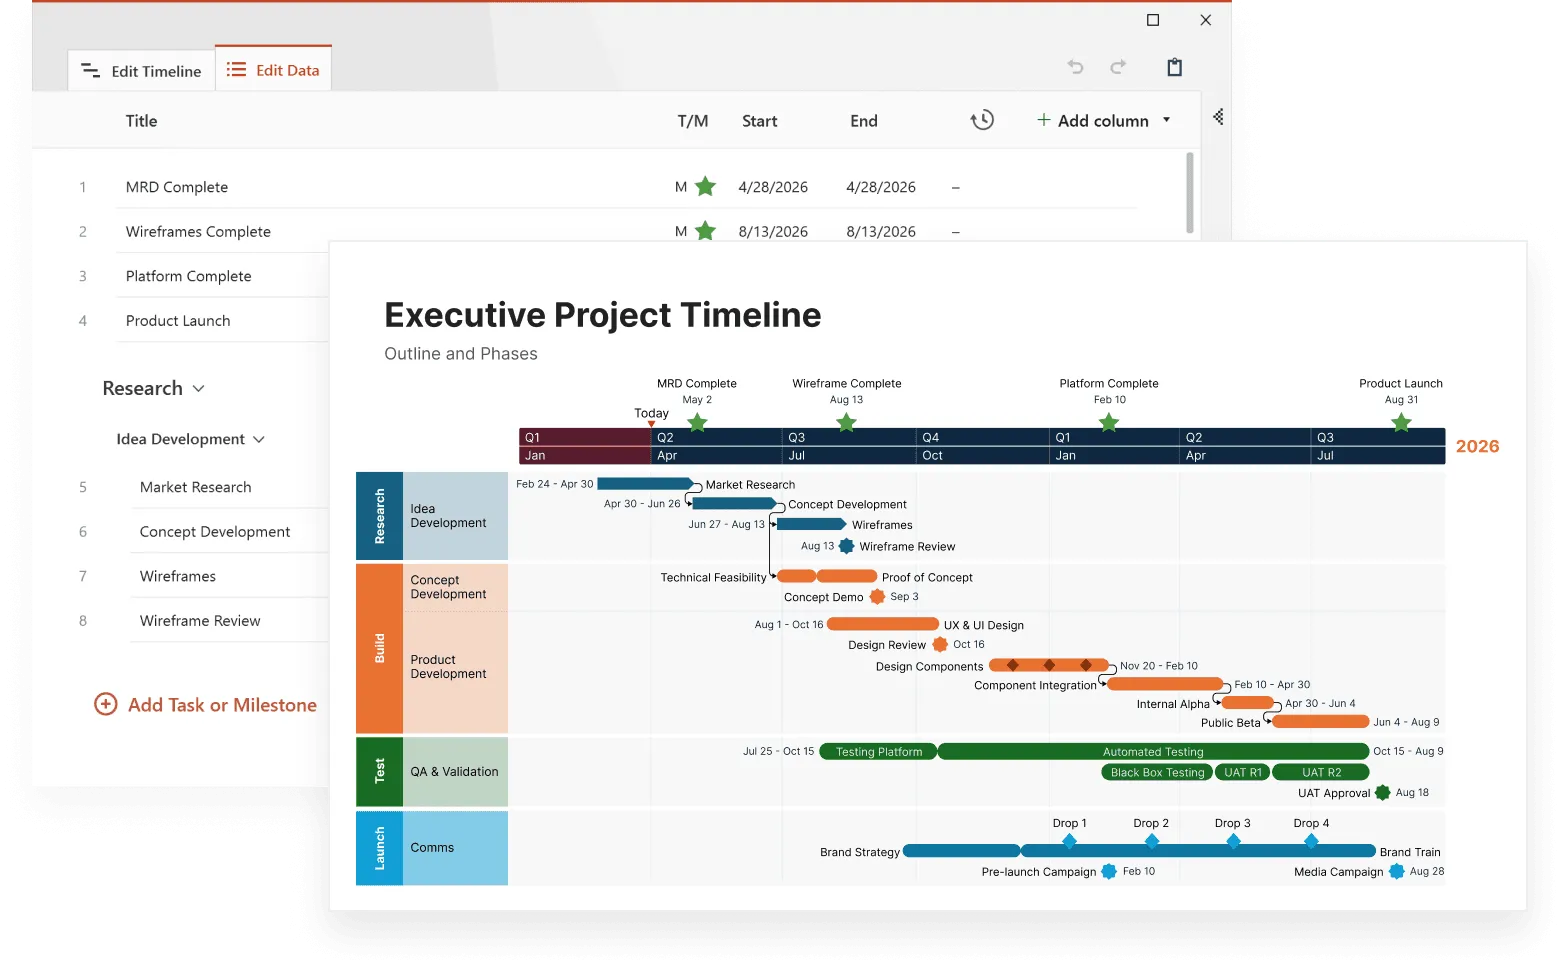
- Office Timeline: Creates timelines right inside PowerPoint with a simple ribbon interface
- Venngage: Offers beautiful templates with drag-and-drop customization
- Canva: Provides an easy design experience with plenty of visual options
- TimelineJS: Builds interactive timelines perfect for websites and online presentations
The best part about dedicated tools is how quickly you can create professional results. What might take an hour in PowerPoint often takes just minutes in a specialized timeline maker.
Create timelines in minutes
Try Office Timeline for free. Build clear, professional timeline visuals directly in PowerPoint.
Where vertical timelines work best: practical applications
Vertical timelines shine in specific situations where you need to show progression clearly. Let's look at where they make the most sense and how real organizations use them effectively.
Project management
When your team needs to see what's happening when, vertical timelines create a clear roadmap. We've seen project managers use them in kickoff meetings to set expectations about phases and deadlines. The vertical format works well in meeting rooms where everyone can see the full project scope projected on a wall.
Historical documentation
Museums and educational websites often use vertical timelines to show how events connect across time. The Smithsonian's online exhibits frequently use this format to help visitors understand how earlier events influenced later developments.
Corporate history
Companies celebrating anniversaries or major milestones often create vertical timelines for their websites and annual reports. These visual histories help new employees understand the company's background and give long-time staff a reminder of how far they've come together.
Personal development records
Professional portfolios and LinkedIn profiles increasingly include vertical timelines to illustrate career progression. The upward flow naturally communicates growth and advancement, making it perfect for showing how your skills and experience have built over time.
Product development visualization
When explaining how a product evolved through various versions, vertical timelines help customers understand the improvement process. They work particularly well for software companies showing feature additions across multiple releases.
Educational materials
Teachers create vertical timelines to help students grasp historical periods, scientific discoveries, or literary movements. The format helps students connect cause and effect across time periods, improving comprehension and retention.
Team coordination
For teams working on complex, multi-phase projects, vertical timelines posted in common areas keep everyone informed about upcoming deadlines and deliverables. The visual format makes it easier to spot potential bottlenecks or conflicts before they become problems.
Comparing vertical vs. horizontal timelines
Choosing between vertical and horizontal layouts makes a big difference in how effectively your timeline communicates. Each format has distinct advantages depending on where and how people will view your information.
| Aspect | Vertical timeline | Horizontal timeline |
| Space requirements | Works well in narrow spaces like sidebars | Needs wider space but can be shorter |
| Phone & tablet viewing | People naturally scroll down on mobile devices | Requires users to swipe sideways, which feels less natural |
| Handling many events | Can extend downward as long as needed | Limited by screen or page width |
| Visual metaphor | Suggests climbing, advancement, and growth | Conveys forward movement and progress |
| Natural reading flow | Works against typical reading patterns in Western cultures | Follows the familiar left-to-right reading direction |
| Information density | Usually allows more text for each event | Often requires briefer descriptions due to width constraints |
We've noticed that vertical timelines work particularly well for websites and digital presentations, while horizontal formats often shine in printed materials and slide presentations. The best choice depends on your specific situation, including who will see your timeline and where they'll view it.
Practical tips for vertical timeline creation
After creating hundreds of vertical timelines for various clients, I've noticed patterns in what works and what causes problems. Here are my most practical recommendations:
- Know your purpose first: Before opening any software, write down exactly what story your timeline needs to tell. Is it showing progress? Explaining cause and effect? Setting expectations? This clarity prevents feature creep.
- Be ruthlessly selective about events: Most effective timelines include 7-10 major events. Including too many dilutes the impact of truly important moments. Ask yourself: "Will removing this event change the overall story?" If not, consider cutting it.
- Check readability in real conditions: Text that looks fine on your 27-inch monitor might be impossible to read on a phone or when printed. Test your timeline on the actual devices and in the environments where people will use it.
- Plan for updates from the start: Timelines often need updates as projects evolve or new historical information emerges. Choose creation methods that don't require rebuilding from scratch when you need to add or change items.
- Find the right text-visual balance: I've seen timelines that look like wall-to-wall paragraphs and others that are pretty but content-free. Aim for concise text paired with meaningful visuals that reinforce your message.
- Create breathing room: White space isn't wasted space—it helps people focus on what matters. Give each event enough room to stand on its own, especially important milestones.
- Keep your formatting consistent: Use the same text size, color scheme, and layout for similar items throughout your timeline. This consistency helps people process information more quickly.
- Add a brief orientation: In just 2-3 sentences at the top, tell viewers what they're looking at and why it matters. This orientation helps people understand the timeline's purpose and importance from the first glance.
During a recent project for a tech company's 25th anniversary, we applied these principles to create a vertical timeline that employees stopped to read every day when passing through the lobby.
The timeline highlighted just eight defining moments in the company's history, but those carefully selected events told the complete story of how the organization evolved.
Conclusion
Vertical timelines show progression in a way that makes intuitive sense to most people. The upward movement naturally feels like advancement, which is why so many organizations use this format to tell their stories of growth and development.
I've seen vertical timelines work effectively in many different contexts. Project managers use them to keep complex initiatives on track. Marketing teams create them to showcase company history. Teachers use them to help students connect historical events. Even individuals create them to document personal and professional growth.
If you're ready to build your own vertical timeline, start with the basics: identify the story you want to tell, pick the most important events (being selective is better than including everything), choose a design approach that fits your purpose, and select tools you're comfortable using.
The most effective timelines I've seen share certain qualities: they're clear, visually interesting, and focused on telling a specific story rather than cramming in every possible detail. Aim for these qualities in your own timeline, and you'll create something that people actually want to read and remember.
Look for our next article in this series, where we'll explore interactive timelines that allow users to zoom, filter, and explore chronological information in new ways.
Frequently asked questions about vertical timelines
Got questions about building and customizing vertical timelines? This section offers answers to some common questions on this topic.
For a basic timeline with 8-10 events, expect to spend 1-2 hours if you're using familiar tools. Using dedicated timeline software can cut this time in half. More complex timelines with custom graphics might take 3-4 hours. The biggest time factor is usually collecting and verifying the dates and information, not the actual timeline creation.
Yes, but it's not just a matter of rotating the design. Vertical timelines typically need different spacing and layout considerations. The most effective approach is to start with your original event data and rebuild the timeline in vertical format rather than trying to transform the horizontal design directly.
When some periods have many events while others have few, consider using a non-linear time scale. You might compress long, uneventful periods while expanding event-rich timeframes. Just be sure to visually indicate this compression with breaks in the timeline or explanatory notes so viewers understand the time scale isn't consistent.
For digital timelines, include proper alt text describing the timeline's purpose and main events. Ensure text has sufficient contrast with background colors (at least 4.5:1 ratio). Structure the underlying data so screen readers can access the information in chronological order. For printed timelines, consider providing an accompanying text summary that covers the key events and their significance.