Timelines display events in chronological order, presenting information visually in a clear and organized manner. A basic timeline is an excellent tool for tracking project milestones, documenting historical events, or planning personal goals, transforming complex information into an easy-to-understand visual representation.
This step-by-step guide walks you through the timeline creation process, from planning to execution. You'll learn about different layouts, practical tools, and design tips to make your timeline both informative and visually appealing.
For a broader overview of how timelines are used in history, education, projects, and everyday life, check out our introduction to timelines.
Understanding timelines
A timeline is a visual representation that shows a sequence of events arranged chronologically along a line. Timelines place dates and events in order, allowing you to see how they relate to each other over time.
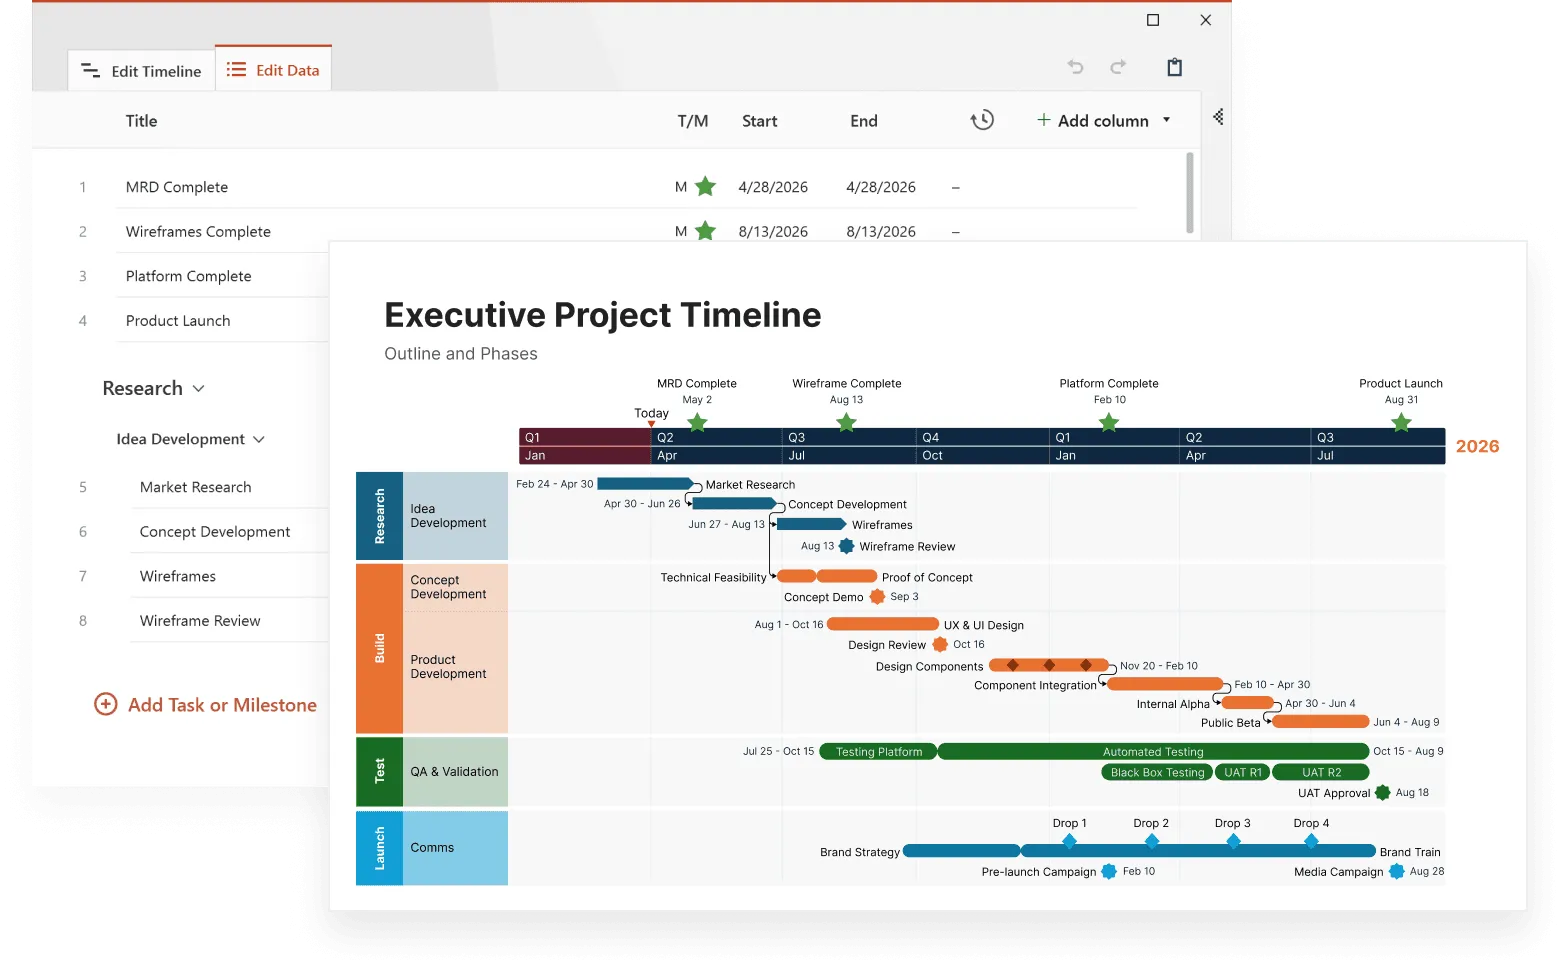
In project management, timelines show when tasks should be completed and help team members understand deadlines. They make project scheduling concrete by illustrating what needs to happen and when.
A well-designed timeline shows specific events alongside their scheduled dates, revealing how activities unfold within a set timeframe.

Timelines work well beyond project management too. They document historical events, track personal milestones, map out business plans, and establish practical expectations for any time-based process. Whether you choose a simple linear design or something more elaborate, timelines effectively highlight important dates and developments.
Getting started with your timeline
Creating a simple timeline requires some initial steps that are needed before you start to create your timeline. The following steps will guide you through planning, gathering data, choosing a layout, identifying your audience, leading finally to the process of timeline creation that we’ll explain in detail from start to finish.
Planning your timeline
Before creating a timeline, take time to plan its structure and content. First, determine its purpose: Are you documenting project phases, historical events, or personal achievements? Your goal will guide which events to include and what time period to cover.
After clarifying your purpose, compile the specific incidents or tasks for your timeline. This means identifying significant milestones relevant to your objective. Developing an organized layout now will improve both the visual design and information clarity later.
Finally, establish clear start and end points to frame your timeline appropriately. Whether you're building a comprehensive project schedule or a simple chronological outline, thoughtful planning creates informative and visually appealing timelines.
Gathering your data
Collecting accurate information forms the backbone of an effective timeline. Begin by gathering all relevant dates, events, and details related to your subject. This might involve reviewing project notes, interviewing participants, or researching historical facts. Be thorough - missing important milestones creates gaps in your chronology.
Once you've collected your data, arrange everything in sequential order to visualize how your timeline will flow. List each milestone or event using bullet points for clarity. Consider adding images or symbols to complement the written information - these visual elements make your timeline more engaging and help communicate your message effectively.
Choosing a timeline layout
Selecting the right layout significantly impacts how clearly your information comes across. Common timeline formats include:
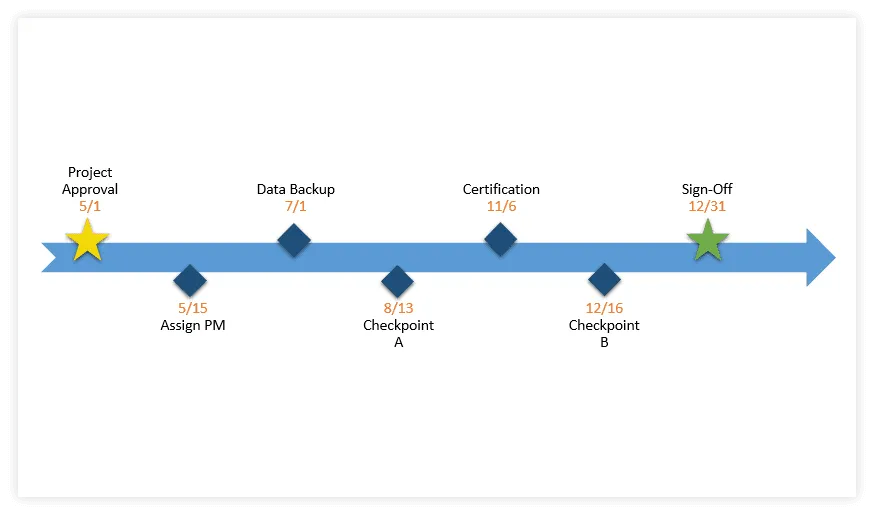
- Linear (horizontal): The most traditional format, showing events from left to right,
- Vertical: Events flow from top to bottom,
- Circular: Good for cyclical processes or recurring events.
When selecting a layout, consider both your audience and the purpose of your timeline. Different formats work better for different scenarios: linear designs excel at showing sequential progression, while circular layouts might better represent repeating processes.
By choosing a layout that matches your objectives and resonates with your audience, your timeline will effectively communicate information while keeping viewers engaged.
Identifying your audience
Understanding who will use your timeline determines how you should design it. Adjust the detail level and complexity to match your audience's needs. Technical teams might prefer comprehensive data, while general audiences respond better to straightforward, visually engaging presentations.
Use graphics that appeal to your intended viewers to increase engagement. Modify the amount of information based on their familiarity with the subject matter. This audience-centered approach ensures your timeline clearly communicates its intended message.
Creating your timeline: step-by-step
Now that you've planned your timeline and gathered your data, it's time to bring your timeline to life with these steps.
Selecting your tools
The first step in creating your timeline is choosing the right tool. Options range from digital software to manual methods:
- Digital tools: a professional timeline making tool like the Office Timeline add-in for PowerPoint, or project management software, like Asana or Trello.
- Online timeline makers: Office Timeline Online, Canva, Adobe Express or Google Sheets.
- Manual methods: Paper, whiteboards, poster board.
Your choice should match both your technical comfort level and the timeline's purpose. Simple personal timelines might work well with manual methods, while complex project timelines benefit from specialized software.
Start your first timeline easily
Try the Office Timeline add-in for free. Create simple, polished timelines in minutes with templates designed for beginners.
Defining the scale and duration
Next, determine your timeline's scale - the time increments you'll use (days, weeks, months, years). This decision depends on your timeline's overall duration and the level of detail needed.
Set clear start and end dates to establish boundaries. A project timeline might span several weeks or months, while a historical timeline could cover decades or centuries. The appropriate scale makes your timeline both accurate and readable.
Adding events chronologically
Place all events on your timeline in chronological order, including comprehensive descriptions with essential information. For clarity:
- List each event with its corresponding date.
- Add brief but informative descriptions.
- Use consistent date formatting throughout.
- Apply color codes or symbols to categorize different types of events.
This organization helps viewers quickly understand what happened and when.
Illustrating connections
If your timeline includes related events, show these connections using arrows or lines. This visual technique illustrates dependencies between activities and helps viewers understand cause-and-effect relationships.
Highlight particularly important milestones using different colors, larger text, or distinctive symbols. These visual cues draw attention to central events that deserve special focus.

Practical timeline tools for every skill level
From familiar office software to dedicated timeline platforms, these accessible tools provide various approaches to timeline creation based on your specific needs and technical comfort.
Creating a timeline in Microsoft Word
Microsoft Word offers several built-in features that make timeline creation straightforward, even for beginners with no design experience.
Using SmartArt
Begin by opening a new document and switching to landscape orientation, which provides more horizontal space for your timeline.
Access the SmartArt feature through the Insert tab to find timeline-specific templates. Word offers several options, including Basic Timeline and Circle Accent Timeline, which you can customize to suit your needs.
Inserting SmartArt and selecting a layout
To add SmartArt in Word:
- Click the Insert tab.
- Select SmartArt.
- Choose a timeline layout from the Process category (Basic Timeline works well for simple chronologies).
The Basic Timeline layout accommodates up to seven key events, making it perfect for straightforward chronologies.
Adding your data
Use the text pane that appears alongside your SmartArt graphic to input information. Type your dates and event descriptions in the provided fields. You can customize the design by modifying colors, shapes, and text formatting through the SmartArt Design tab.
This method offers a quick way to create professional-looking timelines without advanced design skills.
You can find detailed step-by-step instructions in our tutorial on how to make a timeline in Word.
Using online timeline makers
Online timeline creators simplify the process with user-friendly interfaces and flexible templates. Platforms like Office Timeline Online, Adobe Express and Canva allow you to either build timelines from scratch or modify existing templates.
These tools feature intuitive drag-and-drop interfaces that make it easy to customize layouts and add graphic elements. They offer various design options, letting you select styles based on type, color schemes, and aesthetic preferences.
Office Timeline Online
Office Timeline Online is a web-based application that allows project managers to create and share timelines and Gantt charts directly from their browsers. Unlike its PowerPoint add-on counterpart, this platform works across operating systems and accommodates a wider range of users.
This tool particularly benefits Mac users or individuals with limited computer permissions. It offers simple sharing options and team collaboration through view-only web links while allowing assignment of specific project responsibilities among team members.
With Office Timeline Online, you can manage your timeline remotely, making changes and updates regardless of your location.
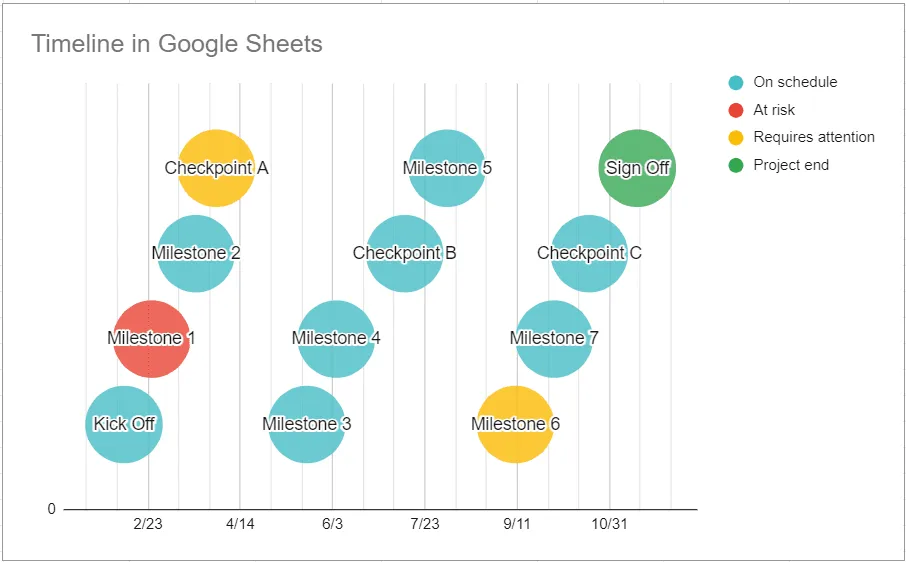
Creating a timeline in Google Sheets
Google Sheets offers powerful charting features that make creating interactive timelines straightforward and visually appealing.
Using charts
Create a professional timeline in Google Sheets by following these steps:
- Enter your timeline data in three columns: dates in column A and events in column B and plotting numbers in column C.
- Select all the columns of data including headers.
- Click Insert > Chart.
- In the Chart Type menu, select the Bubble chart option under the Scatter category.
- Format your chart.
- Click on the Chart Area to select it and drag its sizing handles to customize height and width.
- Adjust the Vertical Axis to make the uppermost milestones fully visible.
This method creates an interactive timeline that displays events in chronological order with clear date markers.
Customize your timeline
To customize your timeline's appearance, go to the Customize tab in the Chart Editor. You can set a different color for your milestones, texts, or dates, change sizes and fonts, or add a chart title
- Change the colors of data points to categorize different types of events.
- Add or remove gridlines.
- Adjust the chart size to fit your needs.
- Use text formatting options to highlight important events.
If you need more advanced features for complex timelines, consider using conditional formatting on your data points to automatically color-code events based on their categories or importance.
For complete instructions on how to create a timeline in Google Sheets, check out our guide on how to make a timeline in Google Docs and Google Sheets.
Adobe Express
Adobe Express provides a robust solution for creating timelines. Start by searching for “timeline” to access pre-designed templates that you can customize with images and icons. Additional design elements are available for more personalized customization.
Using Adobe Express allows you to create and share your timeline with minimal effort, improving both its appearance and impact.
Canva
Canva's timeline maker features an extensive media library and intuitive interface. Begin by searching for “Timeline infographics” to find relevant resources. With pre-designed templates and various graphic elements at your disposal, you can easily customize your timeline using Canva's drag-and-drop editor.
This tool makes creating visually appealing timelines accessible even without design experience.
Tips for effective timelines
Creating a timeline that communicates clearly requires thoughtful design choices and content decisions that enhance understanding without overwhelming your audience.
Select events carefully
Be selective about which events to include. Focus on significant milestones and avoid overcrowding your timeline with excessive details. Use clear, straightforward language and concentrate on major developments so viewers can easily follow the progression.
Incorporate visual elements
Add colors, symbols, and images to increase understanding and maintain viewer interest. Consistency in design elements creates visual harmony across your timeline. Highlight important milestones and deadlines to distinguish central events from less significant ones.
Keep the timeline updated
Regularly incorporate new developments to maintain your timeline's relevance and accuracy. Establish effective methods for collaboration and distribution to ensure your timeline reaches its intended audience efficiently, whether shared digitally or physically.
Practical applications of timelines
Timelines are versatile tools that serve various purposes across different settings. They organize chronological information visually, making it easier to understand relationships between events and track progress over time. Here's how timelines function in professional, educational, and personal contexts.
Project management
In project management, timelines provide clear visual representations of task schedules, milestones, and deadlines. They help teams see the complete project trajectory, including dependencies between tasks and critical path activities. When unexpected changes occur, timelines allow for quick adjustments and help communicate these changes to all stakeholders.
Project managers use them to allocate resources efficiently, monitor progress, and ensure all team members understand their responsibilities within the broader project context.
Education
In educational settings, timelines help students understand historical sequences and cause-effect relationships. By placing events in chronological order, they reveal patterns and connections that might otherwise be missed when studying isolated facts.
Teachers use timelines to illustrate how scientific discoveries, literary movements, or historical developments unfolded over time. For research projects, timelines help students organize information systematically and present findings in a logical sequence.
Personal use
On a personal level, timelines can track life events, goals, and achievements. They provide structure for planning future activities while documenting past accomplishments.
People use timelines for various purposes - from planning education and career paths to organizing family events and travel itineraries. They serve as both planning tools and visual records of personal progress.
Timelines work effectively for different cognitive styles and information needs. They transform disconnected dates and events into coherent narratives, making complex temporal information accessible and meaningful across diverse applications.
Conclusion
Creating your own timeline doesn't have to be complicated. We've walked through all the steps - from planning what goes on your timeline to picking the right tool for the job. The key is starting with clear goals and thinking about who will use your timeline.
You've got options! Microsoft Word works great for simple projects, Google Sheets offers more data flexibility, and platforms like Adobe Express and Canva provide eye-catching designs with minimal effort.
Whichever method you choose, remember that a good timeline tells a story through time, helping people connect the dots between events in ways that make sense. You can put these ideas into practice yourself and build timelines that communicate exactly what you need them to.
Choose a timeline layout based on your audience and purpose. Select a format that effectively shows the sequence of events or highlights project phases according to these specific needs.
Create timelines using Microsoft Word, Google Sheets, or online tools like Adobe Express, Canva, or Office Timeline Online. These options offer various customization features to match your requirements and technical comfort level.
Collect all relevant details, events, and dates through thorough research. After gathering this information, arrange it chronologically. Identify the main milestones and dependencies when building a comprehensive timeline.
Consistently refresh your timeline to keep it relevant and accurate, capturing all significant updates and new developments. This routine helps you stay organized and informed.