Want to turn your overwhelming research project into something manageable? This guide shows you exactly how to create a timeline that keeps you organized and on track from start to finish. You'll learn how to break down big tasks, set realistic deadlines, and handle problems when they come up.
Creating a good research timeline helps you handle complex tasks and keeps your project moving forward. The most important parts include: setting clear goals, marking key milestones, and making sure you have what you need to get each task done. Being flexible and staying in touch with your team helps you deal with surprises and keeps everything running smoothly.
Feeling lost in your research project?
Starting a research project can feel like staring at a huge mountain you need to climb. You know you need to get to the top, but the path looks impossible. Where do you even start? This feeling hits almost everyone who takes on research.
It's easy to get buried under everything you need to do, from reading papers and collecting data, to analyzing results and writing reports. The deadlines feel too close, and the work feels too big. But here's the good news: there's a way to make sense of it all.
Think of a research timeline as your GPS for the project. It shows you exactly where you are, where you need to go next, and how long each part should take. Instead of one scary big project, you suddenly have a series of smaller steps that you can actually handle.
Sticking to your timeline matters because it keeps you from falling behind. If you need to change things, that's okay—just make sure to let your advisor or team know what's happening and why.
This guide walks you through everything you need to know about research timelines. Whether you're an experienced researcher or this is your first big project, you'll get the tools and strategies you need to succeed. We'll cover setting goals, tracking progress, adjusting when needed, and keeping everything organized. For educators and students, you can also explore educational timelines to see how similar tools support classroom and academic projects.
Ready to transform how you approach research? Let's dive in and turn that overwhelming project into something you can confidently tackle step by step.
Why research timelines matter
A good research timeline is like having a roadmap for your entire project. Without it, research quickly becomes a confusing mess of tasks with no clear direction. When you have a solid timeline, that huge project breaks down into smaller pieces you can actually manage, and you can see how you're doing along the way.
One of the best things about creating a timeline is being able to see your progress. Tools like Gantt charts help you picture your whole project, showing when different parts happen and how they connect to each other. When you can see everything laid out visually, those scary deadlines start feeling much more doable.
A realistic timeline also helps you use your time and resources wisely. Instead of scrambling at the last minute, you know exactly what needs to happen when. You can plan around busy periods, make sure you have the right materials ready, and avoid the stress of trying to do everything at once.
The key is building in flexibility from the start. Research rarely goes exactly as planned, you might need more time to find participants, your data collection could hit snags, or you might discover something that changes your direction. A good timeline accounts for these surprises and gives you room to adjust without throwing everything off track.
Think of your timeline as a living document that grows with your project. You'll probably need to tweak it as you go, and that's perfectly normal. The important thing is having that framework to guide you through each phase of your research journey.
What makes a good research timeline
A successful research timeline needs to cover all the main parts of your project, literature review, data collection, analysis, and writing, while leaving room for things to go wrong. Each part plays an important role in keeping your research moving forward and helping you stay focused on what needs to happen next.
By week 3 or 4 of your project, you should have clear research questions or goals figured out. These will guide everything else you do. Having a structured plan also helps if you're working with a team because everyone knows what they're supposed to do and when.
Visual tools like Gantt charts make managing your timeline much easier. They show you when each task starts and ends, how different parts connect to each other, and where you might run into problems. The key thing to remember is that your timeline should change as your project changes, it's not set in stone.
If your research involves overlapping tasks or parallel work-streams (for example literature review + data collection + writing happening concurrently), a swimlane diagram is what you need: it uses horizontal lanes to differentiate each stream while still keeping everything aligned in time.
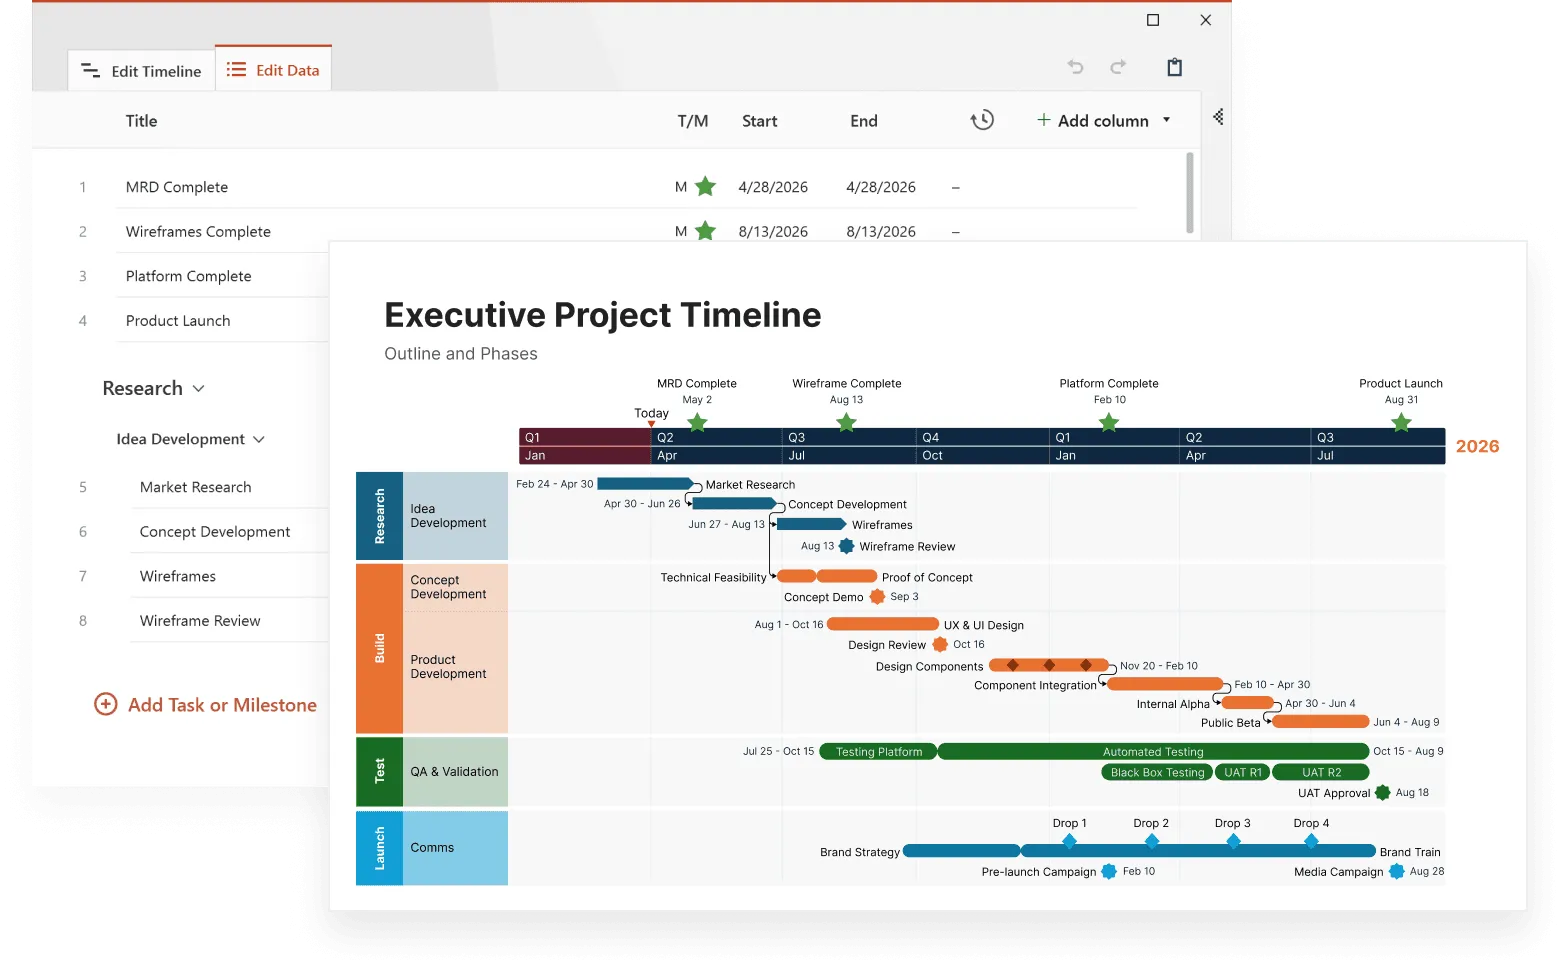
The example below shows how a research timeline can be organized using a swimlane layout. Each lane represents a different phase of the project, with milestones marking major checkpoints along the way. This format helps visualize overlapping tasks across phases and highlights how progress in one area connects to the others. Tools like Office Timeline make it easy to build and adjust this kind of multi-phase view as your research evolves.
Planning stage
This is where everything starts, and getting it right makes the rest of your project much smoother.
Set clear research goals
Your research goals are like a compass for your entire project. They keep you pointed in the right direction and help you make decisions along the way. Good goals are specific enough that you can tell whether you've achieved them or not.
When you're setting these goals, think about what you really want to learn and how your research will add something new to what's already known. Talk to your advisor or team members to make sure everyone understands what you're trying to accomplish.
Clear goals also help when you're writing about your research later. Readers will understand why your work matters and what you're trying to contribute to the field.
Mark your key milestones
Milestones are the big checkpoints in your project, like finishing your literature review, completing data collection, or submitting your first draft. They help you track progress and give you something concrete to work toward.
Break your project into major chunks and set realistic deadlines for each one. If you're working with others, make sure everyone agrees on these dates. It's also smart to have backup plans in case something takes longer than expected.
Use daily or weekly to-do lists to connect your big milestones with smaller tasks. This makes huge projects feel more manageable because you're always working on something specific rather than just "research."
Plan your resources
Figure out what you need to make each part of your project happen. This includes time, money, equipment, and people. If you need to survey 200 people, when will you find them and how will you reach them? If you need special software, when will you get access to it?
Think about each stage of your project and what resources it will need. Data collection might need more time and money, while analysis might need specific software or skills. Writing might need quiet space and feedback from others.
Planning your resources early prevents surprises later. It's much better to realize you need something now than when you're already behind schedule.
Literature review phase
The literature review is the starting point for your research. It helps you see what’s already been studied, how others have done their work, and what still needs to be explored. Taking clear notes now will make it easier to stay on track later.
At the same time, you’ll begin thinking about how you’ll do your own research, your general approach and how you’ll gather your data. Planning things out early helps keep your project focused and gives it a strong base to build on.
Reading and organizing existing research
Start by finding and reading studies related to your topic. Look for patterns and themes across different papers. A simple spreadsheet or chart can help you keep track of what each study found and how it relates to your research.
Group similar studies together, maybe by topic, method, or findings. This makes it easier to see the big picture and spot areas where more research is needed. Visual tools like charts can help you organize and summarize what you've learned.
Good organization now saves time later. When you're writing your final paper, you'll be able to quickly find and reference the studies that support your work.
Finding research gaps
As you read through existing studies, look for things that haven't been studied yet or questions that haven't been fully answered. These gaps are where your research can make a real contribution.
Pay attention to the discussion sections of papers, authors often suggest areas for future research. Also look for limitations in previous studies that your research might be able to address.
Finding these gaps helps you explain why your research matters and how it adds something new to the field.
Research design and methodology
This phase (usually weeks 5-8) is where you plan exactly how you'll conduct your study. You'll choose your research methods, create tools for collecting data, and figure out how you'll analyze everything you gather.
Choosing your research methods
You have two main options: qualitative methods that focus on understanding themes and patterns, or quantitative methods that use numbers and statistics. Your choice depends on what you're trying to learn.
If you want to understand how people feel about something or why they behave in certain ways, qualitative methods like interviews work well. If you want to measure how much of something exists or find statistical relationships, quantitative methods like surveys are better.
Make sure your methods match your research questions. The connection between what you're asking and how you're finding answers should be clear and logical.
Creating data collection tools
Whether you're making surveys, interview guides, or observation checklists, test them first with a small group. This pilot testing helps you spot problems and fix them before you start collecting real data.
For surveys, make sure questions are clear and don't lead people toward certain answers. For interviews, prepare questions that encourage people to share their thoughts freely. For observations, create clear criteria for what you're looking for.
Take time to refine your tools based on feedback from your pilot tests. Better tools lead to better data.
Planning your analysis
Decide how you'll analyze your data before you start collecting it. This ensures you gather information in the right format and don't miss anything important.
For quantitative data, choose appropriate statistical tests based on your research questions. For qualitative data, plan how you'll code and categorize responses.
Set up quality checks to make sure your data is accurate and complete. Having clear procedures helps maintain consistency throughout the collection process.
Data collection phase
This is where you actually gather the information you need to answer your research questions. Plan for about 8 weeks, though it might take longer depending on your methods.
Planning your schedule
Data collection often takes longer than expected. People don't respond to surveys immediately, interviews get canceled, and equipment sometimes breaks. Build extra time into your schedule to handle these delays.
Coordinate your resources carefully. Make sure you have access to the people, places, and equipment you need when you need them. A detailed schedule helps prevent conflicts and keeps everything moving smoothly.
Handling problems
Things will go wrong during data collection, count on it. The key is responding quickly when problems arise. Can't find enough survey participants? Try new ways to reach people. Interview subjects keep canceling? Have backup options ready.
Stay flexible with your timeline while keeping your overall goals in mind. Sometimes you need to adjust your approach, but don't let small setbacks derail your entire project.
Keeping data quality high
Check your data regularly as you collect it. Don't wait until the end to discover that something went wrong early on. Set up simple checks to catch errors and inconsistencies.
Train anyone helping with data collection so everyone follows the same procedures. Consistent methods lead to reliable data, which makes your results more trustworthy.
Good data quality from the start saves time and frustration later when you're trying to analyze and interpret your findings.
Data analysis stage
This is where you turn all the information you've collected into meaningful answers to your research questions. Plan for about 6 weeks to carefully examine your data and figure out what it all means.
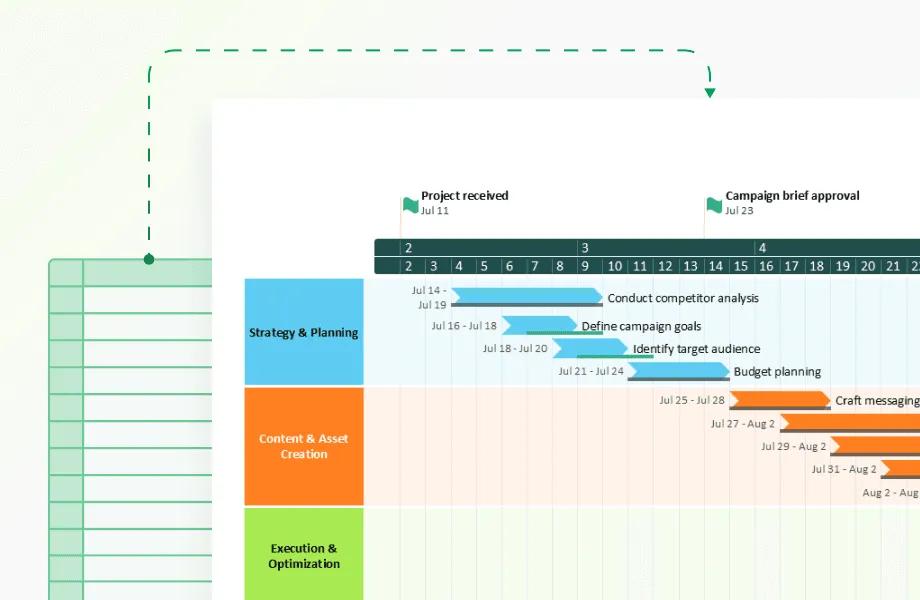
The timeline below shows a staged analysis process with clear phase gates and reviews. Each lane tracks a different stream (overall lifecycle, candidate selection, and formal reviews) so you can see how evidence accumulates, options narrow, and decisions are made to advance, pivot, or stop.
Use a similar layout in your project to set interim analysis checkpoints (preliminary, mid-analysis, final), define criteria for moving forward, and keep stakeholders aligned on progress.

Analyzing your data
Use the right software for your type of data. Programs like R, Python, or even Excel can help you process numbers and find patterns. For interview data, you might use coding software to organize themes and responses.
Take a step-by-step approach to your analysis. Don't try to answer everything at once, focus on one research question at a time. This helps ensure you're thorough and don't miss important findings.
The key is using methods that match your data type. Numbers need statistical analysis, while interview responses need careful reading and categorizing to find common themes.
Understanding your results
Look at your findings in relation to your original research goals. What do the numbers or patterns actually tell you? Are there surprising results that you didn't expect?
Present your results clearly, focusing on the most important findings first. Use charts, graphs, or tables to make complex information easier to understand. Visual aids help readers grasp your findings quickly.
Make sure your interpretations actually connect to your research questions. It's easy to get sidetracked by interesting but irrelevant findings.
Reporting what you found
Write about your results in a way that's clear and to the point. Organize your findings logically so readers can follow your thinking from start to finish.
Get feedback from others while you're working on this section. Fresh eyes can spot problems you might miss and suggest better ways to explain your findings.
Remember that this section should focus on what you found, not what it means, save the interpretation for your discussion section.
Writing and drafting phase
Now you turn all your research into a complete paper. Give yourself about 6 weeks for this phase, which includes writing, revising, and polishing your work.
Organizing your paper
Most research papers follow a standard structure: Title, Abstract, Introduction, Methods, Results, Discussion, and References. Start by creating an outline that covers all these sections.
Your outline should show how each section connects to the others and helps build your overall argument. This planning makes the actual writing much easier.
Use headings and subheadings to organize your content clearly. Charts and tables can help present complex information in ways readers can quickly understand.
Writing and revising
Don't expect your first draft to be perfect. Plan to write multiple versions, each one better than the last. Focus on getting your ideas down first, then worry about making them sound good.
Start sharing drafts early to get feedback while you can still make big changes. It's much easier to reorganize sections now than after you've spent weeks polishing every sentence.
Pay attention to the flow between paragraphs and sections. Each part should connect smoothly to the next, building your argument step by step.
Getting feedback
Share your work with advisors, colleagues, or anyone else who can give you honest feedback. Different people will catch different problems and suggest improvements you might not think of.
Ask specific questions about what you want feedback on. "Does this make sense?" gets better responses than "What do you think?"
Take feedback seriously, but don't feel like you have to use every suggestion. You know your research best, so use your judgment about which changes will actually improve your paper.
Final review and submission
The last phase focuses on polishing your paper and getting it ready to submit. This includes final editing, formatting, and making sure you've followed all the requirements.
Final editing and proofreading
Set aside about 4 weeks for this final stage. Read your paper out loud or print it out to catch errors you might miss on screen.
Check for consistency in how you present information, use terminology, and format citations. Small details matter more than you might think.
Consider having someone else proofread your paper, you've been looking at it so long that you might not notice obvious mistakes.
Formatting and citations
Follow the style guide your field requires, whether that's APA, MLA, Chicago, or something else. Pay attention to details like margins, font size, and spacing.
Double-check all your citations to make sure they're complete and correctly formatted. Missing or incorrect citations can cause serious problems.
Make sure your paper looks professional and is easy to read. Clear headings, consistent formatting, and proper spacing all contribute to a good impression.
Following submission guidelines
Read the submission requirements carefully and follow them exactly. This includes deadlines, file formats, cover letters, and any additional documents you need to include.
Missing a deadline or submitting in the wrong format can disqualify your work, no matter how good it is. Pay attention to these details.
Prepare your submission package early so you're not rushing at the last minute. Having everything ready ahead of time reduces stress and prevents mistakes.
Making your research timeline work
Using your research timeline well is key to keeping your project on track and finishing on time. Set clear milestones throughout your project to help you monitor progress and stay focused on what matters most. These checkpoints help you see whether you're moving in the right direction and catch problems before they get serious.
Expect things to go wrong and plan for them. Building extra time into your schedule helps you handle unexpected delays without throwing off your entire project. When you have buffer time built in, small setbacks don't become major disasters.
The trick is using your timeline as a flexible guide rather than a rigid rule book. You want structure to keep you organized, but enough flexibility to adapt when circumstances change.
Tracking your progress
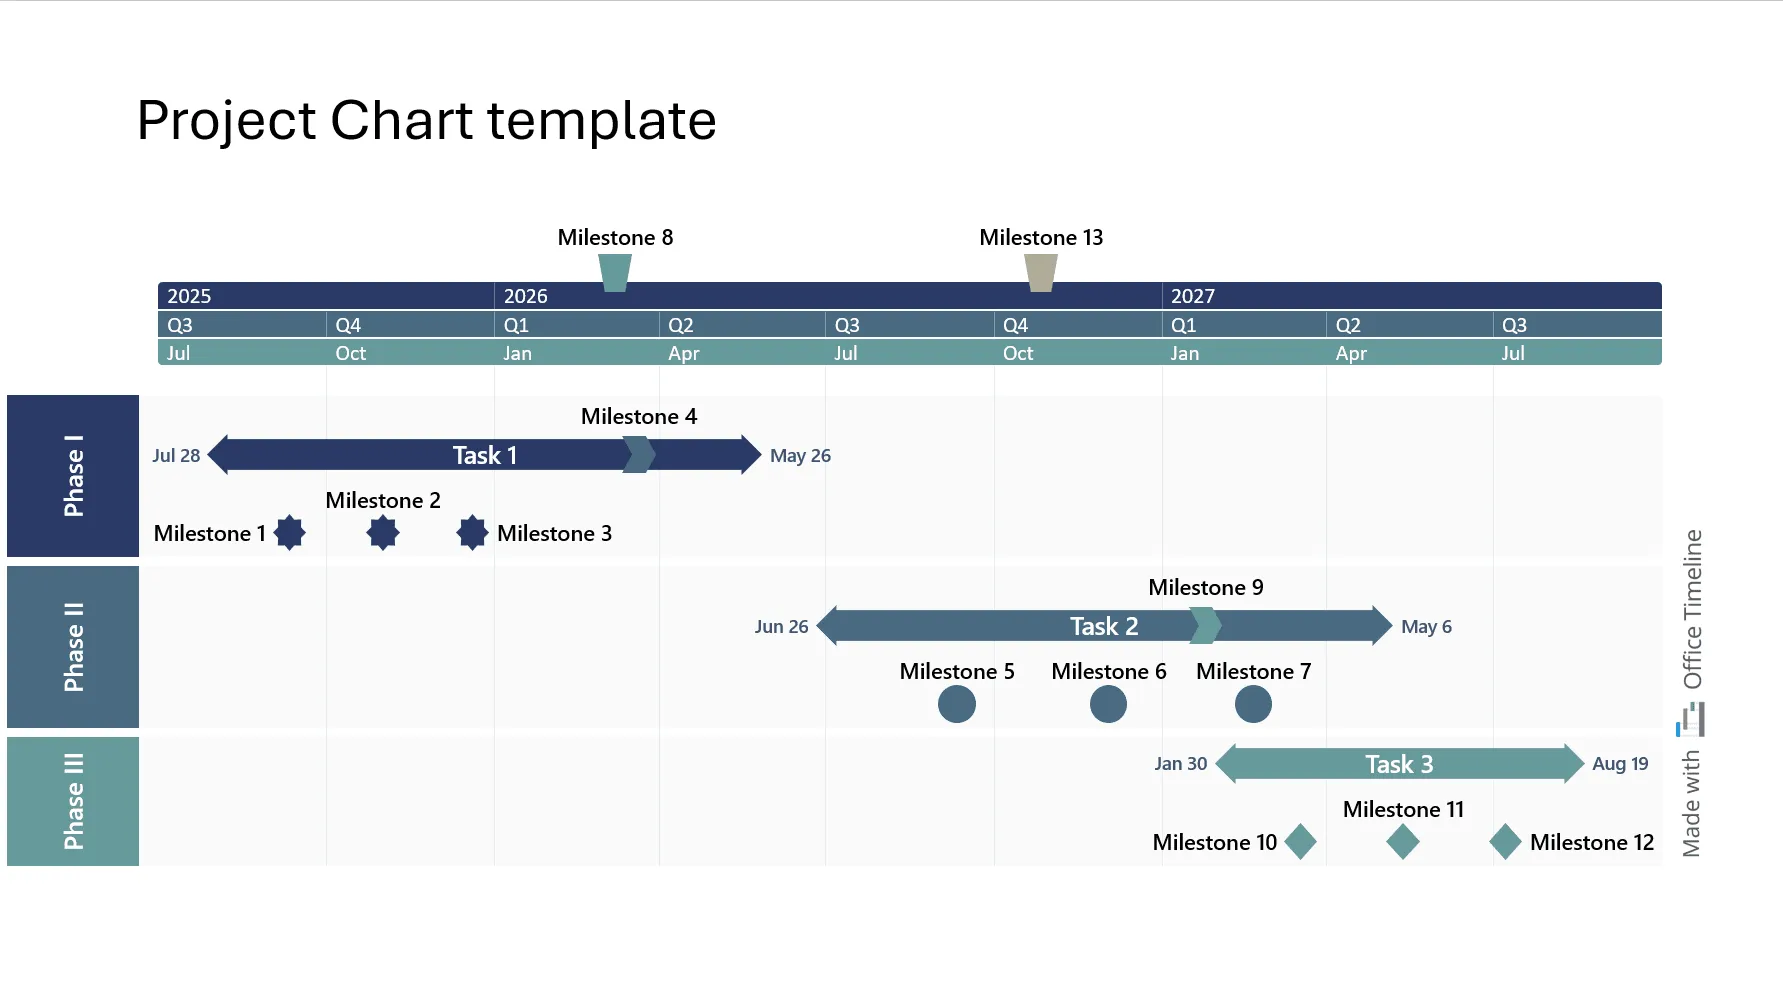
Visual tools make tracking progress much easier. Gantt charts show your whole project timeline at a glance, when tasks start and end, how they connect to each other, and where you currently stand.

The example above shows a research project timeline created with Office Timeline with clear milestones and task phases. The timeline uses color-coding to distinguish different types of tasks and shows the duration of each phase. The milestone markers help researchers see deadlines at a glance, while the task bars show exactly when each phase of work should begin and end. This visual approach makes it easy to spot potential scheduling conflicts and ensures nothing gets overlooked.
Download this research project template for free and customize it for your specific project. Using a pre-built template saves hours of setup time and ensures you don't miss important phases like buffer periods for revisions or time for unexpected delays. The template can be easily adjusted to match your project's timeline and requirements.
Simple tools like Excel, Trello, or Asana can help you create basic timelines, but Office Timeline offers specialized templates designed specifically for research projects. Its drag-and-drop interface makes it easy to create clear, professional-looking timelines that you can share with advisors or present to committees without needing design skills.
You don't need expensive software, just something that lets you see your progress visually. Office Timeline strikes a good balance by offering professional results with user-friendly tools that work particularly well for academic timelines where clarity and presentation quality matter.
Update your timeline as you complete tasks and hit milestones. Seeing your progress adds up over time can be motivating, especially during the long middle phases of research when it feels like nothing is happening.
Start your research timeline with a template
Try Office Timeline for free. Save hours of setup and create a structured project timeline in PowerPoint using intuitive templates.
Adjusting when needed
Your timeline should change as your project evolves. Research rarely goes exactly as planned, so build flexibility into your schedule from the start.
When data collection takes longer than expected or you discover you need to change your methods, adjust your timeline accordingly. The goal isn't to stick to the original plan no matter what, but to complete good research on time.
If you need to make significant changes, communicate with your advisor or team members right away. Don't wait until you're seriously behind to let people know there's a problem.
Building buffer time into each phase gives you room to adjust without affecting later parts of your project. If one phase finishes early, you can use that extra time elsewhere or just stay ahead of schedule.
Working with your team
If you're working with others, regular check-ins keep everyone aligned and help solve problems quickly. Weekly meetings work well for most projects, frequent enough to catch issues but not so often that they become a burden.
Use your timeline as a communication tool. When everyone can see the overall schedule and understand how their work fits into the bigger picture, coordination becomes much easier.
Project management tools that show progress visually help team members understand what others are working on and how different tasks connect. This prevents conflicts and helps people prioritize their work.
Make sure everyone knows how to update the timeline and when changes need to be communicated to the whole team. Clear communication prevents small problems from becoming big ones.
Your roadmap to research success
Creating a detailed timeline for your research project brings order and clarity to what can feel like an overwhelming task. By breaking down your big project into smaller, manageable pieces, you stay organized and focused throughout the entire process.
Building an effective research timeline involves setting clear goals, marking major milestones, and making sure you have the resources needed for each phase. Your timeline should cover everything from literature review through data collection, analysis, and final writing. Following this organized approach lets you break your research into smaller tasks that you can track and adjust as needed.
Tools like Gantt charts and project management software make collaboration easier and help keep your project on track. A well-planned timeline transforms what might seem like a chaotic research process into a clear, step-by-step path to success.
Good planning is what separates successful research projects from ones that struggle or fail. Remember that research success comes from careful planning, good teamwork, and staying flexible when things don't go as expected. Your timeline is a tool to guide you, not a rigid set of rules. Use it to stay organized and motivated as you work toward completing meaningful research that contributes to your field.
Frequently asked questions about research timelines
Researchers often have questions about creating and managing project timelines. Here are answers to the most common concerns about organizing your research from start to finish.
A research timeline is crucial because it breaks down complex work into manageable tasks, helps you meet deadlines, and keeps you organized throughout your project. It also gives you flexibility to adjust when unexpected challenges come up, preventing small problems from derailing your entire project.
Think about what kind of data will best answer your research questions. If you want to understand people's experiences or find themes and patterns, use qualitative methods like interviews. If you need numerical data and statistics, choose quantitative methods like surveys or experiments.
Focus on the major phases: literature review, data collection, analysis, and writing. Make sure to clearly define your research questions, set key milestones, and plan how you'll use your resources. Having these components in place keeps your project organized and moving forward.
Simple tools like Excel, Trello, or Asana work well for most projects. Gantt charts are especially helpful because they show your whole timeline visually and let you track progress easily. Choose whatever tool you'll actually use consistently.
Build buffer time into your schedule from the start and stay flexible with your timeline. When problems arise, communicate quickly with your advisor or team so you can solve issues together. Most delays can be managed if you catch them early and adjust your plan accordingly.