Teachers know that history comes alive when students can see how events connect. Timeline projects offer a simple but powerful way to help students understand the flow of history by placing events in order.
This guide shows teachers how to use timeline activities in their classrooms to make history more interesting and easier to remember. You'll find free tools that work well for different grade levels, practical tips from other teachers, and ideas for helping students see how one historical event leads to another. Whether studying ancient Egypt or the Civil Rights Movement, timeline projects help students organize information in a way that makes sense and sticks with them long after the lesson ends.
In this article, you'll also discover practical ways to implement timeline projects that strengthen students' historical understanding and build research skills. You'll learn about easy-to-use digital tools for creating educational timelines, see examples that work for different age groups, and get tips for designing activities that help students connect historical events to their broader context.
What is a timeline?
A timeline is a visual tool that shows events in order from earliest to latest. Think of it as a line with important moments marked along the way, helping us see how things happened one after another. This simple arrangement makes it easier to understand how events connect and flow together over time.
Timelines work well for many different purposes. Teachers use them to show historical periods like Ancient Egypt or the American Revolution. Students can create timelines of famous people's lives or important inventions. Project managers use them to track deadlines and milestones. Families even make timelines of their own history with special moments like births, moves, and celebrations.
The power of a timeline comes from seeing the big picture at a glance. When events are lined up in order, patterns and connections become clear that might be hard to notice when reading text alone. For example, a timeline of the 1960s might show how music, fashion, civil rights events, and space exploration all happened alongside each other, giving a fuller picture of the era than studying any single aspect would provide.
In the classroom, timelines help students grasp how one event leads to another and understand cause and effect in history. This visual approach makes information stick better than memorizing dates alone, turning abstract time periods into concrete, meaningful stories.
The importance of historical timelines
Historical timelines help students make sense of the past by showing events in the order they happened. When students see history laid out visually, they better understand how one event led to another and how different time periods connect. This makes it easier to spot cause and effect—seeing how earlier events influenced later ones.
Timelines help with memory too. When information is organized in a clear visual format, students remember it better than when studying from text alone. The timeline gives them a mental picture they can recall later, with each event connected to what came before and after. This helps them remember not just isolated facts, but how events relate to each other.
For teachers, timelines bring history lessons to life. Instead of just memorizing dates, students see the story unfold. A timeline of the Civil Rights Movement, for example, shows how smaller events built upon each other over time, helping students grasp the bigger picture. This visual approach works especially well for students who struggle with traditional reading assignments.
Timelines also build critical thinking skills. As students create or study timelines, they naturally ask questions about why events happened when they did and how they influenced what came next. This deeper engagement with history helps them develop thinking skills they can use across subjects and throughout their lives.
Benefits of using a timeline
Timelines make complicated history easier to understand. When events are arranged in order along a line, students can see at a glance what happened when, helping them make sense of complex historical periods. For example, a World War II timeline shows students how battles, political decisions, and home front events all happened alongside each other, giving them a complete picture they might miss when reading chapter by chapter.
The visual nature of timelines helps students spot patterns and connections. They might notice that several inventions appeared around the same time, or see how a series of smaller events built up to a major turning point. These insights often spark classroom discussions as students begin asking "why" questions about the timing and relationship between events.
Timelines also help with memory. When students see events in context rather than as isolated facts, the information sticks better. The physical act of creating timelines—whether on paper, digitally, or as a wall display—gets students actively involved with the material, which further improves learning.
For teachers, timelines offer a quick way to check understanding. A glance at a student's timeline shows whether they've grasped the correct sequence and relative importance of events. This makes timelines valuable both as learning activities and as assessment tools.
How to create a historical timeline
Creating a historical timeline with your students is rewarding; it brings the past to life while building valuable research and critical thinking skills. The process involves six main steps: choosing a timeline tool, selecting a historical period, researching events, adding descriptions and visuals, customizing the design, and sharing the finished product. Let's explore each step in more detail to help you implement this engaging activity in your classroom.
Step 1: Choose your timeline tool
Start by selecting a timeline creation tool that matches your students' age and technical abilities. Digital options work well for middle and high school students, while elementary classes might prefer hands-on methods.
Popular digital timeline makers include:
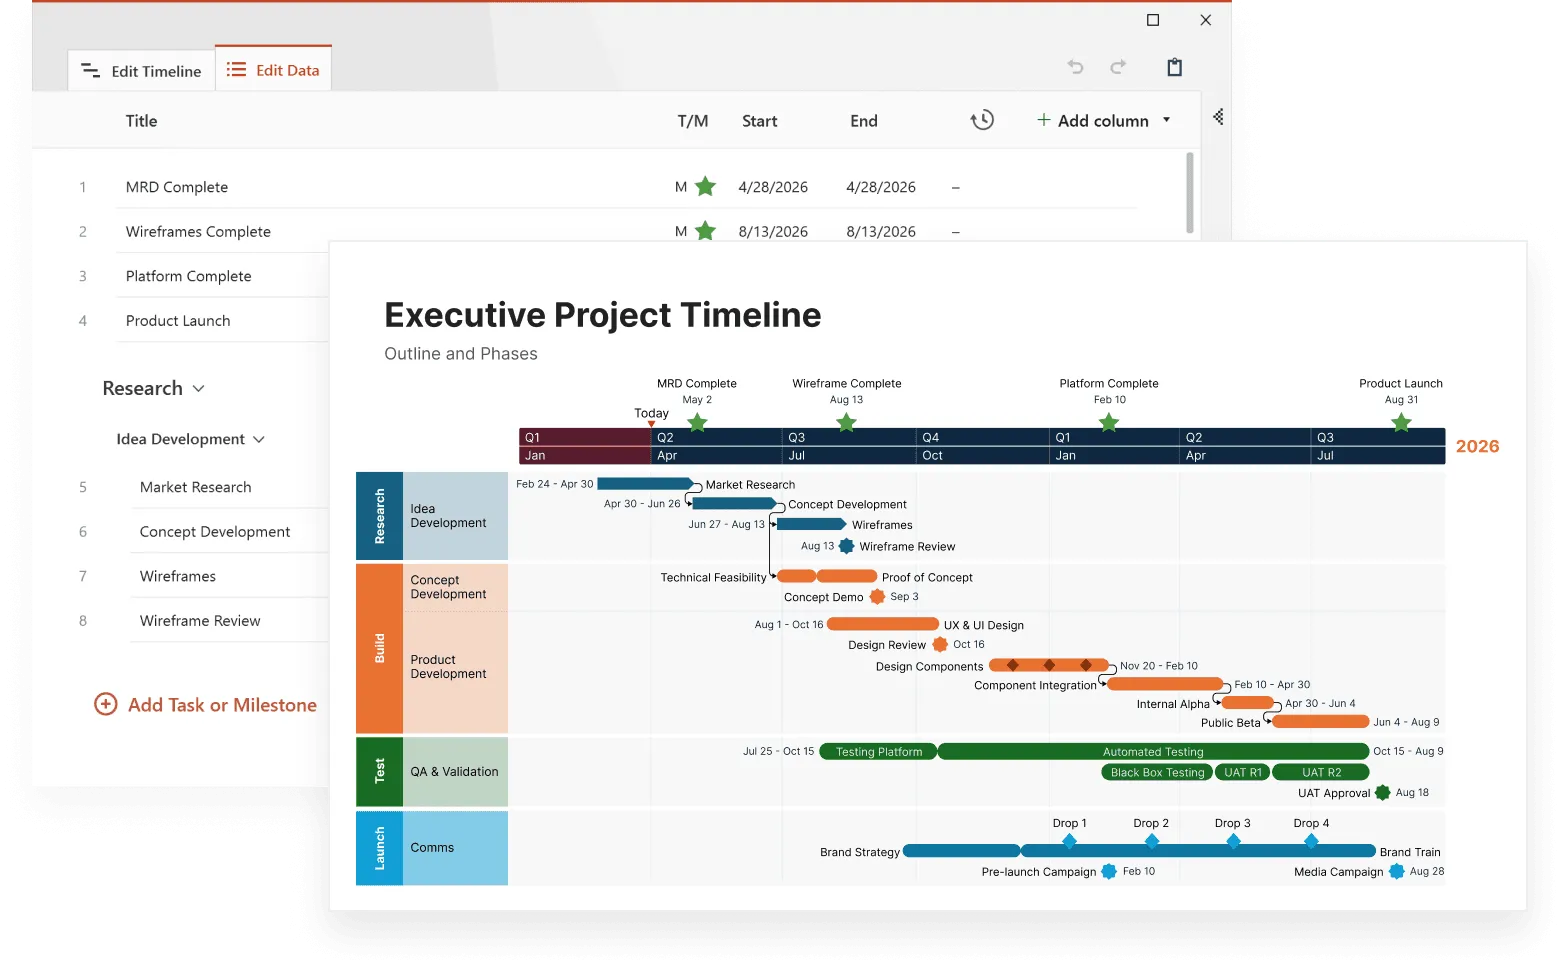
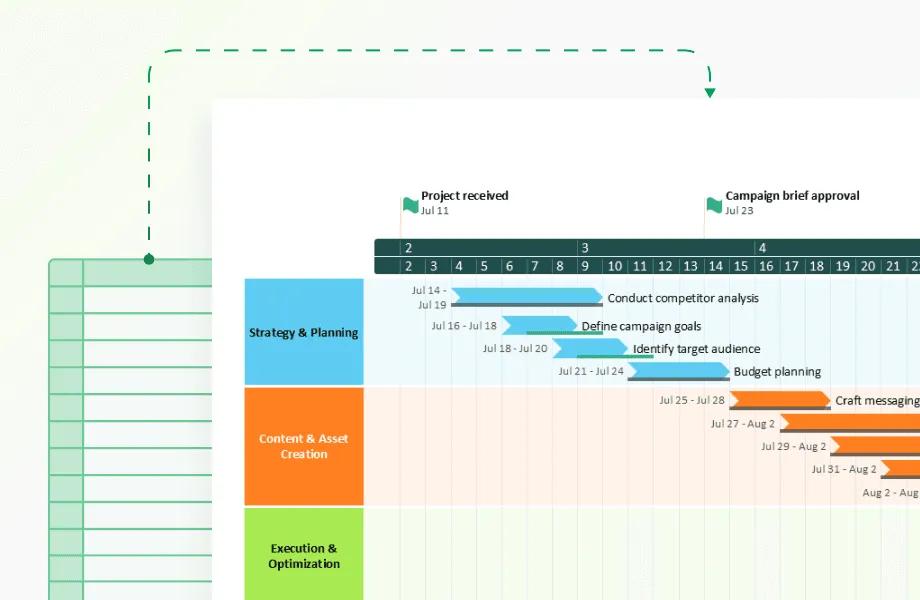
- Office Timeline, which offers specialized educational templates designed for classroom use.
- TimelineJS, a free tool that integrates with Google Sheets.
- Canva and Adobe Express, which provide versatile design capabilities.
- Tiki-Toki, known for its user-friendly interface.
For younger students, large paper timelines created with markers, construction paper, and printed images can be just as effective and often more engaging as a group activity.
Make classroom timelines easy to build
Try Office Timeline for free. Create clean, engaging timelines using ready-made templates designed for teaching and learning.
Step 2: Select a historical period
Help students choose a specific time period or theme to focus on. This could be a major historical era (Ancient Rome, the Renaissance), a significant movement (Civil Rights, Women's Suffrage), or even a narrower topic like the development of flight or the history of your local community.
A well-defined scope keeps the project manageable and allows students to explore connections between events rather than simply listing dates. Consider your curriculum goals when guiding students toward appropriate topics.
Step 3: Research key events
Guide students in finding important dates, people, and events using reliable sources. This step builds crucial research skills as students learn to:
- distinguish between primary and secondary sources;
- verify information across multiple references;
- identify truly significant events versus minor happenings;
- recognize bias in historical accounts.
School libraries, reputable online archives, and history textbooks provide good starting points. Encourage students to look for patterns and connections between events rather than isolated facts.
Step 4: Add descriptions and visuals
Show students how to craft concise, informative descriptions of each event. Rather than just noting "Declaration of Independence - 1776," they might explain why the document was created and its significance.
Visuals bring the timeline to life and help with information retention. Students can include:
- historical photographs or artwork, (e.g. portraits of key figures),
- maps showing where events occurred,
- symbols representing different types of events.
Step 5: Customize using templates and design elements
Using pre-made templates saves time and ensures a professional-looking result. Office Timeline offers timeline templates for teachers that provide an excellent starting point, allowing students to focus on content rather than design basics.
Templates also teach students about effective visual organization. Once they have the basic structure, students can personalize their timelines by color-coding related events or themes or using different icons to represent various types of events. Adding creative touches make the timeline more appealing and engaging.
Step 6: Share and present
The final step transforms the timeline from a simple assignment into a meaningful learning experience. Have students present their work to classmates, explaining the connections they discovered and why they included certain events.
Consider creating a classroom display or digital gallery of timelines. Some teachers even organize a "museum walk" where students view and comment on each other's work, or invite parents to see the completed projects during open house events.
With these steps completed, let’s explore next some specific timeline customization options and presentation techniques.
Historical timeline examples for classrooms
Timeline projects get students actively involved in history through hands-on, visual learning. When students arrange historical events in order, they see more clearly how one event leads to another and understand why certain moments mattered. This visual approach helps students grasp historical connections that might be missed when reading textbooks alone.
Timeline projects also allow students to make history personal. They can connect major historical events to family stories or local history, helping them see how the past relates to their own lives. For example, students might discover that their grandparents lived through significant historical periods or that important events happened in their own community.
Teachers find that starting with interesting "hook" events often works better than strict chronological teaching. Beginning with dramatic moments, like the moon landing or the Boston Tea Party, captures student interest before filling in surrounding events. This makes history feel more like an exciting story than a list of dates.
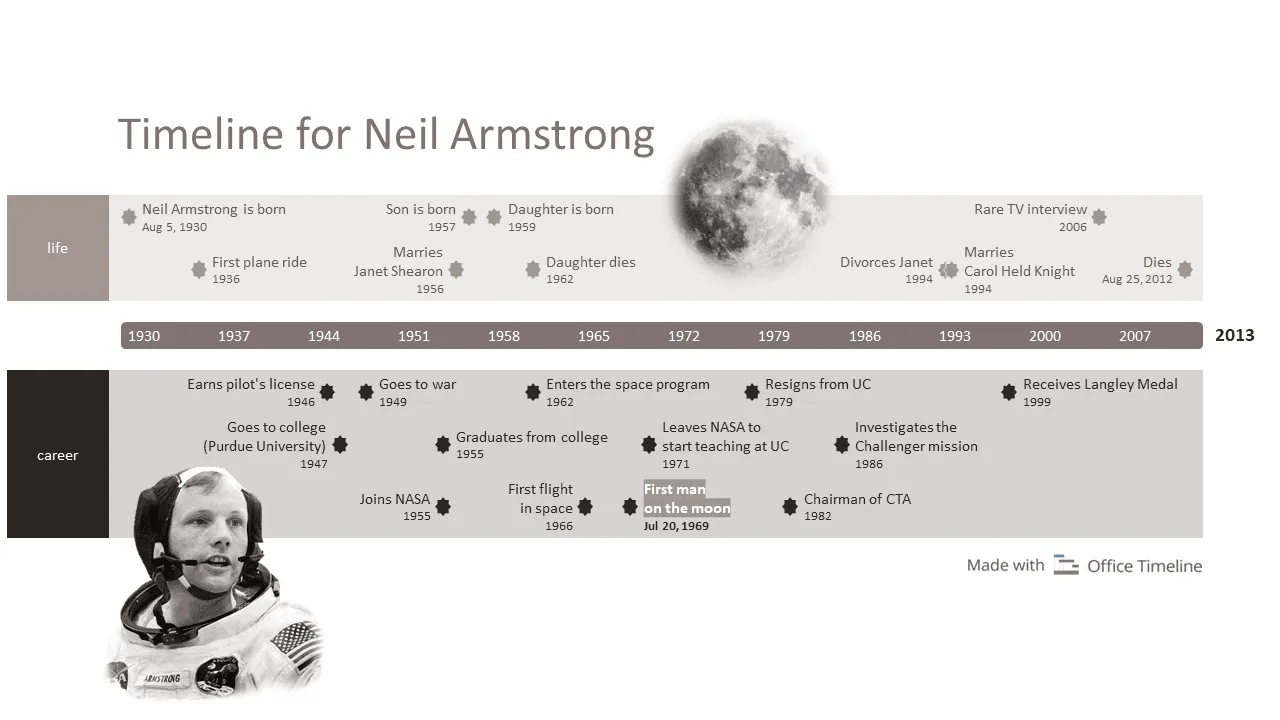
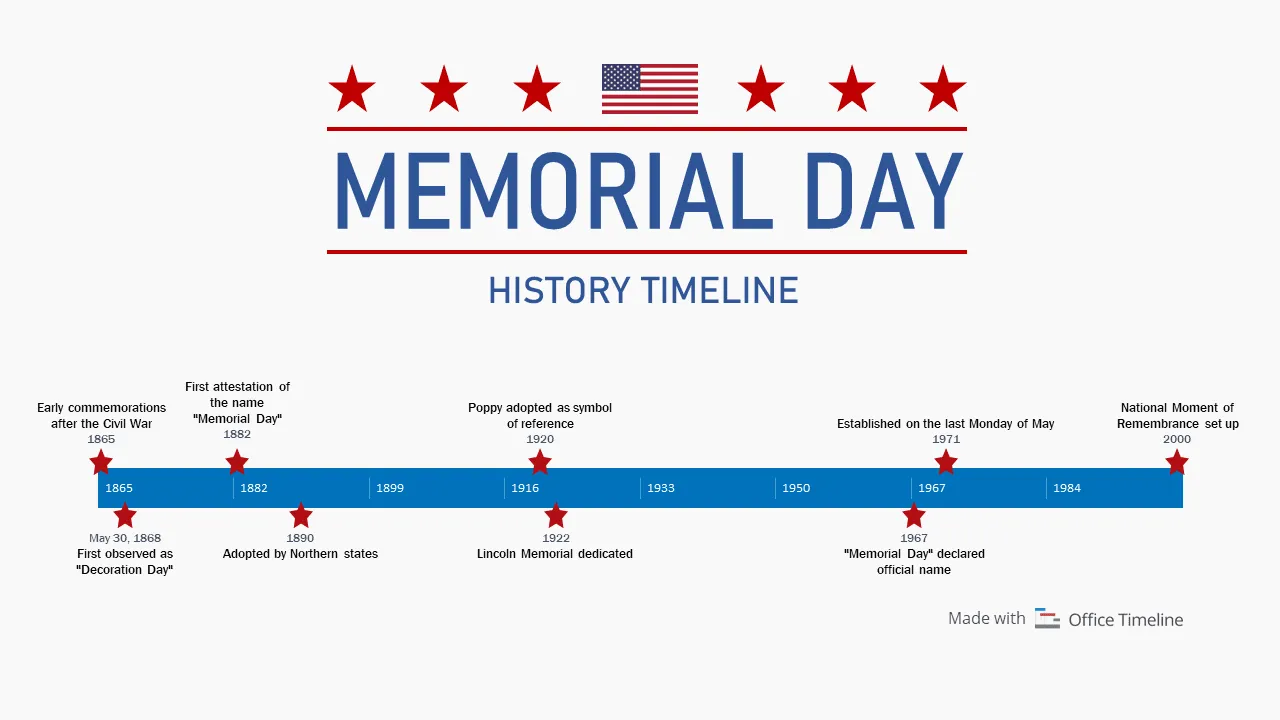
For example, students might create a timeline like the Memorial Day history example above, created with Office Timeline's intuitive software. This timeline tracks the evolution of an American holiday from its Civil War origins to modern observances, helping students understand how national traditions develop and change over time. This is an example of how Office Timeline's educational templates make it easy for students to produce professional-looking results while focusing on historical content rather than design technicalities.
These more sophisticated projects build critical thinking skills as students evaluate which events were truly significant and analyze how they related to each other. For instance, older students can explore how technological developments influenced historical events or how scientific breakthroughs shaped society. These connections help them understand history as an interconnected web rather than isolated facts.
The process of researching, organizing, and presenting complex historical information prepares them for college-level work while deepening their understanding of how the past shapes our present world.
Tips for effective historical timeline projects
Good planning and organization make timeline projects run smoothly in the classroom. Here are some practical tips to help your students create meaningful historical timelines:
Start with clear guidelines about what you expect in the final project
Provide a rubric that outlines requirements for research depth, number of events to include, visual elements, and presentation quality. Setting these expectations early helps students plan their work effectively.
Teach students to distinguish between major and minor events
Not every historical happening deserves a place on their timeline. Help them understand that a good timeline highlights truly significant moments rather than trying to include everything.
Encourage creativity in the visual presentation
While digital tools like Office Timeline create professional results with minimal effort, students can also use color-coding, symbols, and illustrations to organize information and make their timelines visually engaging.
Build in checkpoints throughout the project
Have students submit their event selections, research notes, and draft layouts before the final deadline. This prevents last-minute work and gives you opportunities to provide feedback when it's most helpful.
Make it collaborative when possible
Timeline projects work well as small group activities where students can discuss which events to include and why they matter. This collaboration encourages deeper thinking about historical significance and introduces students to different perspectives.
Include reflection questions that ask students to think beyond the timeline itself
Questions like "Which event do you think had the biggest impact and why?" or "Did you notice any surprising connections between events?" prompt critical thinking about the historical content.
Connect timelines to other learning activities
Use completed timelines as reference tools during discussions, writing assignments, or test preparation. This reinforces the value of the project and helps students see how organizing information visually supports their overall learning.
By incorporating these strategies, timeline projects go beyond being just chronological displays; they transform into valuable learning experiences that develop research skills, historical thinking, and visual literacy.
Bringing history to life through classroom timelines
Timeline projects transform how students experience history by converting abstract dates and events into visual stories they can understand and remember. The process of researching historical moments, deciding which ones matter most, and arranging them in sequence develops valuable skills that extend beyond history class.
As students create timelines in the form of simple paper versions in elementary grades or sophisticated digital projects in high school, they actively engage with historical content rather than passively receiving it. This hands-on approach helps them see connections between events, understand cause and effect relationships, and recognize patterns across time periods.
Tools like Office Timeline make the technical aspects of timeline creation simpler, allowing students to focus on historical content rather than design challenges. With user-friendly templates and intuitive features, even younger students can create professional-looking timelines that effectively communicate their historical understanding.
From ancient civilizations to modern social movements, timeline projects adapt to any historical subject and accommodate diverse learning preferences. They give visual and hands-on learners opportunities to shine while encouraging all students to exercise their creativity. By incorporating these visual tools into your classroom, you'll deepen students' historical understanding and help them develop skills for interpreting how past events continue to shape our present world.
Frequently asked questions about timeline projects
Teachers often have questions about implementing timeline activities in their classrooms. Here are answers to some common inquiries about creating effective historical timelines with students.
Several excellent free tools make timeline creation accessible for classrooms. Adobe Express, Tiki-Toki, Canva, and Genially all offer free versions with templates specifically designed for historical timelines. Office Timeline also provides specialized templates that work particularly well for educational purposes, with options that match different grade levels and historical subjects.
Accuracy comes from using reliable sources and checking information across multiple references. Teach students to verify dates and facts using reputable history books, educational websites, and primary sources like letters and official documents. School libraries often have curated resources that are grade-appropriate and historically accurate.
Enrich your timelines with photographs, illustrations, maps, quotes, and brief descriptions of key people and events. Many timeline tools also support embedded videos or audio clips, which can be powerful additions for older students. Primary source documents like newspaper headlines or speech excerpts add authenticity and help students connect with the historical period.
Most digital timeline tools offer multiple sharing options. You can download timelines as image files or PDFs for printing, share direct links for online viewing, or embed them in school websites and learning management systems. For classroom displays, large-format printing works well, while email or shared drives are convenient for distributing timelines to parents and other teachers.
Focus on quality over quantity by having students select truly significant events rather than trying to include everything. Encourage them to consider multiple perspectives on historical events and discuss why certain moments matter more than others. Building in time for presentation and discussion helps students learn from each other's research and strengthens their understanding of historical connections.