Ever watched your students struggle to put historical events in order? You're not alone. Many students can tell you about the American Revolution, the Civil War, and World War II, but ask them which happened first, and you might get some creative answers. Dates get jumbled, events seem disconnected, and history feels like a confusing collection of random facts.
This is where timelines come in as your teaching superpower. These simple visual tools can transform how students understand history by showing events in the order they actually happened. Instead of memorizing isolated dates, students see how one event leads to another, creating a story that makes sense. When students can visualize the flow of history, those jumbled dates start falling into place.
Teaching chronology doesn't have to be a struggle for you or your students. This article explores why educational timelines work so well in history classrooms, shares practical benefits you'll see right away, and gives you ready-to-use activities that make learning about the past interactive and memorable. Whether you're a veteran teacher looking for fresh approaches or new to the classroom, these timeline strategies will help bring order and clarity to your history lessons.
Different ways to teach history
When it comes to organizing history lessons, teachers face a classic dilemma: should you teach events in the order they happened, or group them by themes and topics? Both approaches have their strengths and work well in different situations.
Chronological teaching
The traditional way teaches events in the order they happened. Students start with early events and work their way forward through time. In American history, this might mean beginning with the American Revolution, moving through the Civil War, and ending with modern times.
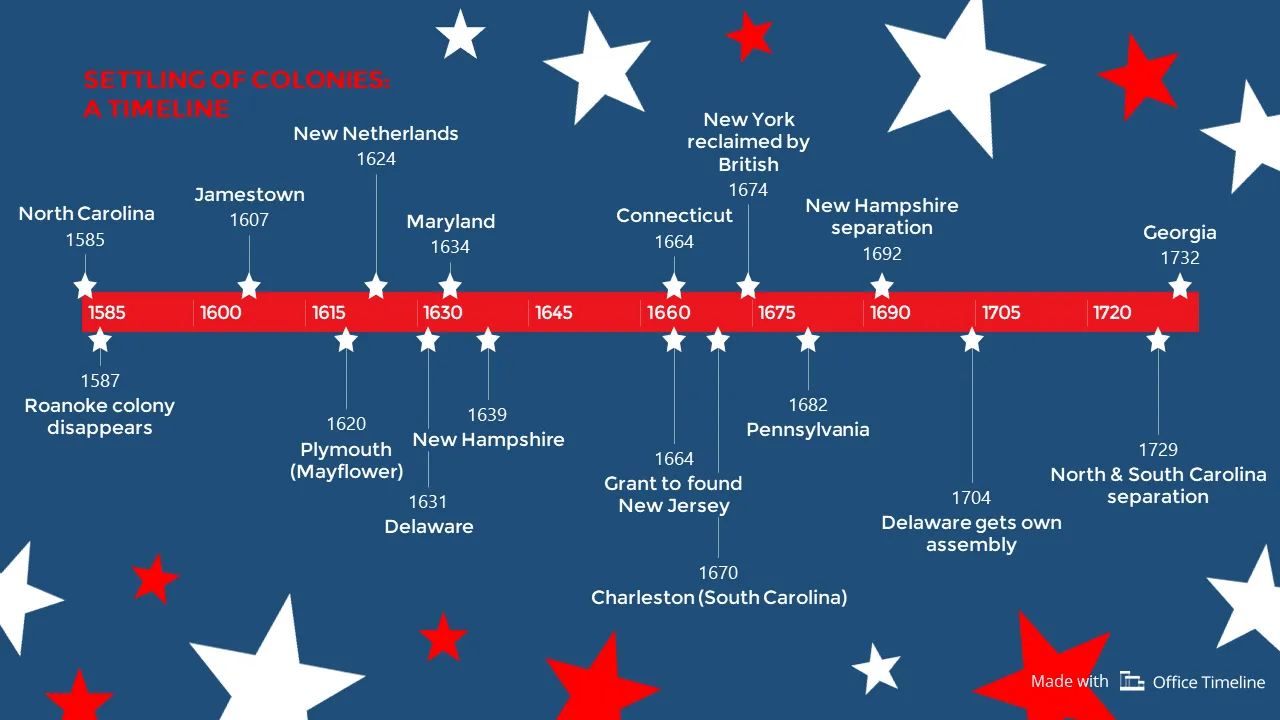
The timeline above shows how chronological teaching works, displaying the settling of American colonies from 1585 to 1732. Created with Office Timeline, this visual helps students see how colonial settlements developed over time and understand the progression from early failed attempts like Roanoke to successful permanent settlements. Students can easily grasp that nearly 150 years passed between the first settlement attempts and the founding of Georgia, and see patterns like how settlements clustered in certain time periods.
This approach helps students understand how events connect to each other. They can see how the American Revolution influenced the Constitution, which later affected Civil War decisions. It's like telling a story from beginning to end, everything builds on what came before.
Students develop a strong sense of historical sequence with this method. They know what happened first, second, and third, which helps them understand cause and effect relationships throughout history.
Thematic teaching
The thematic approach organizes lessons around topics rather than time periods. Instead of studying all events from the 1800s together, students might focus on themes like civil rights, economic changes, or wars across different centuries.
For example, a unit on civil rights could include the Underground Railroad from the 1800s, the Civil Rights Movement from the 1960s, and current social justice issues. Students see how similar themes play out across different time periods.
This method helps students spot patterns and make connections they might miss when studying events in strict chronological order. They start asking questions like "Why do these same issues keep coming up?" and "How have approaches to solving problems changed over time?"
Making both approaches work
The best history teaching often combines both methods. Start with chronological understanding so students know the basic sequence of events. Then explore themes to help them see deeper connections and patterns.
Timelines can work perfectly with either approach. For chronological teaching, they show the flow of events clearly. For thematic teaching, they help students see when different examples of their theme occurred and how they relate to other historical events.
By mixing these approaches and using visual tools like timelines, teachers create lessons that work for different types of learners and help all students understand history better.
The power of seeing history laid out
Think about how confusing a movie would be if you watched all the scenes randomly mixed up. That's how history often feels to students; they know about the Civil War and World War II, but can't quite figure out how they fit together. Timelines solve this problem by giving students a clear visual path through the past.
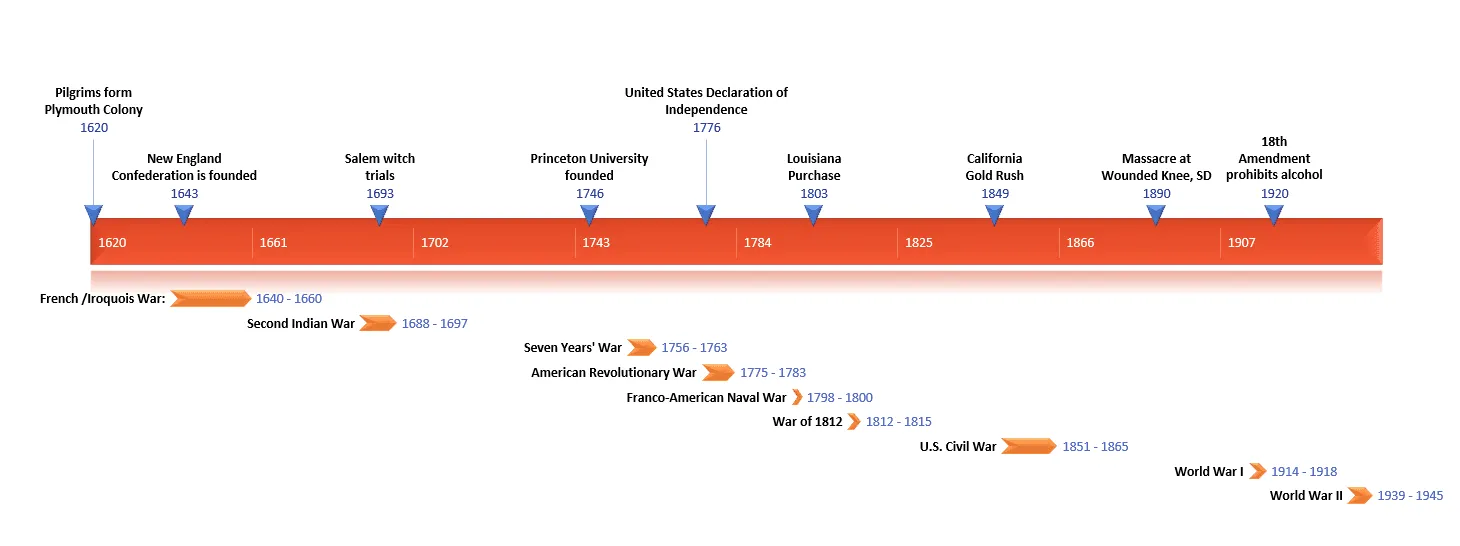
The timeline above shows American history from colonial times through World War II, created with Office Timeline's educational templates. It clearly displays both individual events (like the Declaration of Independence) and longer periods (like wars and conflicts) on the same visual. Students can instantly see that over 150 years passed between the first colonial settlements and the Revolutionary War, or that World War I and World War II happened relatively close together in historical terms. This type of comprehensive timeline helps students understand the scope and flow of American history in ways that textbook chapters often miss.
Build classroom timelines in minutes
Try Office Timeline for free. Design clear, presentation-ready history timelines without complicated tools or formatting.
Making sense of when things happened
The biggest benefit of timelines is helping students see the order of events. Instead of history feeling like a jumbled mess of random facts, timelines show how events flow from one to another. Students start to see history as a connected story rather than separate, unrelated incidents.
When students can visualize the sequence of events, they remember information better. Seeing that the Civil War happened before World War I, and understanding how much time passed between them, gives students a framework for organizing historical knowledge in their minds.
Spotting connections and patterns
Timelines help students become historical detectives. When events are placed next to each other visually, students start noticing relationships they might miss otherwise. They can see how one event might have caused another, or how similar events happened at different times.
This visual approach builds critical thinking skills naturally. Students begin asking questions like "Why did this happen right after that?" or "How are these two events connected?" These questions lead to deeper understanding of cause and effect in history.
Understanding the bigger picture
One of the most powerful aspects of timelines is showing what else was happening in the world at the same time. While students are learning about the American Civil War, a timeline can show them what was happening in Europe, Asia, or other parts of America during the same period.
This broader view helps students understand that history isn't just a series of isolated events in one place. They start to see how different societies and cultures were connected, even when they were far apart geographically.
Getting students actively involved
Timeline activities get students doing history instead of just reading about it. Whether they're creating their own timelines, arranging event cards in order, or acting out historical sequences, students become active participants in learning.
This hands-on approach makes history more memorable and engaging. Students remember information better when they've physically worked with it, and they develop a stronger connection to the historical content they're studying.
Getting started: simple timeline ideas for your classroom
You don't need fancy technology or expensive materials to bring timelines into your history classroom. Some of the best timeline activities use simple supplies you probably already have.
Create a classroom wall timeline
Start with a long timeline that stretches across one wall of your classroom. As you cover different historical periods throughout the year, add events to this growing timeline. Students can help create cards or markers for important dates, and you'll build a visual history of everything you've studied together.
This wall timeline becomes a reference tool students can use all year long. When you're discussing World War II in spring, students can look back at earlier events on the timeline to remember what led up to the conflict. It helps them see the big picture of how events connect across time.
Try personal "My Life" timelines
Get students comfortable with timeline concepts by having them create timelines of their own lives. They can mark important events like starting school, moving to a new house, family vacations, or learning new skills.
This personal connection helps students understand how timelines work before you ask them to tackle more complex historical content. They already know the order of events in their own lives, so creating a timeline feels natural and manageable.
Focus on specific time periods
Create detailed timelines around particular events or eras that you're studying in depth. For example, you might make a timeline showing the steps leading up to the American Revolution, or track the major battles of the Civil War in order.
These focused timelines let students dive deep into specific topics while still maintaining that crucial sense of chronological order. Students can see how individual events within a larger historical period connect and build on each other.
Keep it simple to start
Remember, these are just starting points. The goal is to get students thinking chronologically and seeing history as a connected story. Once they're comfortable with basic timeline concepts, you can try more complex activities and digital tools.
The key is starting somewhere and building up your timeline activities as both you and your students get more comfortable with using them as learning tools.
Creating interactive timelines
Want to see your students get excited about exploring history on their own? Interactive timelines transform students from passive viewers into active investigators, clicking through events and discovering connections they might never notice in a textbook.
Choose the right digital tool
Look for timeline platforms that are easy to use and don't require a steep learning curve. Tools like Tiki-Toki, TimelineJS, and Sutori offer simple interfaces where you can add pictures, videos, and links to original documents.
For teachers who want professional-looking results without the complexity, Office Timeline provides templates specifically designed for educational use. Their educational templates include pre-built formats, which means you can focus on content rather than design. The drag-and-drop interface makes it simple to create timelines that look polished enough to share, while still being easy enough for classroom use.
The key is finding a tool that you're comfortable using and that works reliably with your school's technology setup. Start simple; you can always try more advanced features once you and your students get the hang of basic timeline creation.
Many teachers find that having access to professional templates saves significant preparation time, especially when creating multiple timelines throughout the school year. This lets you spend more time on the historical content and student engagement rather than figuring out formatting and design details.
Get students involved in building the timeline
Instead of creating all the content yourself, assign students to research and add specific events or time periods to your class timeline. This collaborative approach gets students more invested in the project while teaching research skills.
For a unit on World War II, different students might research major battles, home front changes, or key political decisions. Each student becomes an expert on their piece of the timeline and can teach others about what they discovered.
Add interactive elements
You can take your timelines beyond just reading material. Create scavenger hunts where students have to find specific information or spot patterns across different time periods. Use the timeline as a starting point for discussions about cause and effect or debates about historical decisions.
You might ask students to find examples of how economic problems led to political changes, or have them trace how technological advances affected daily life across different decades.
Keep building throughout the year
Don't create your timeline once and forget about it. Add new events as you cover them in class, and regularly review earlier entries to help students see connections across time periods.
This ongoing process helps students understand that history is continuous and connected. When you're studying the 1960s, students can look back at earlier civil rights events on the timeline to see how the movement developed over time.
Interactive timelines transform history from a list of facts to memorize into a story students can explore and understand on their own terms.
Engaging timeline activities for history lessons
Ready to get your students out of their seats and into history? The best timeline activities turn your classroom into a time machine where students physically experience the flow of historical events – they get up, move around, and interact with the content.
Here are some classroom-tested activities that bring chronology to life in your classroom.
Human timeline
This activity gets students out of their seats and thinking on their feet. Give each student a card with a historical event and date, then have them arrange themselves in chronological order around the classroom.
Students naturally start discussing their events as they figure out where they belong in line. "Wait, when did the Louisiana Purchase happen? I think that was before the War of 1812." These conversations reinforce learning while students solve the chronology puzzle together.
You can adapt this activity for any time period or theme. Try it with battles from the Civil War, inventions from the Industrial Revolution, or key events leading up to World War I.
Event card scramble
Give students sets of cards featuring important historical events and dates, then challenge them to put the cards in proper chronological order. This works well as individual practice or small group work.
The hands-on nature of moving physical cards helps students remember the sequence better than just reading about events. Students can also group related events together to see patterns and connections.
For added challenge, include some event cards without dates and have students figure out where they belong based on context clues from other events.
Build-a-timeline project
Assign students or small groups to research specific time periods or events to add to a larger class timeline. This ongoing project can span several weeks or even a full semester.
Each group becomes the expert on their assigned period and teaches the rest of the class about their findings. Students develop research skills while contributing to a shared understanding of historical chronology.
You can create these timelines on classroom walls using paper and markers, or use digital tools that let multiple students contribute to the same online timeline.
Comparative timelines
Create side-by-side timelines showing what was happening in different places during the same time period. For example, compare technological developments with political changes during the Industrial Revolution, or show what was happening in different countries during World War II.

This Independence Day timeline demonstrates how comparative organization helps students understand complex historical periods. Notice how it separates military events from diplomatic events during the Revolutionary War period, created using Office Timeline's thematic templates. Students can easily see that while military battles were happening (like Lexington and Concord in 1775), political developments were occurring simultaneously (like the Townshend Acts in 1767). This dual-track approach helps students understand that history involves multiple types of events happening at the same time.
These parallel timelines help students understand that history doesn't happen in isolation. While Americans were fighting the Civil War, what was happening in Europe? How did events in one place influence what happened elsewhere?
Students start making connections between different types of historical events and see how various factors, economic, political, social, technological, all influence each other over time.
These activities transform timeline learning from a passive reading exercise into active exploration. Students remember chronology better when they've physically worked with it, discussed it with classmates, and discovered connections on their own.
Tips for timeline success in the classroom
You've decided to try timeline activities with your students. But like any teaching strategy, timelines work best when you know a few tricks to avoid common pitfalls.
Here are practical tips that will help your timeline lessons run smoothly and keep students engaged:
Keep it simple and clear
Don't try to cram too much information onto one timeline, especially with younger students. A timeline showing every single event from the Civil War will overwhelm students and defeat the purpose. Instead, focus on the most important events that help tell the story you want students to understand.
Make sure your timelines are easy to read. Use clear fonts, leave enough space between events, and choose colors that actually help organize information rather than just making things look busy.
Help students understand time scale
Many students struggle with understanding how much time actually passed between historical events. Help them grasp these concepts by comparing different time periods they can relate to.
Point out that a decade is about how long they've been in school, while a century is longer than their great-grandparents have been alive. When students understand these time scales, they can better appreciate how quickly or slowly historical changes happened.
Use visual cues to show time scale on your timelines. If the Civil War lasted four years but the period between the Civil War and World War I was fifty years, make sure your timeline shows that difference clearly.
Connect timelines to your learning goals
Don't use timeline activities just because they're fun, make sure they actually help students learn what you want them to learn. If your goal is helping students understand cause and effect, design timeline activities that highlight those connections.
Before creating any timeline activity, ask yourself: "What specific historical thinking skill am I trying to build?" Then design your timeline to target that skill directly.
Use visuals that actually help
Pictures and symbols can make timelines more engaging, but choose them carefully. Every visual element should help students understand or remember the historical content, not just decorate the timeline.
Use symbols consistently, if you use a sword symbol for battles, use it for all battles on your timeline. This helps students quickly identify different types of events and see patterns across time periods.
Photos from the actual historical period work better than clip art for helping students connect with the past. A real photograph of a Civil War battlefield means more than a cartoon drawing of soldiers.
Start small and build up
If you're new to using timelines, start with simple activities and add complexity as both you and your students get comfortable with the format. A basic wall timeline might work better than a complex digital project for your first attempt.
Pay attention to what works and what doesn't, then adjust your approach for next time. Timeline activities get easier and more effective as you gain experience with what engages your specific students.
Bringing historical order to your classroom
Using timelines in history teaching helps students understand when things happened, why the order matters, and how events connect to each other. These visual tools turn dates into stories that students can follow and remember. They can see how historical events flow together and make connections, understand context, and learn actively about the past.
Try these timeline ideas in your own classroom and see how they work with your students. Start simple with a basic wall timeline or human timeline activity, then build up to more complex projects as both you and your students get comfortable with chronological thinking.
By making timelines a regular part of your history instruction, you'll give students an organized way to understand the past while helping them develop skills they can use across all their learning. Watch as your students stop seeing history as random facts to memorize and start understanding it as connected stories that help explain our world today.
Frequently asked questions about teaching with timelines
Teachers often have questions about how to effectively use timelines in their history classrooms. Here are answers to the most common concerns about bringing chronological thinking into your lessons.
Timelines help students see the sequence of events clearly and understand how historical moments connect to each other. Instead of memorizing isolated dates, students start to see history as a flowing story where one event leads to another. This visual approach builds context and gets students actively engaged in learning rather than just passively reading about the past.
Begin with simple activities that don't require special technology. Create a wall timeline that grows throughout the year, or have students make personal "My Life" timelines to practice chronological thinking. These basic activities help students understand how timelines work before you move on to more complex historical content.
Human timelines get students moving around the classroom to arrange themselves in chronological order. Event card scrambles let students physically organize historical events while working together. Build-a-timeline projects give students ownership over researching and presenting specific time periods. These hands-on activities make history more memorable than traditional textbook reading.
Keep your timelines clear and focused, avoid cramming too much information onto one timeline. Connect every timeline activity to specific learning goals so students practice the historical thinking skills you want them to develop. Use visuals that actually help students understand content rather than just decorating your timelines.
Timelines transform abstract dates into concrete, understandable sequences that students can follow. They help students see cause and effect relationships between events and understand how different historical factors influenced each other. Most importantly, timelines turn passive learning into active exploration as students discover connections and patterns in historical events.