Looking for the best way to organize your academic schedule and keep track of important dates? Academic timeline tools can transform how you manage your studies by turning scattered deadlines and events into clear, visual schedules you can actually follow.
These tools help students create visual maps of their academic year, showing everything from assignment due dates and exam periods to project milestones and school breaks. Instead of struggling with multiple calendars and sticky notes, you get one clear overview of what's coming up and when. This visual approach makes it much easier to plan ahead, avoid last-minute stress, and stay on top of your academic responsibilities.
Whether you're managing a busy semester schedule, tracking a long-term research project, or planning your entire academic career, the right timeline tool can make the difference between feeling overwhelmed and feeling in control. In this guide, you'll discover the best academic and educational timelines available, learn what features to look for, and find out how to choose the one that fits your specific needs and study style.
What are academic timelines?
Academic timelines are visual schedules that map out important dates, deadlines, and events throughout your educational experience. Think of them as roadmaps for your academic year that help you see the big picture while keeping track of daily details.
Academic timelines can cover different time periods depending on how your school organizes the year. Some schools use semesters (usually fall and spring), while others work with trimesters or quarters. Most academic years start in late summer or early fall and wrap up the following spring or summer.
A good academic timeline includes exam periods, assignment due dates, project deadlines, registration dates, and school breaks. When you can see all these important dates laid out visually, it becomes much easier to plan your time and avoid conflicts.
Both students and teachers benefit from well-organized timelines. Students can plan their study schedules and balance multiple courses, while teachers can coordinate assignments and exams across different classes. The key is having the right tools to create these timelines easily and keep them updated throughout the year.
Academic timelines also need to account for the rhythm of school life, such as busy periods before exams, lighter loads during certain weeks, and breaks that give everyone time to recharge.

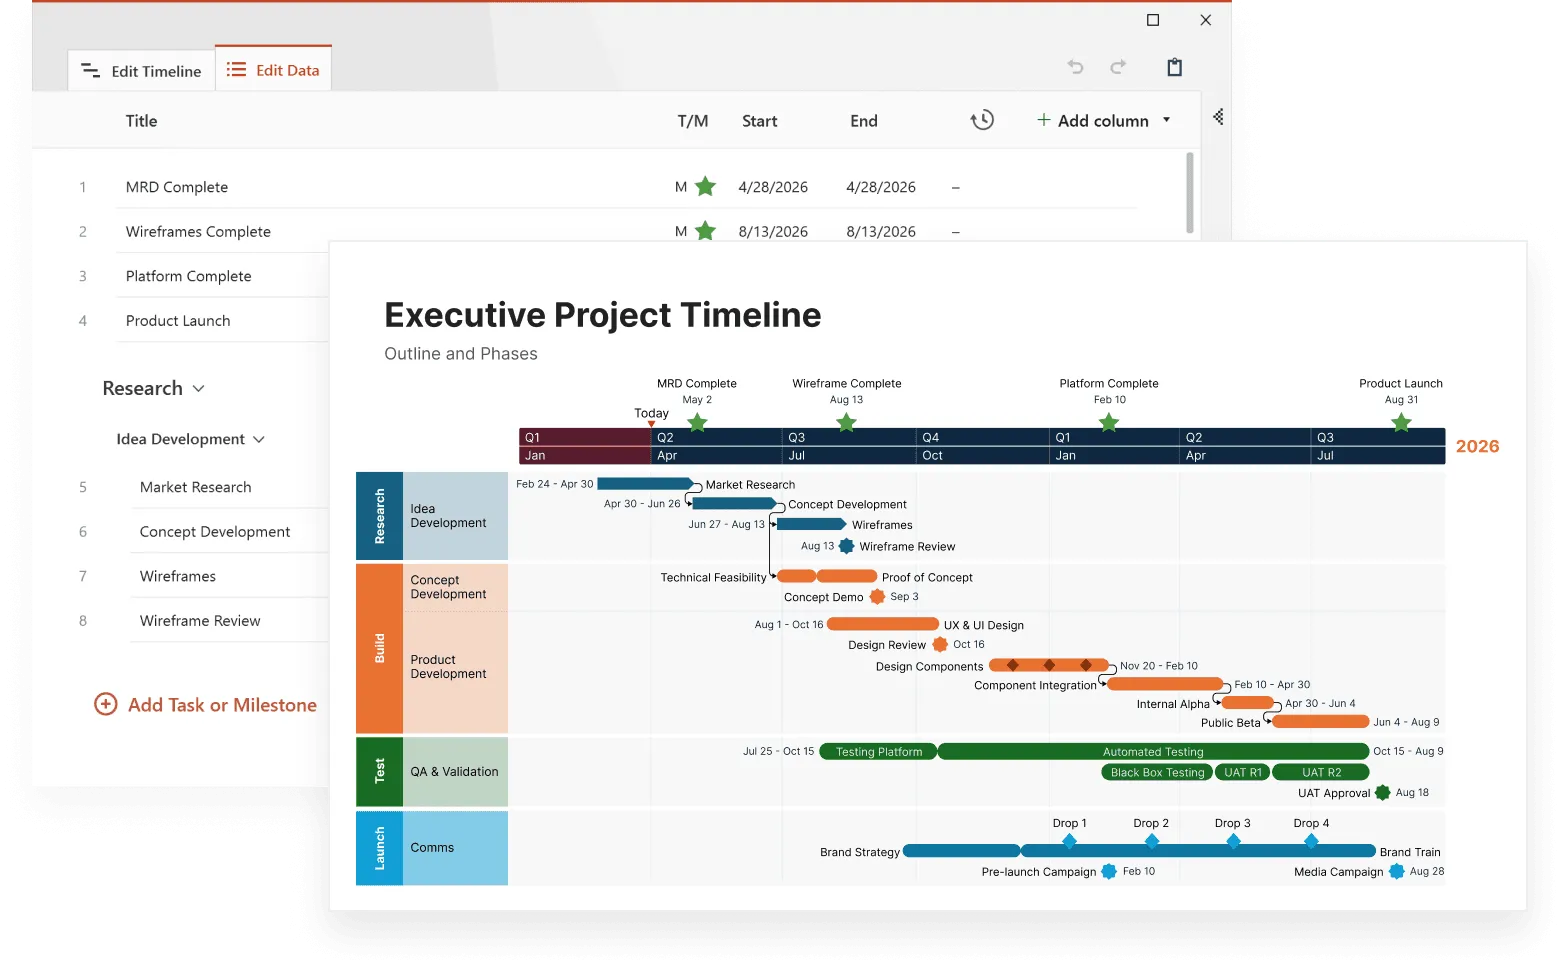
This event planning timeline is a good example of timeline that can be used for academic planning. It was created with Office Timeline and it shows how academic timelines work in practice, and how students can organize semester-long projects or academic events using clear stages, milestone markers, and activity tracking.
The timeline spans multiple months with specific deadlines and phases clearly marked. This is exactly how students can visualize their academic commitments throughout a term. The swimlane format helps separate different aspects of a project, making it easy to see what needs to happen when.
Why academic timeline tools work
Academic timeline tools are software programs that help students, teachers, and researchers create visual schedules and maps of events over time. Instead of dealing with confusing lists of dates and deadlines, these tools let you see everything laid out clearly on a timeline you can actually understand and use.
Making complex information simple
Ever stared at five different syllabi trying to figure out when everything is due? Academic timeline tools fix this problem by taking all that scattered information and organizing it visually. When you can see your semester timeline with assignment deadlines, exam dates, and project milestones all in one place, planning suddenly makes sense.
Students use these tools to track their academic progress, manage multiple course deadlines, and see how different assignments and exams fit together throughout the semester. Teachers find them helpful for planning curriculum, organizing lesson schedules, and keeping track of student progress across different classes.
Researchers benefit by mapping out their research timelines, tracking when they need to collect data, and organizing their findings in ways that work. Whether you're working on a short project or a multi-year study, being able to visualize your timeline helps keep everything moving forward.
Why students actually use these tools
When students can see important concepts and historical events arranged in chronological order, connections start making sense. Suddenly, the link between the Industrial Revolution and World War I becomes obvious, or they understand why their professor scheduled that research paper deadline when they did.
Timeline tools give students a complete picture of their academic journey. Students can track their progress across different stages, celebrate their successes, and spot areas where they need to improve. Whether you're working with dates from ancient civilizations or planning next semester's courses, good timeline tools handle any time period you throw at them.
Well-designed timelines highlight important deadlines and major milestones in ways that help students avoid the dreaded "wait, that's due tomorrow?" moment. This clear organization often leads to better grades because students can manage their time effectively and focus on what actually matters instead of whatever feels most urgent.
Having a visual framework helps students stay focused on long-term goals while making steady progress through their academic work. When you can see how different courses, projects, and deadlines connect to each other, you start making smarter decisions about how to spend your time and energy.
Popular academic timeline tools
The difference between academic success and constant stress often comes down to having the right organizational tools. While there are dozens of timeline and planning apps out there, only a few actually deliver on their promises to make student life easier. We've selected tools that students and teachers consistently recommend because they actually work instead of adding more complexity to your schedule.
MyStudyLife
MyStudyLife works like a digital planner designed specifically for students. You can input class schedules, assignment deadlines, and exam dates all in one place, then access everything from your phone or computer. The app sends alerts for upcoming deadlines and includes features like Pomodoro timers to help with study sessions.
What makes MyStudyLife useful is how it handles both academic and personal commitments in one organizer. You can set up recurring events for regular study sessions and customize the interface with different themes and colors. It's free to use and syncs across all your devices, so you always have your schedule with you.
Office Timeline
Office Timeline creates professional-looking timelines and charts directly inside Microsoft PowerPoint. The drag-and-drop interface makes it simple to add events and milestones, while customizable templates handle different types of academic projects.
Since most students already use PowerPoint for presentations, Office Timeline integrates seamlessly into existing workflows. You can create everything from historical timelines to research project schedules, then easily update them as things change. The tool handles complex projects with multiple deadlines well, making it valuable for both students and educators who need polished, presentation-ready timelines.
Create polished academic visuals
Try Office Timeline for free. Turn your academic tasks and milestones into clean, professional visuals your teachers will love.
Tiki-Toki
Tiki-Toki specializes in interactive timelines with engaging visual features. Its 3D view option creates visually striking timelines, while multimedia support lets you embed videos, images, and audio clips directly into your timeline.
The platform offers both free and paid accounts, with premium features starting at $9.50 per month. You can categorize events with color coding and share your timelines via URL or embed them on websites. This makes Tiki-Toki particularly good for educational projects that need dynamic, interactive content.
Microsoft SmartArt
For students who already use Microsoft Office, SmartArt provides built-in timeline templates with various visual styles. You can add text directly to the timeline or use the text pane for easier editing. The tool includes styling options like 3D effects and different line styles to enhance the visual appeal.
SmartArt works well for straightforward timeline needs without requiring additional software. Its Continuous Picture List layout lets you integrate images into timelines, making it useful for history projects and basic project management tasks. The familiarity of the Microsoft interface makes it an accessible choice for students already comfortable with Office applications.
What to look for in a timeline tool
Choosing the right timeline tool can make the difference between a frustrating experience and actually getting things done. Here's what to look for when picking a tool that will actually help with your academic work.
Essential timeline features
Start with the basics: good academic timeline tools let you create visual timelines, arrange events in chronological order, and add useful details like text descriptions and images. These core features help students build timelines that actually teach something while looking professional enough to share.
Customization options matter more than you might think. Being able to change colors, add background images, and adjust layouts makes your timeline more engaging and easier to follow. When students can make their timelines look the way they want, they're much more likely to keep using the tool and show their work to others.
Multimedia support can transform a basic timeline into something really compelling. Tools that handle videos from YouTube or Vimeo well give you ways to add context and depth to complex topics. This variety helps different types of learners connect with the material and keeps everyone more interested.
Collaboration and sharing capabilities
The best timeline tools make sharing your work simple and painless. Whether you need to email your timeline to a professor or post it online for group feedback, the process should be straightforward.
Collaborative editing features let classmates or team members work together on the same timeline, which makes group projects much smoother. Platforms like Tiki-Toki offer shared editing so multiple people can contribute without stepping on each other's work or losing important changes.
These collaboration features work well for both solo study sessions and group projects. The right tool adapts to how you prefer to learn and work, whether you're tackling assignments alone or coordinating with a team.
Interactive features that engage students
Interactive timeline tools turn passive reading into active exploration. Students can click through different time periods, zoom in on specific events, and discover connections they might miss in a textbook. This hands-on approach works especially well for history projects, tracking academic progress, or planning future courses.
These tools encourage students to dig deeper into topics that interest them. Instead of just reading about historical events or academic requirements, students can explore, compare, and make their own discoveries about how things connect.
Interactive features help students take charge of their own learning process. This active engagement helps information stick better and builds the kind of critical thinking skills that transfer to other courses and real-world situations.
How to create and customize your academic timeline
Building an effective timeline for your academic work doesn't have to be complicated. The key is starting with a clear plan and building your timeline step by step, focusing on what actually matters for your studies.
1. Getting started with your timeline
Creating your first academic timeline can feel overwhelming when you're staring at a blank screen. The good news? You don't have to figure everything out from scratch.
- Pick your starting point wisely. Most timeline tools offer templates that can save you hours of setup time. Academic templates already include common elements like semester markers, exam periods, and project phases. If you need something more specific, starting from scratch gives you complete control over every detail.
- Add your events systematically. Start with the biggest deadlines first, such as major exams, final projects, and paper due dates. Then fill in smaller assignments and milestones. Include clear descriptions for each event so you'll remember what's actually due when you look at your timeline weeks later.
- Make it visually work for you. Adjust colors, fonts, and layouts to create something you'll actually want to look at regularly. Different colors for different courses or types of assignments help you spot patterns and avoid conflicts at a glance.
- Bring it to life with multimedia. Adding images, videos, or audio clips can transform a basic timeline into something engaging. A photo from your field trip, a video explanation of a complex concept, or audio notes about project ideas make your timeline more useful and memorable.
- Set up sharing and collaboration. Whether you need to share with study group members or submit to professors, make sure you can export your timeline as an image or share it online easily. Real-time collaboration features help when working on group projects.
2. Keeping your timeline organized and useful
You've built your timeline, added all your deadlines, and now it looks like a rainbow exploded on your screen. Time to turn that colorful chaos into something actually helpful. The difference between a timeline that helps and one that clutters your life comes down to smart organization.
- Group related events intelligently. Go beyond listing everything chronologically; create categories that make sense for how you think about your work. You might group by course, by type of assignment, or by priority level. Related events should visually connect so you can see patterns and relationships.
- Write labels that actually help. "History paper due" tells you nothing useful three weeks from now. "Renaissance art analysis paper (5 pages, include 3 primary sources)" gives you actionable information. Your future self will thank you for the specifics.
- Highlight what matters most. Use different colors, sizes, or icons to make critical deadlines stand out from routine assignments. Your midterm exam should look more important than a weekly quiz on your timeline.
- Keep it current. A timeline that's weeks out of date becomes useless fast. Set a weekly reminder to update deadlines, add new assignments, and remove completed tasks. This habit keeps your timeline valuable throughout the semester.
3. Sharing your timeline
Here's where many students stumble: they create amazing timelines for themselves but struggle when they need to share them with others. Academic work rarely happens in isolation, so your timeline needs to work for collaboration too.
- Choose the right sharing method for your situation. Exporting as an image works well for including timelines in presentations or reports. Embedding on websites or blogs creates interactive experiences for ongoing projects. Direct sharing links work best for quick collaboration with classmates.
- Make collaboration smooth. Online collaboration tools let multiple people contribute to the same timeline without version conflicts. This works especially well for group projects where everyone needs to coordinate their individual deadlines with shared milestones.
- Consider your audience. A timeline shared with your study group might include personal study schedules and informal notes. A timeline for your professor should focus on major deliverables and project phases. Adjust the level of detail and formality based on who will see it.
The goal is creating something that actually supports your academic success rather than just looking impressive. Focus on functionality first, then make it visually appealing as time allows.
Quick tips for creating better timelines
Creating academic timelines that actually help with your studies goes beyond just putting dates in order. The best timelines combine smart organization with engaging content that makes information stick. Here are practical tips to make your timelines more useful and effective.
Organize your data smartly
Before you start building your timeline, spend time organizing your information properly. A messy data collection leads to a confusing timeline that defeats the whole purpose.
Google Sheets works great for gathering and organizing timeline data before you build the visual version. Tools like TimelineJS can pull information directly from spreadsheets, which makes creating and updating your timeline much easier. When your data is well-organized from the start, your timeline tells a clear story from beginning to end.
Structure your information logically: group related events together, use consistent date formats, and include all the details you'll need later. This upfront organization saves hours of confusion when you're actually building your timeline.
Add multimedia that enhances learning
Smart use of multimedia can transform a basic timeline into something genuinely engaging. Photos, videos, and interactive links help information stick better than text alone, especially for visual learners.
Choose multimedia elements carefully based on relevance and quality rather than just adding things because you can. A well-chosen photo or short video clip can provide context that would take paragraphs to explain in text. You can usually paste URLs or embed codes directly into most timeline tools.
The key is balance. Include enough multimedia to keep things interesting without overwhelming the core information. Each element should serve a purpose in helping you understand or remember the content better.
Keep it clear and simple
The most effective timelines focus on clarity over complexity. Use bullet points or short phrases instead of long paragraphs to present events and dates. This approach keeps important information visible and prevents your timeline from becoming cluttered.
Eliminate unnecessary details that don't contribute to your main learning goals. Focus on the essential elements and highlight the most important information so it stands out. Remember, you can always create more detailed notes separately if needed; your timeline should provide the clear overview.
Clean, uncluttered timelines are easier to review quickly and more likely to help during exam preparation or project planning.
Choose the right tool for your project
Start by honestly assessing what you actually need. Simple projects with basic requirements don't need complex, expensive tools. More involved collaborative projects might justify premium features.
Consider your technical comfort level when choosing tools. The fanciest timeline software won't help if you spend more time fighting with it than actually creating content. Look for tools that match your skill level and the time you have available.
Budget matters too. Many excellent timeline tools offer free versions that handle most student needs perfectly well. Evaluate features like collaboration capabilities and multimedia support based on your specific project requirements rather than trying to get every possible feature.
Making academic timelines work for you
Academic timeline tools can completely change how you handle your studies. Instead of struggling with scattered deadlines and feeling constantly behind, you get a clear visual system that actually keeps you organized and on track.
The best tools combine clean visuals with useful features like multimedia integration and team collaboration. Whether you choose MyStudyLife for daily planning, Office Timeline for professional presentations, or Tiki-Toki for interactive projects, each tool offers something different depending on your needs.
Creating timelines that actually help comes down to three things: organize your information before you start, add visuals that make sense, and keep everything simple enough to use regularly. Pick tools that match your technical skills and budget. Fancy features don't matter if you won't use them.
The payoff is worth the initial setup time. Students who use timeline tools consistently report less stress, better grades, and more control over their academic workload. Start with basic features, get comfortable with the process, then experiment with advanced options as your needs grow.
Your academic success depends on staying organized. Timeline tools give you a proven way to make that happen without adding complexity to your already busy life.
Frequently asked questions
Students and educators often have questions about how to effectively use timeline tools for academic success. Here are answers to the most common questions about choosing and using these organizational tools.
Academic timelines are visual schedules that map out important dates, deadlines, and events throughout your educational experience. They work like roadmaps for your academic year, helping you see the big picture while keeping track of daily details. Instead of juggling multiple syllabi and scattered notes, you get one clear overview of everything that's coming up.
Academic timelines boost student performance by turning chaotic schedules into organized, visual plans. When students can see their deadlines, exam dates, and project milestones laid out clearly, they make better decisions about how to spend their time. This leads to less last-minute cramming, fewer missed deadlines, and more consistent progress toward academic goals.
When choosing an academic timeline tool, focus on features that make planning simple and collaborative. Look for options that:
- offer visual timeline creation with customizable layouts, multimedia integration, and teamwork capabilities;
- include drag-and-drop interfaces for easy event organization;
- allow you to add images, videos, and links to make your timelines more engaging;
- provide sharing features for group projects or submissions to professors.
MyStudyLife stands out as an excellent free option for students. It handles class schedules, assignment deadlines, and exam dates all in one place, with mobile and web access so you can check your schedule anywhere.
For more advanced timeline creation, tools like Office Timeline offer powerful features with educational templates, while Tiki-Toki provides free accounts with basic interactive timeline capabilities.
This is how you can create better academic timelines:
- Start by organizing your information systematically before building your timeline.
- Use multimedia elements strategically to enhance understanding rather than just for decoration.
- Keep your design clean and simple, focusing on essential information and using clear labels that will make sense weeks later.
- Choose tools that match your technical skills and project requirements rather than trying to use every available feature.