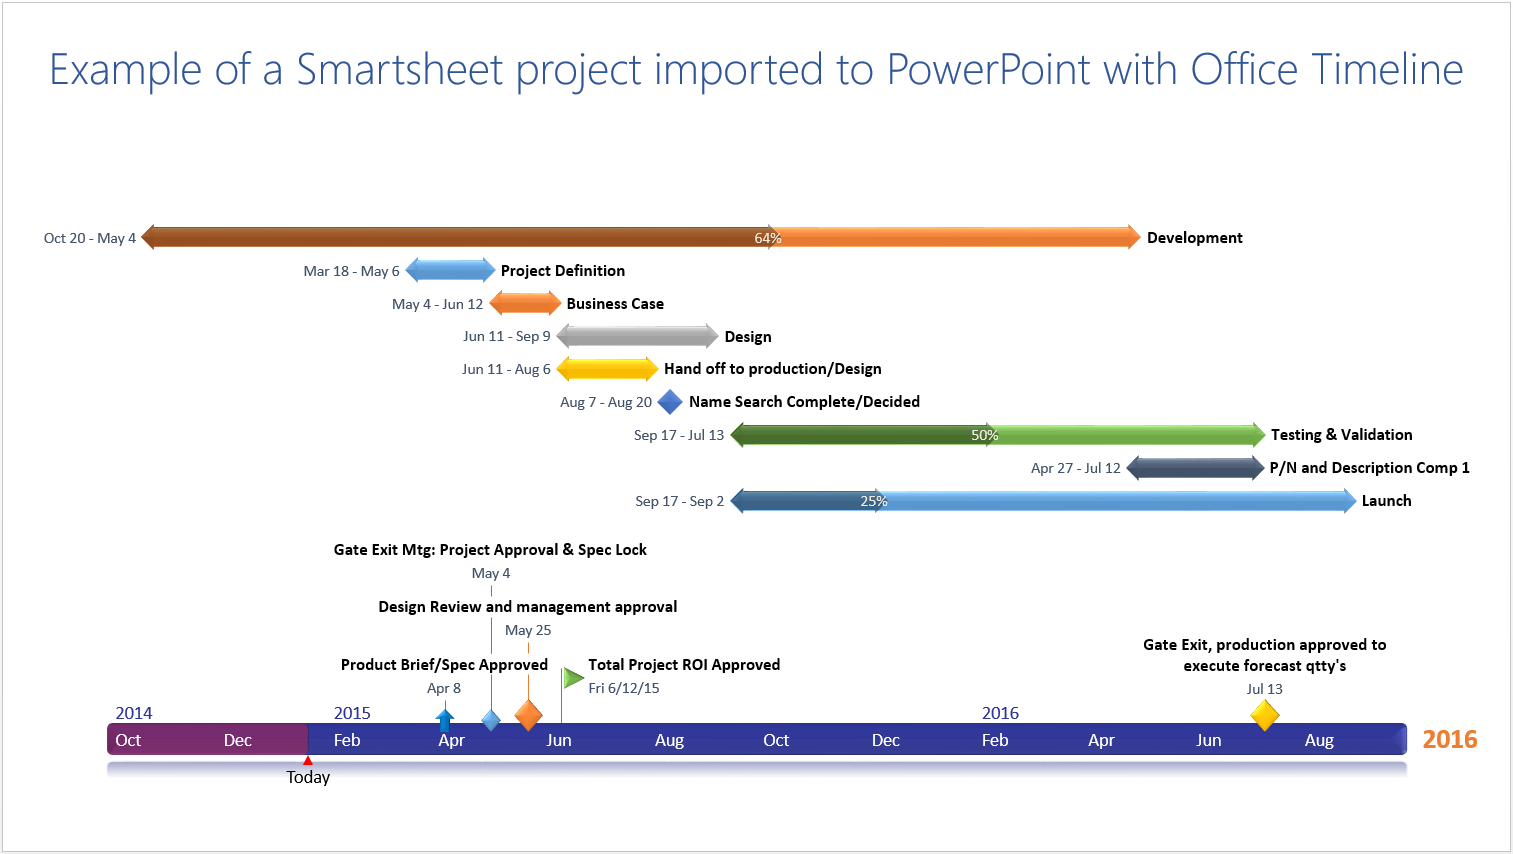
Office Timeline has integrated with Smartsheet. In this post below I will provide guidance on how to get started and a few best practices so you can quickly transform Smartsheet projects into professional looking PowerPoint timelines and Gantt charts.
This post will be divided into the following sections:
- Installing Office Timeline
- Logging into Smartsheet
- Importing data from Smartsheet
- Selecting what data to show
- Editing your data in Office Timeline
- Customizing your project chart from the Task Pane
- Saving Formats, Sharing and Collaboration
- Tips and Tricks
Installing Office Timeline
Office Timeline is a Gantt chart software application that plugs into Microsoft PowerPoint. It requires Microsoft Windows (Vista, Windows 7, Windows 8 or later) and Microsoft PowerPoint 2007 or later. To try Smartsheet integration you can download and install the free version of Office Timeline from the download site. Once installed you will see a new tab on the PowerPoint Ribbon.

Logging into Smartsheet
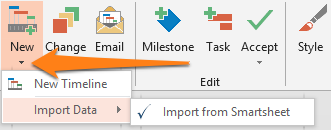
From the Office Timeline ribbon in PowerPoint, navigate to the New button and drop down in the menu to select Import from SmartSheet. Office Timeline will display a Smartsheet log-in window where you will enter your Smartsheet credentials (email and password) and allow access to import data.
Importing data from Smartsheet
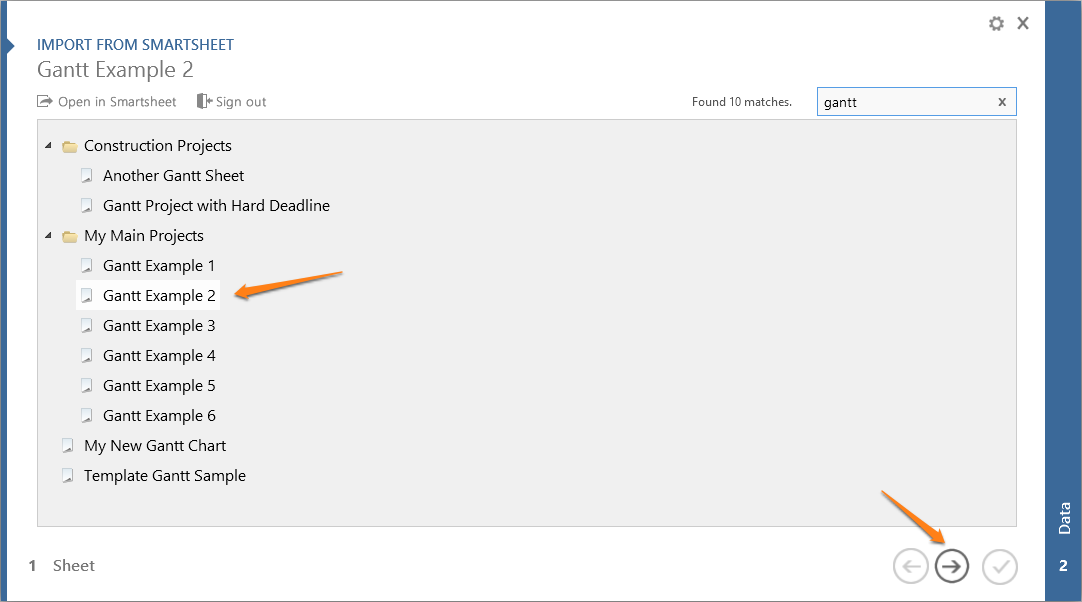
From within the Import from Smartsheet window browse to the sheet or report you would like to create a PowerPoint visual for, or you can use the search feature to find your sheet. Once your sheet has been selected click next arrow to import your data into a list view where you can select which items you want present on a Gantt chart or timeline.
Selecting what data to show
In list view you can pick which items you would like to present on your chart and how you would like them displayed.
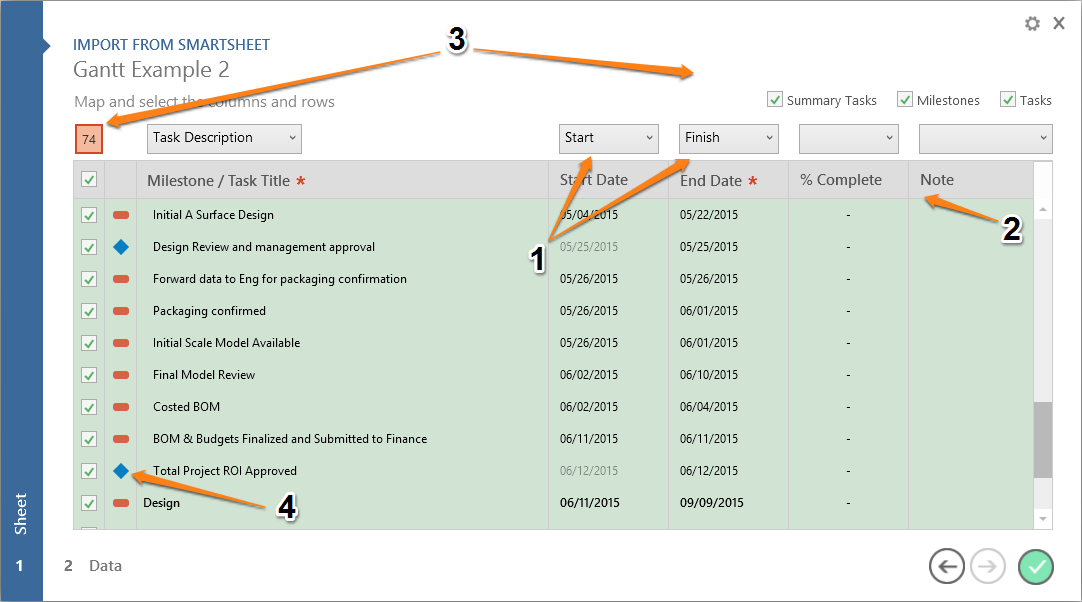
The four primary functions you should be aware of are:
1. Mapping columns
- Office Timeline will auto map the Task Description, Start and Finish columns but any of these selections can be manually mapped or re-mapped using the column drop downs as shown in the Import Wizard above.
2. Notes and % complete.
- You can import comments for each task or milestone and map them to an Office Timeline note field. Comments will not be displayed on the slide, but they are attached as notes. To view task or milestone notes click on the Task or Milestone button on the Office Timeline ribbon in PowerPoint and click on the notes icon. Adding Notes and Links Quick Tip.
- % complete. Office Timeline can also import % complete for tasks which will be displayed on the slide.

3. Selecting items for import
- In the list view, use the check boxes to select which task or milestone will be displayed on the slide. As shown in the image above a green check mark means your item will be selected and charted.
- Office Timeline monitors the space available on a PowerPoint slide, and warns you if you are selecting too many items. In the example above the Selected Item Count box shows 74 items queued-up for import. This is too many for a single slide and the count box changes from a white background to an orange background to warn that your spacing will be compromised if. Hovering your mouse over the warning to get recommendations for optimizing spacing.
- Import only Summary Tasks, Milestones or Tasks. For larger project you can select to import only Summary Tasks, Milestones or Tasks using the check boxes at the top right of the import page.
4. Switching between Tasks and Milestones
- In the list view you can convert a task to a milestone or milestones to tasks by clicking on the icon to the right of the check box. Milestones are displayed as a marker or flag on the time band, and attached to a single date. Office Timeline automatically converts any same day tasks in your data or any task that does not have a start date, to a milestone.
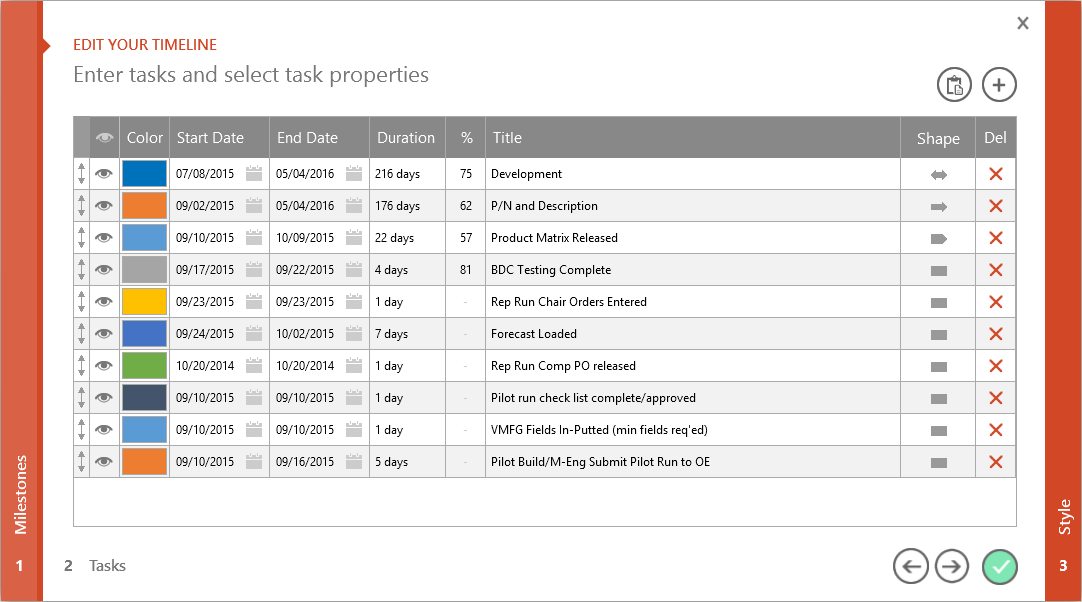
Editing Your Data in Office Timeline
Once imported, you can easily edit your data by clicking on the Milestone or Task button on the Office Timeline ribbon. From here you can change dates, colors and shapes of your milestone or task objects. Additionally you can add new milestones or tasks, change existing ones, add or edit your % complete, or remove any of these items. You can also re-arrange or sort the order of your tasks and hide non-critical milestones or tasks.
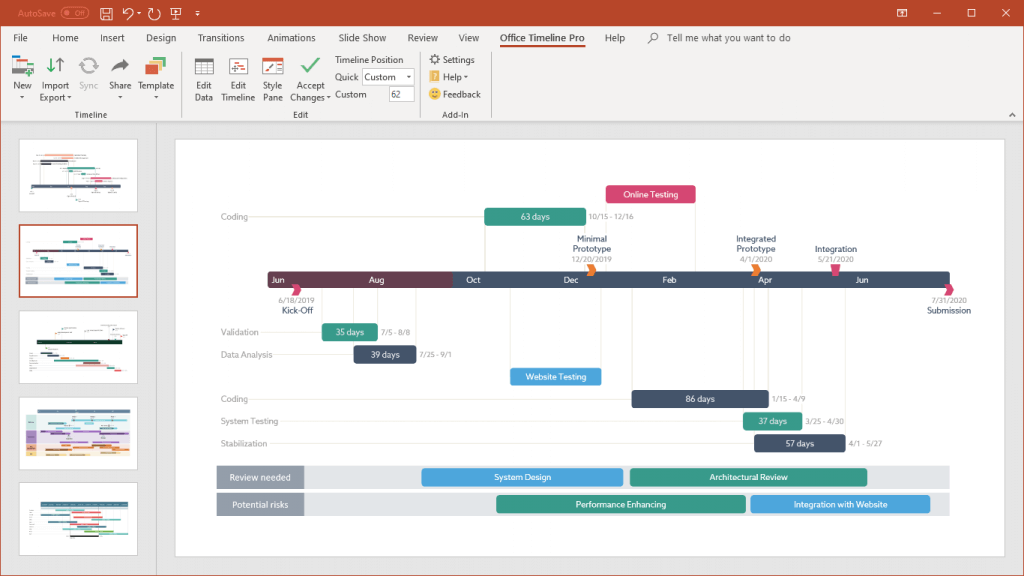
Customizing your project chart from the Task Pane
Office Timeline enables you to modify or style your Gantt chart in many different ways. For example each task description or date can be placed around its object in 5 different positions, or hidden completely. As shown in the image below this can be done by opening the Task Pane (click the Task Pane button on Office Timeline ribbon) and then select any item you want to customize, such as the timeline, a date, a milestone, a task or any text. In my example I have selected the date for the first task. From the Task Pane I can now customize that date’s format, or hide it, or change it’s color, font or size, or change where the date is positioned (left, split, right, center, above or below).
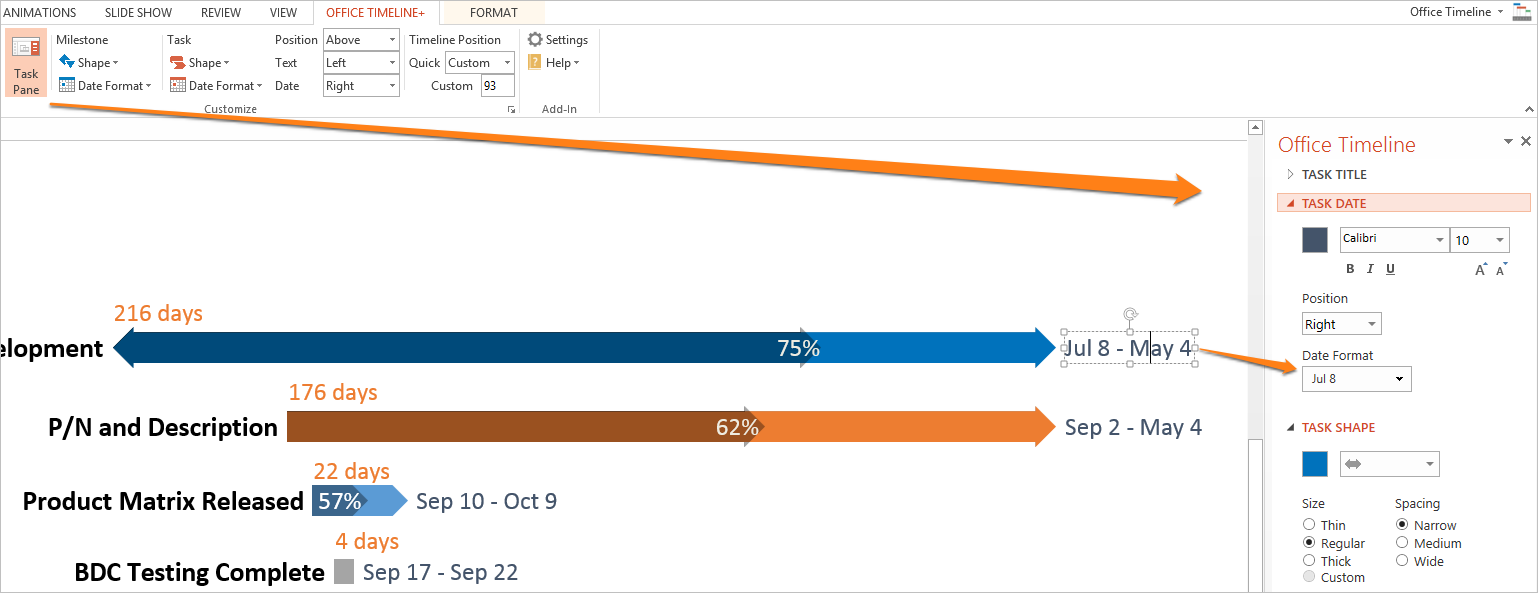
The Task Pane enables you to make similar customization for every each object on your slide. Simply open the Task Pane and then click on the object you want to customize. Beyond the ones I have mentioned you can also make changes to font, color, size, and where your text or dates are positioned and more:
- Scale. The scale of time band to days, weeks, weeks (ISO), quarters, months or years. You can add a Today Marker or show Elapsed Time.
- Task Text Positioning. From the Task Pane you can re-position any Task description by clicking on it and selecting to move it to the Far Left, Left, Center, Right, Above or Below its task band.
- Date formats. Dates can be changed from mm/dd/yyyy to any other format including international formats, or they can be hidden completely if you needed create a dateless timeline.
- Task duration. You can show the # of days or weeks for each task.
- Connectors. You can click on your milestone or task connectors and then change their color or size from the Task Pane. You can also use connectors to show sub-tasks by creating connectors only for import Tasks such as Phases, and not displaying connectors for the sub-tasks of each Phase. See example.
- Reset Changes. Any changes you make to an item from the Task Pane can be reset using the rest changes button in the Task Pane.
Saving formats, Sharing and Collaboration
Slides are automatically built natively in PowerPoint and saved as a native PowerPoint slide. When saving your slide you can use PowerPoint’s Save As functionality and to save your slide in a different format such as PDF, PNG, GIF or JPG. These images can be inserted into emails, newsletters, blogs or used as for executive scorecards.
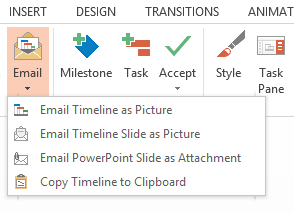
Use the Email button on the Office Timeline ribbon to quickly share your Gantt chart or copy an image to the clipboard. You can share your PowerPoint slide with any team member, customer or colleague who has PowerPoint installed on PC on a PC Mac. They do not need Office Timeline installed to open or even modify the slide. If they wanted to change the data or any settings that are unique to the Gantt chart, they would need to install Office Timeline in order to preserve those updates the next time the chart is being edited.
Tips and Tricks
Learn how to copy and paste from excel, re-position milestones, save manual changes, fit more tasks on your slide, convert your slide to a table or change its style, or localize the language or your timeline.
See how it works
Turn project data into professional timelines
Get the advanced features of Office Timeline free for 14 days.
Get free trial